Critical Hits: Learn to Play Stern's Dungeons & Dragons: The Tyrant's Eye
The Dungeons & Dragons tabletop RPG games have had a surprisingly long hiatus in between their two pinball adaptations. Bally released the first one in 1987, a table with killer music and a unique layout with two drop targets that helped “teleport” the ball from place to place, but the license wouldn’t be touched again until almost 40 years later as pinball evolved into a medium that could more willingly carry an immersive story.
Dungeons & Dragons: The Tyrant’s Eye is the first Stern release of 2025 and was primarily designed by the same team as their 2023 release, Venom. The playfield design was done by famed designer Brian Eddy, and the code was primarily done by veteran Dwight Sullivan with support from Elizabeth Gieske of Jaws fame. Like Venom, the game heavily follows a story and puts immersion at the forefront while still allowing new players to figure out the machine’s flow and rules. Both were also designed with Insider Connected in mind to allow for saved progress in between games, though Dungeons & Dragons: The Tyrant’s Eye takes it a step further by allowing the player to stay in a location they travel to across multiple games and carrying the level of all party members across games.
About Dungeons & Dragons: The Tyrant’s Eye
Guide four warriors on a quest through Faerun to put a stop to the war of dragons and defeat the monsters who lurk there, led by a five-headed dragon named Tiamat. Uses elements of the Forgotten Realms campaign setting from the D&D tabletop games.
- Manufacturer: Stern Pinball
- Release Year: 2025
- Design: Brian Eddy
- Code: Dwight Sullivan, Elizabeth Gieske, Corey Stup, David Sullivan
- Mechanics/Electronics: John Rotharmal, Thomas Malcolm, Cheryl Lininger, Jim Shird
- Art & Illustrations: Vince Proce
- Displays: Paul Chamnankit
- Music & Sound: Jerry Thompson, Cris Velasco
- Story: Dwight Sullivan, Zak Proce
- Voice Acting: Laura Bailey, Mica Burton, Anthony Carboni, Michael Dorn, Luke Gygax, Matthew Mercer, Chris Prynoski, Marisha Ray, Brendon Small, Kevin Smith, Gerard Way
D&D Playfield Overview
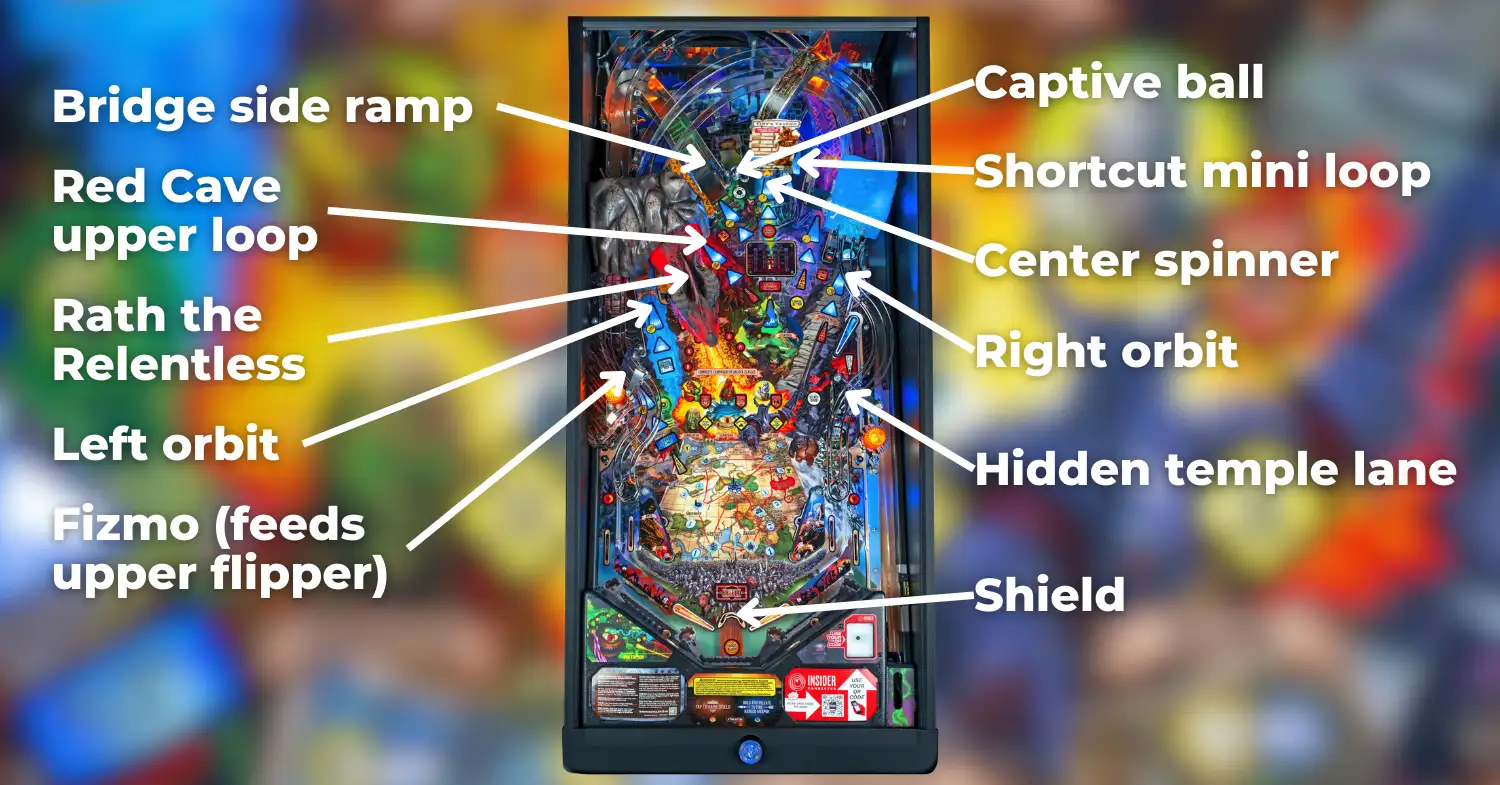
Brian Eddy continues his run at Stern of making layouts that are willing to be a little more experimental than his older ones; this one slightly resembles the layout of one of his earliest machines, Black Rose, with an upper flipper and a plethora of targets throughout the playfield.
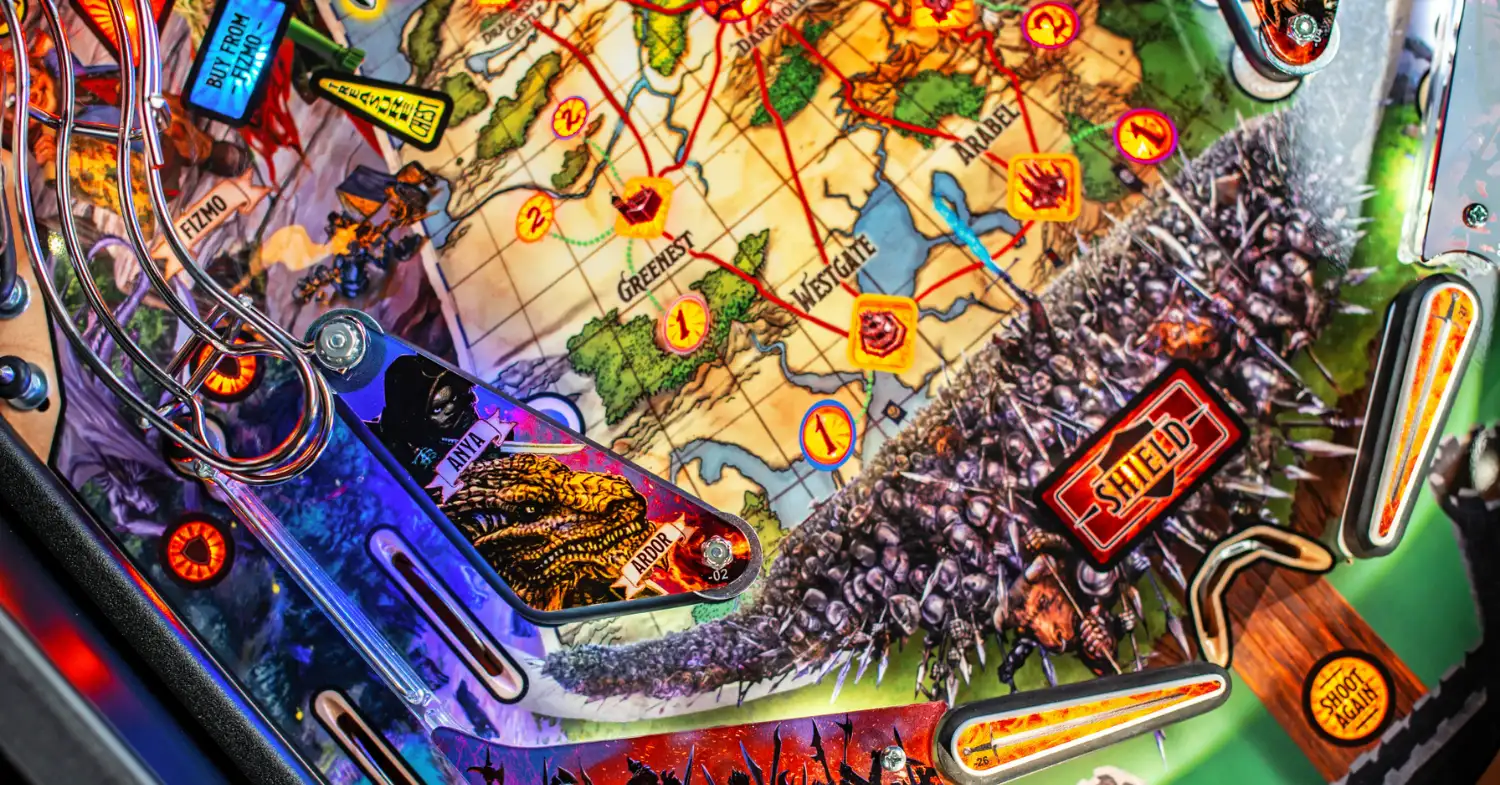
The left side of the playfield features two major shots, one of which seems unassuming but can help significantly with making some of the game’s tougher shots. This shot is the left kicker or the Fizmo shot and is in a similar position to the catapult on Medieval Madness but will send the ball to the upper flipper when hit. It is also used to access the shop when lit and opens treasure chests found in town dungeons. The left orbit that gates it is one of the toughest but most important shots in the game – it alternates between feeding the upper flipper, and sending the ball to the gelatinous cube where it might be locked for a lucrative multiball. The lowered left orbit can be hit from either lower flipper including the left flipper as a backhand, but the left ramp can only be hit from the right flipper.
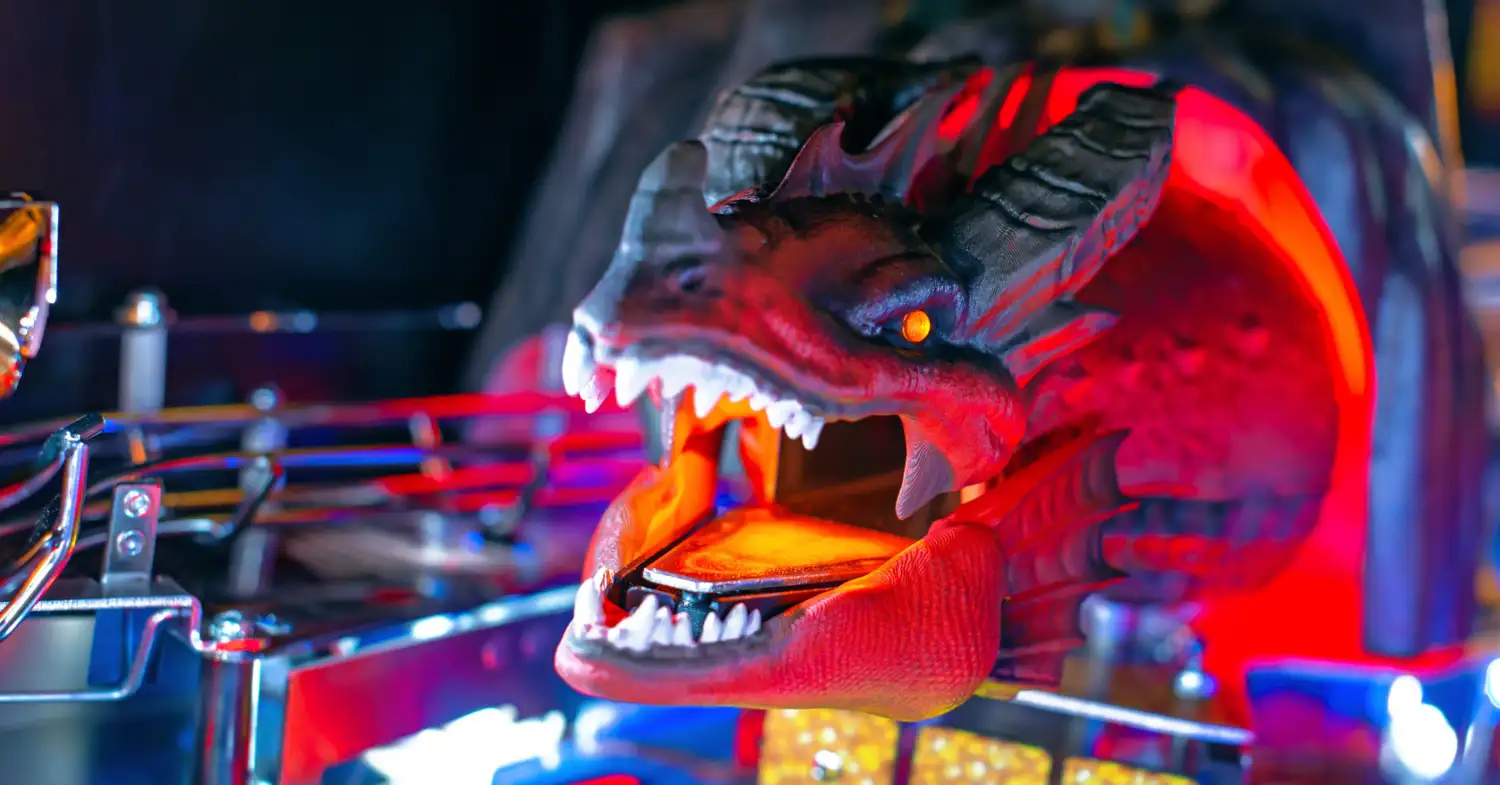
The game’s main gimmick is the sculpt of Rath the Relentless, a red dragon who resides above a 3-bank of standup targets. On the Pro this sculpt moves up and down to block the targets and can be hit directly, while on Premium / LE models the sculpt has movement in all directions and releases balls throughout Dragon Multiball using a staged ball capture. Behind Rath is the Red Cave upper loop shot which can be hit with late flips from the upper flipper, and above the loop is the bridge side ramp which is one of the shots that can choose the next action when available.
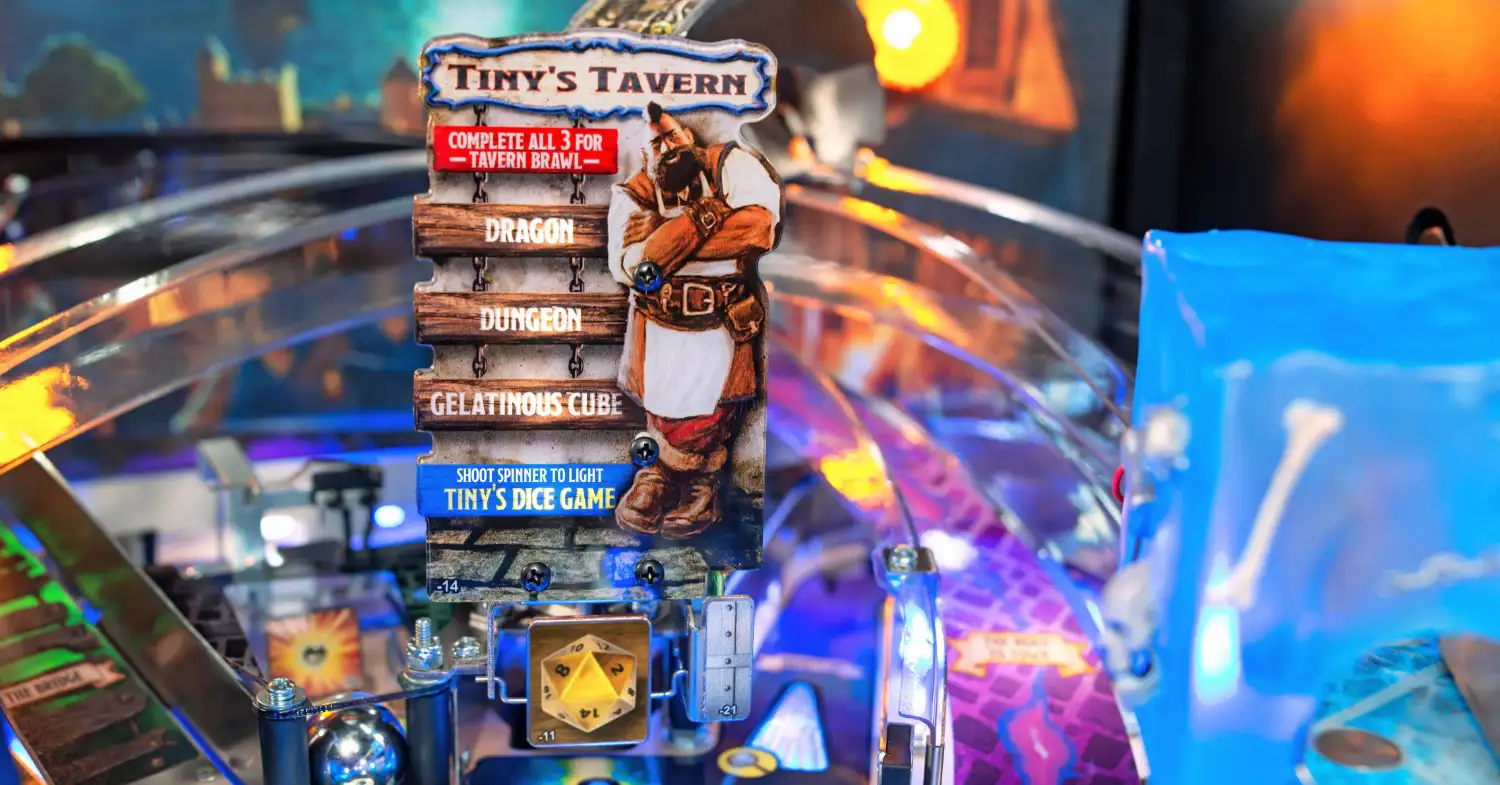
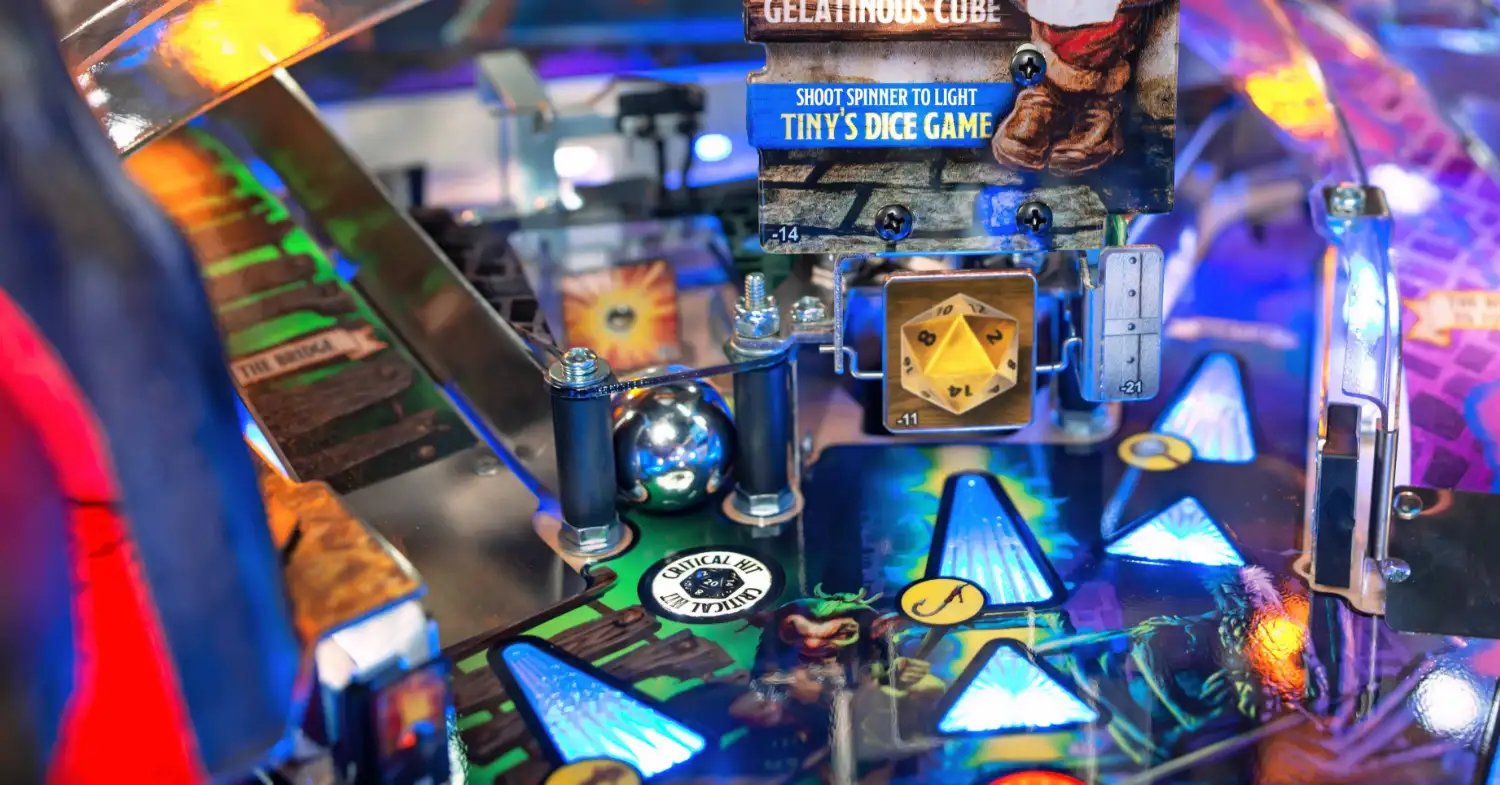
Directly above the bridge ramp is a captive ball that, if hit twice in succession, scores a natural 20 / critical hit and advances progression towards all game features, even spotting shots during battles if one is running. The center spinner shot, Tiny’s Tavern, is located near it, which qualifies dungeon crawl and sends balls back to the right flipper when hit; on the Premium / LE, there is a pop-up dungeon scoop that sends balls out its entrance and is in front of this spinner. The last center shot is the shortcut mini-loop, which can be hit from either lower flipper and sets the ball up for a controlled upper flipper shot.
The right side of the playfield is occupied by the road to town right ramp, a tough ramp shot that collects extra balls and can help with choosing the next action when available, and the right orbit, which starts dragon multiball when lit and sends the ball around the back of the game to the left flipper. Directly at the entrance to the right orbit, roughly below the gelatinous cube sculpt, is a magnet that holds any ball that enters the Fizmo shot or shortcut mini-loop for a controlled upper flipper shot. The upper flipper also hides a “hidden temple” lane that starts double-scoring once the secret door target in front of it has been hit as well.
Between the flippers is a metal bar called the shield. By pressing the action button when flashing orange, this shield will raise and prevent SDTMs while also allowing for “shield staging” the left orbit and right ramp shots on some copies. The action button has a short delay between being pressed and the shield raising and is relit by completing the return lanes an increasing number of times.
Scoring on Dungeons & Dragons: The Tyrant’s Eye is average for its era, with “good” scores (including at least one Dragon Multiball and a mode) tending to surpass 200M, though there are many ways to break this barrier.
Abridged Dungeons & Dragons Tutorial
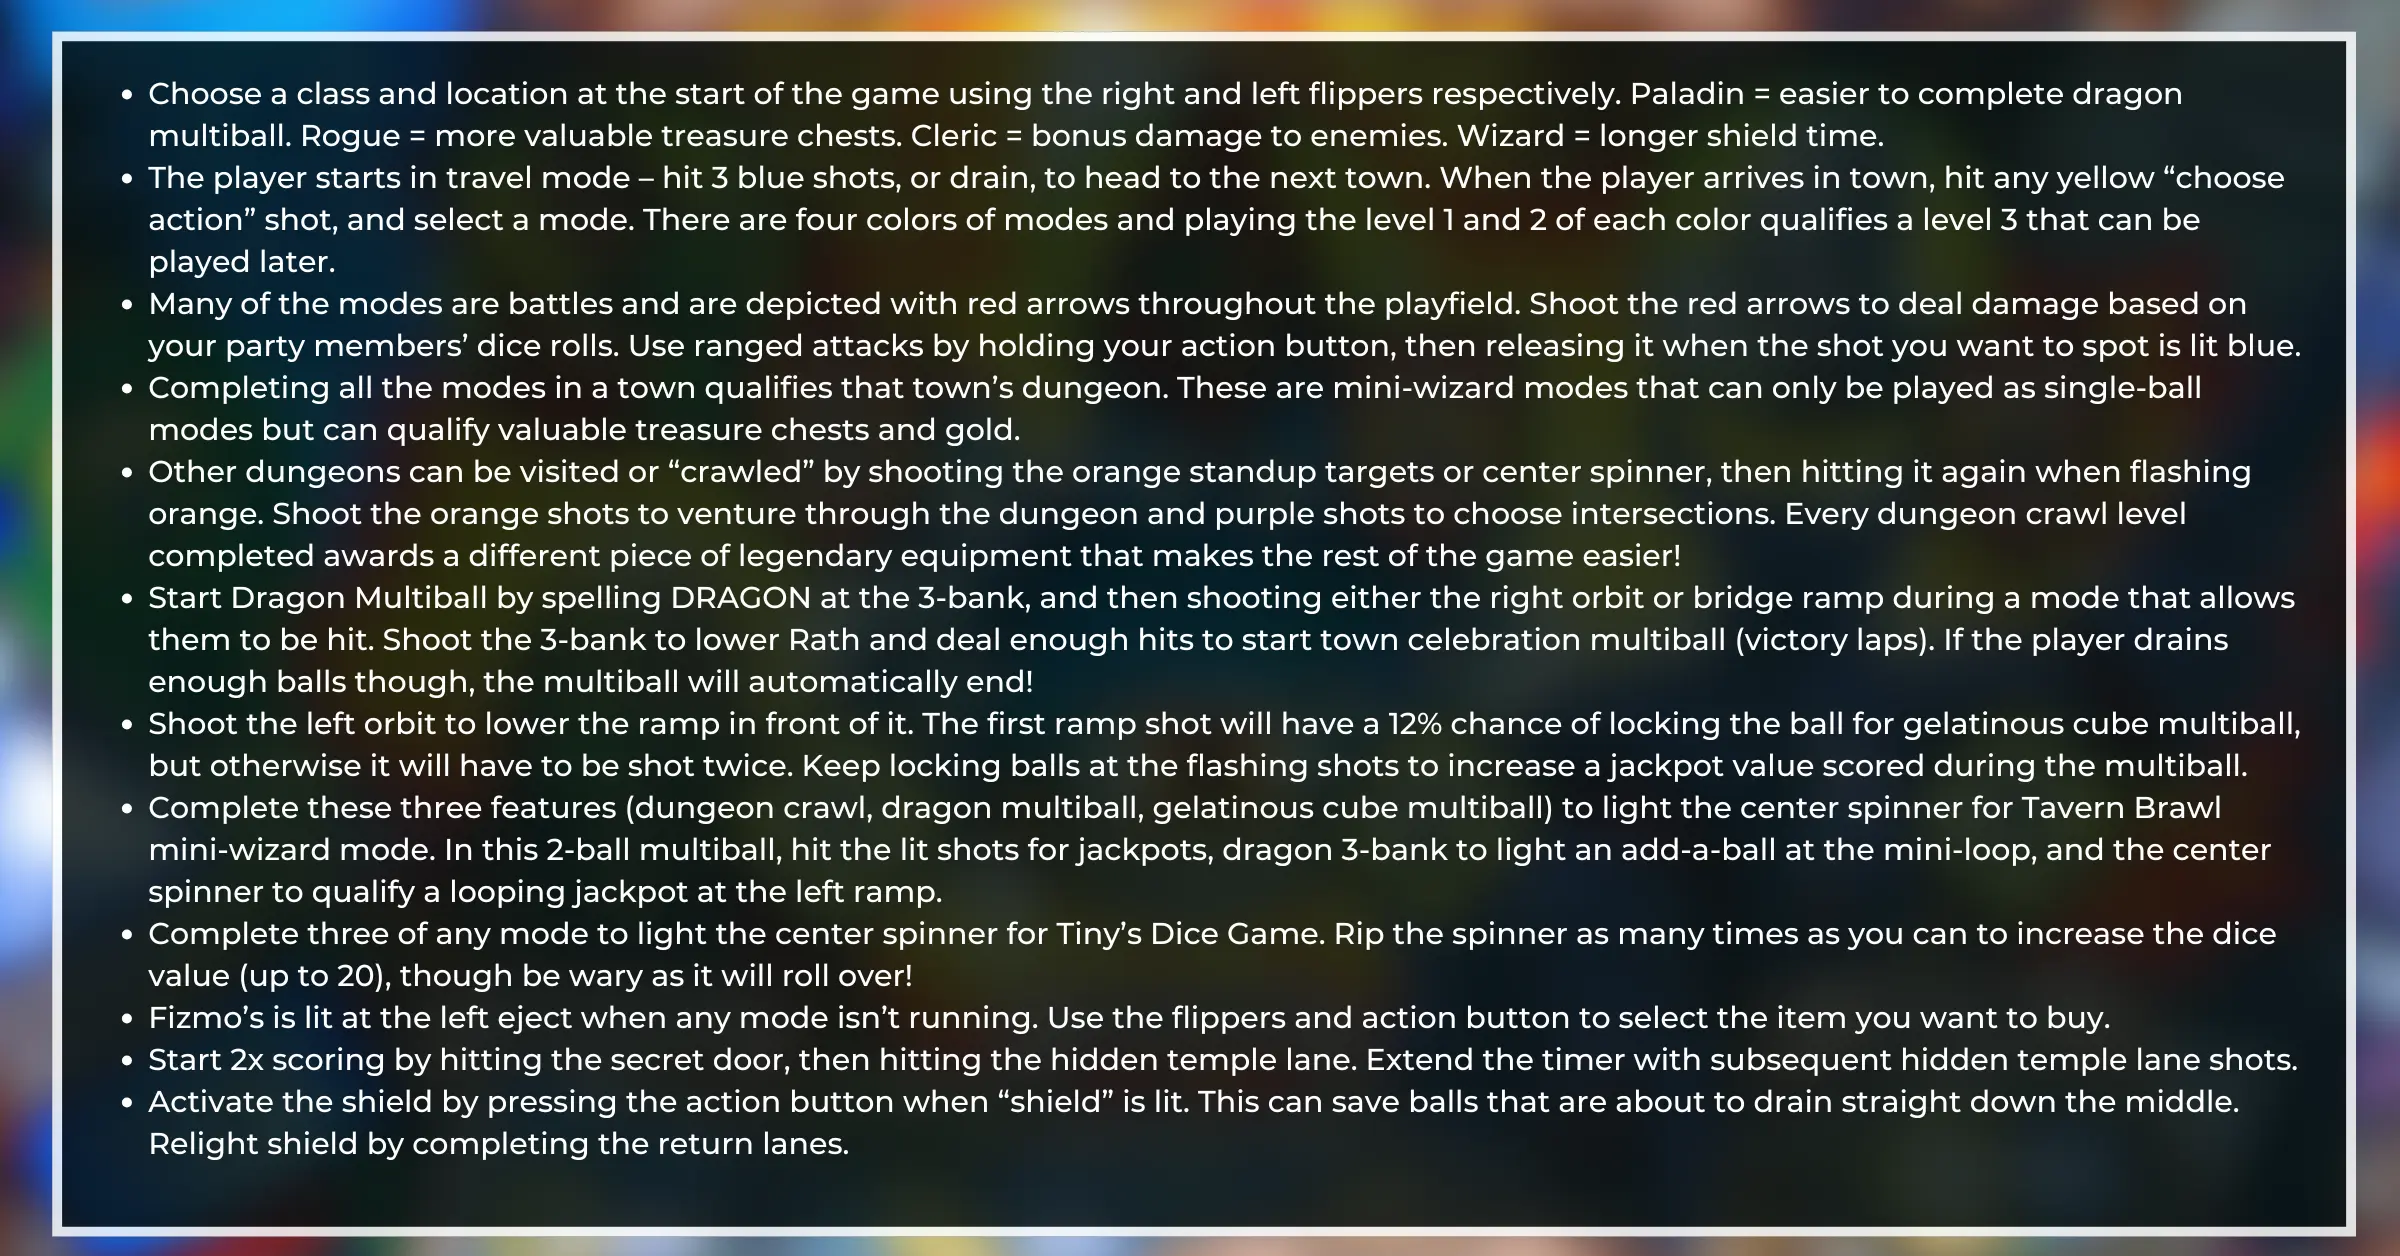
- Choose a class and location at the start of the game using the right and left flippers respectively. Paladin = easier to complete dragon multiball. Rogue = more valuable treasure chests. Cleric = bonus damage to enemies. Wizard = longer shield time.
- The player starts in travel mode – hit 3 blue shots, or drain, to head to the next town. When the player arrives in town, hit any yellow “choose action” shot, and select a mode. There are four colors of modes and playing the level 1 and 2 of each color qualifies a level 3 that can be played later.
- Many of the modes are battles and are depicted with red arrows throughout the playfield. Shoot the red arrows to deal damage based on your party members’ dice rolls. Use ranged attacks by holding your action button, then releasing it when the shot you want to spot is lit blue.
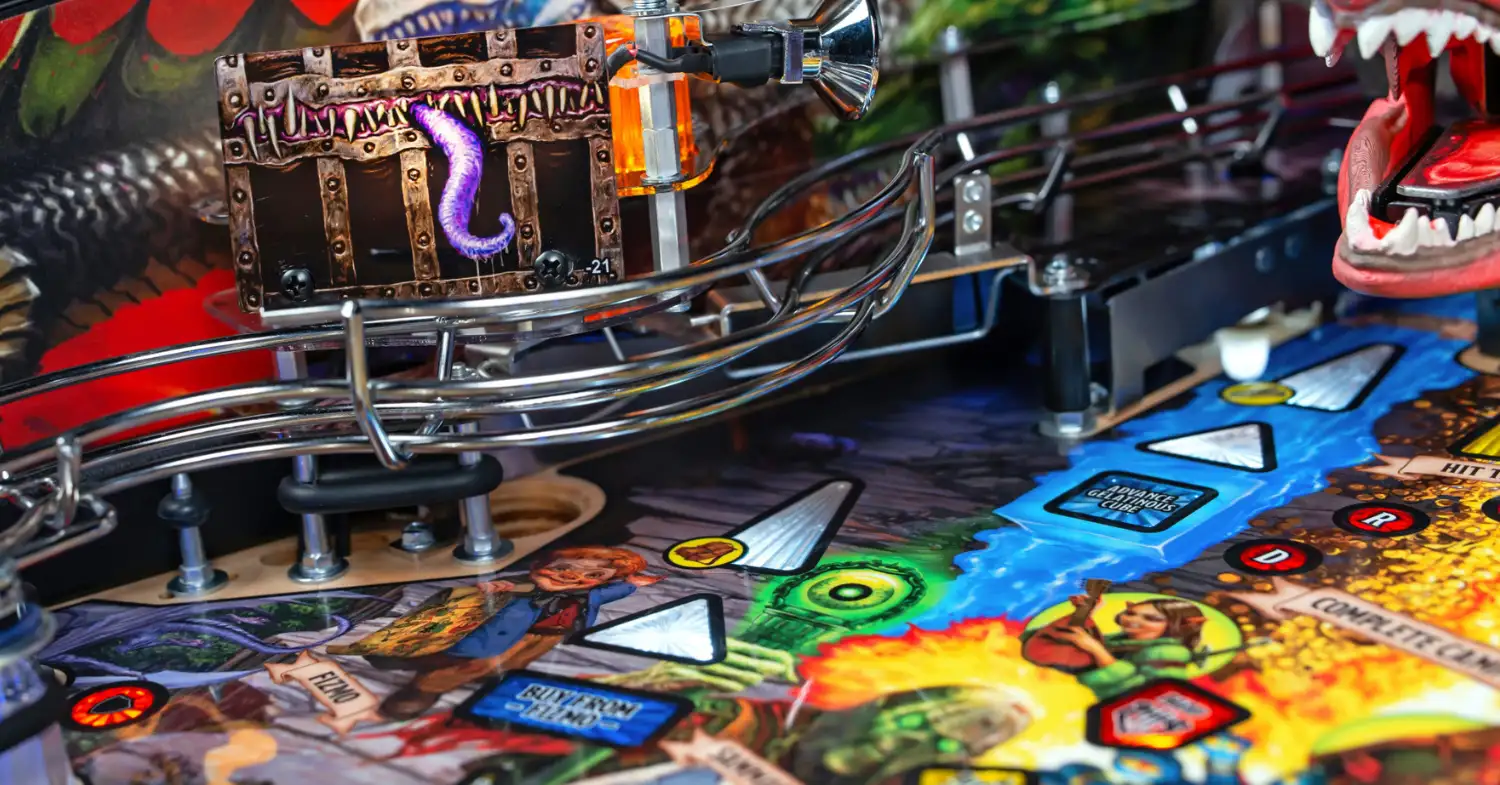
- Completing all the modes in a town qualifies that town’s dungeon. These are mini-wizard modes that can only be played as single-ball modes but can qualify valuable treasure chests and gold.
- Start dungeon crawl by shooting the orange standup targets or center spinner, then hitting it again when flashing orange. Shoot the orange shots to venture through the dungeon and purple shots to choose intersections. Big scores can be obtained if players have enough stamina, and players can also find legendary equipment in treasure rooms during dungeon crawls so long as they aren't kicked out via a trap.
- Start Dragon Multiball by spelling DRAGON at the 3-bank, and then shooting either the right orbit or bridge ramp during a mode that allows them to be hit. Shoot the 3-bank to lower Rath and deal enough hits to start town celebration multiball (victory laps). If the player drains enough balls though, the multiball will automatically end!
- Shoot the left orbit to lower the ramp in front of it. Any of the first four ramp shots could lock the ball for gelatinous cube multiball, but on competition install it will have to be shot twice. Keep locking balls at the flashing shots to increase a jackpot value scored during the multiball. Only one gelatinous cube multiball per game.
- Complete these three features (dungeon crawl, dragon multiball, gelatinous cube multiball) to light the center spinner for Tavern Brawl mini-wizard mode. In this 2-ball multiball, hit the lit shots for jackpots, dragon 3-bank to light an add-a-ball at the mini-loop, and the center spinner to qualify a looping jackpot at the left ramp.
- Complete three of any mode to light the center spinner for Tiny’s Dice Game. Rip the spinner and shoot the dungeon as many times as you can to increase the dice value (up to 20) while hitting lit shots to extend the timer.
- Fizmo’s is lit at the left eject when any mode isn’t running. Use the flippers and action button to select the item you want to buy. Play a mode or change towns to relight Fizmo's.
- Start 2x scoring by hitting the secret door, then hitting the hidden temple lane. Extend the timer with subsequent hidden temple lane shots.
- Activate the shield by pressing the action button when “shield” is lit. This can save balls that are about to drain straight down the middle. Relight shield by completing the return lanes.
Class Selection
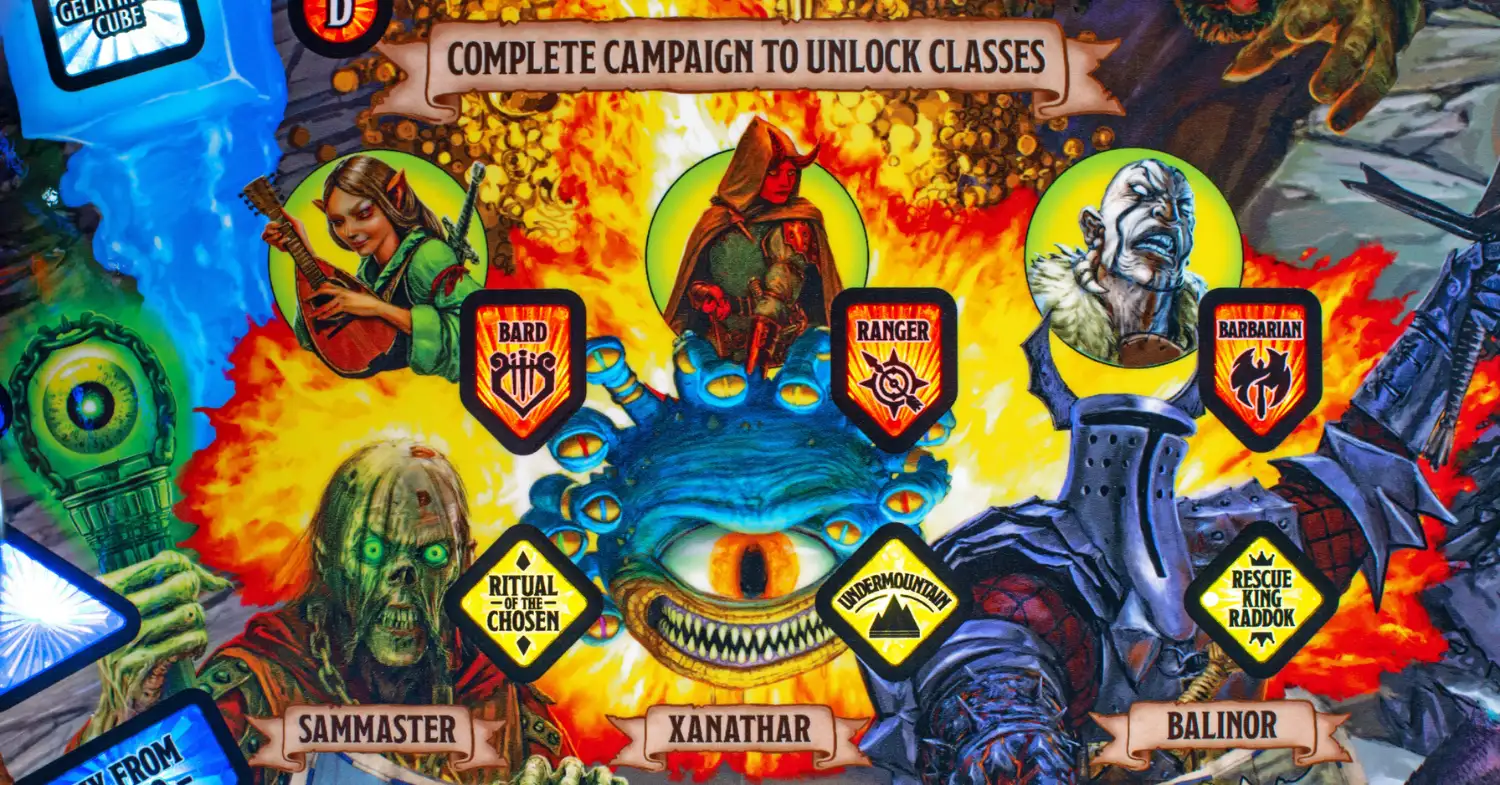
At the start of the game, the player chooses two items: a character/class using the right flipper, and a location using the left flipper. There are four different characters by default with three additional ones that can be unlocked by completing full campaigns. Each character has a unique perk, but also slightly different stats that contribute to the difficulty of battles and ease of buying items from Fizmo’s.
The four default characters are:
- Paladin (Ardor): Makes it easier to complete dragon multiball, requiring fewer shots to Rath to start town celebration. Ideal for new players.
- Rogue (Anya): Increases the likelihood of earning rarer items or mimic hurry-ups from treasure.
- Cleric (Frey Curlyfoot): Increased damage to undead enemies, allowing many battles to be won with fewer shots.
- Wizard (Helenir Weavheart): The shield stays raised for a longer time when the action button is pressed than with other characters.
Battle Overview
There are three distinct modes of play in Dungeons & Dragons: The Tyrant’s Eye – travel mode, location modes, and town dungeons – all of which can involve battles.
During battles, every red shot rolls the die of each party member to determine the amount of damage dealt to the enemy. Your party loses health over time but this can be restored by using healing potions at the green shots when available. Ranged weapons can be used by holding the action button and then releasing it when the blue light is on the shot you want – enable further ranged weapon uses by hitting any shot.
The captive ball can also spot shots during battles if it is hit twice in quick succession – don’t sleep on it.
Travel Mode, Location Modes & Town Dungeons

The player starts each game in travel mode as their party travels to the next city. While traveling, the player might encounter random enemies. After three blue shots, or draining the ball, the player will arrive in town and they can hit any yellow “choose action” shot to decide their next move. They can either travel to a different city or start any level 1 or 2 modes available in that city – once both modes of the same color are completed, a level 3 mode can be started in a city further up the map.
During location modes, complete the required tasks and then shoot any cyan shot to finish the mode for a completion bonus.
There are eight “standard” location modes seen in tournament play (ie. without Insider Connected enabled), but there are two cities that house two modes of their own and require modes of other levels to be completed first. From left to right, the modes are as follows:
- Greenest:
- (White 1) Attack / Remove the Dwarves – Battle against either dwarves or Yuan-Ti. The white shots either collect ore or rescue dwarves depending on which mode was selected.
- (Orange 2) Attack / Defend the Caravan – Battle against either Yuan-Ti or Kobolds. The orange shots will collect ore.
- (Blue 2) Abandoned Farm – Shoot blue arrows to explore the farm. After hitting four shots the player will encounter two waves of Nothics that must be defeated to complete the mode.
- Westgate:
- (Blue 1) Zombie Sailors – Battle against two waves of zombies.
- Arabel:
- (Purple 1) Retrieve a Potion for Nighdaar – Collect 3 hurry-up shots in the following order: center spinner, left ramp, side ramp. If the player is missing shots more will light to make the mode easier.
- Kobold:
- (Orange 1) Rescue Missing Miners – Battle with a single Bulette. Either defeat the Bulette directly or rescue four Kobolds at the orange shots to light the final shot.
- (White 2) Break into the Kobold Vault – Make five white shots or hit anything for 30 seconds to start a battle with a Spectator. Defeat it to light the final shot.
- (Purple 2) Spy on Puck – Stealth mission, the slingshots alert Kobold guards to your presence and will start a battle if enough are hit. Hit 10 purple shots to complete with combo shots advancing 2x progress.
- Darkhold:
- Bonus Round: Complete any town dungeon to light this mode that cannot be accessed at the start of a game. Battle against an unlimited number of goblins with ball save enabled for the entire fight until all party members are defeated. Playing this mode well can result in scores of 100M+ with minimal risk due to the ball save.
The town dungeons for each city are available after completing all the other modes in that city and serve as mini-wizard modes. These are all multi-phase modes that block out starting any other modes, including multiballs, while they are running; requiring serious effort from the player to complete. From left to right, the dungeons are:
- Greenest: Undead Cult of the Dragon. Two battles with cultists sandwiched by a phase where you must search the dungeon by shooting the 3-bank to light yellow shots.
- Westgate: Trouble on the Dock. Battle with Yuan-Ti on the docks, then shoot the center spinner to enter the galleon. Finish the battle by shooting the yellow shots while avoiding the Yuan-Ti malison.
- Arabel: The Crypt Beneath the Temple of Tymora. Battle with a horde of rats, then shoot the red shots to defeat the ooze and eventually rescue Diego Stormbeard on a hurry-up timer.
- Kobold: Mystery at the Bottom of the Mine. Hit 4 shots under stealth, then defeat a Xorn, then defeat an obelisk that spawns gargoyles and must be damaged by collecting switch hits that light the center spinner.
A difficult battle with the Lich awaits players who complete every mode at Dragonspear Castle, and a marathon battle against Balinor's forces awaits players who complete every mode at Gauntlgrym.
Dungeon Crawls
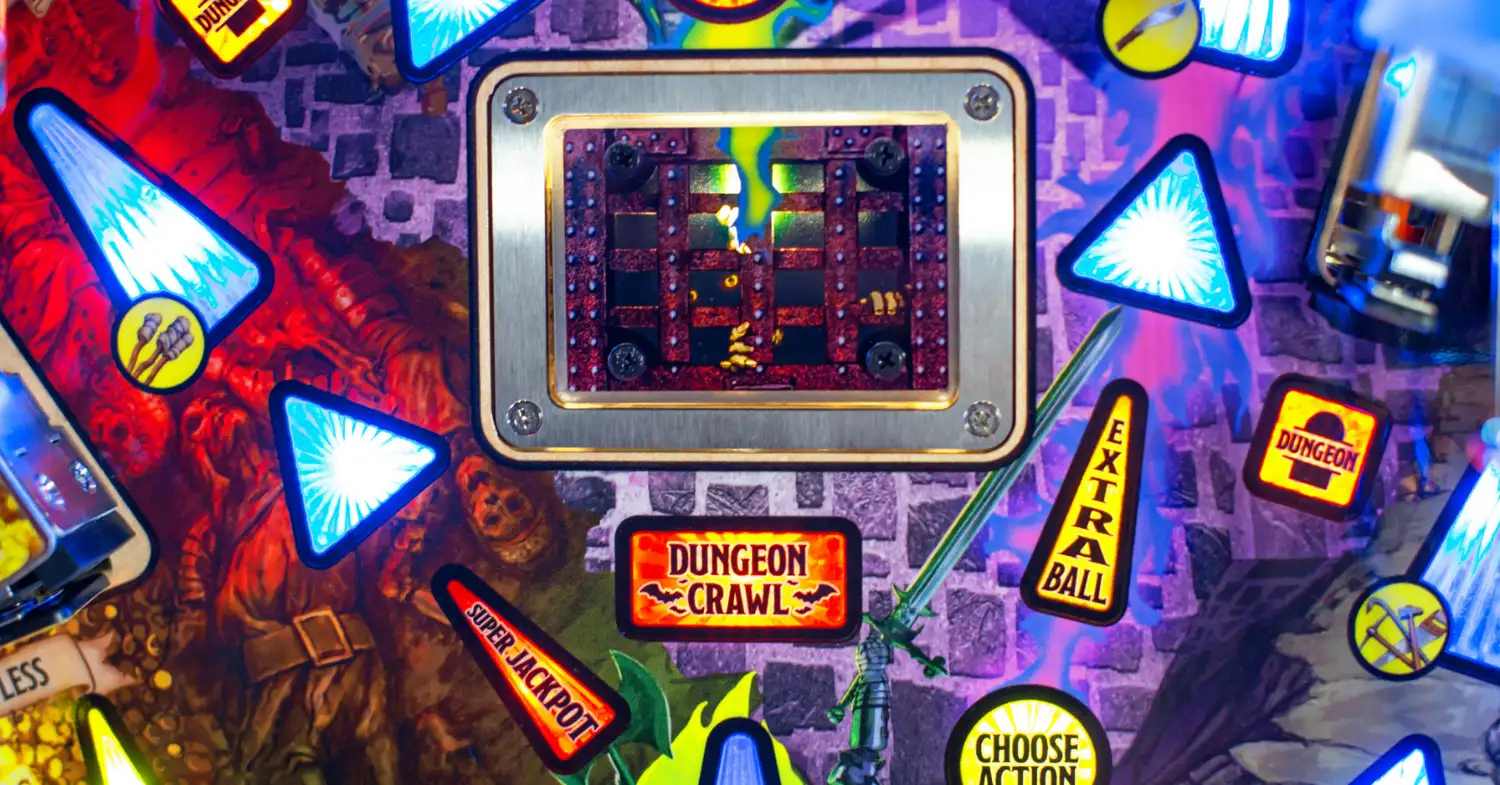
If the player is not currently in a location mode (ie. they are in travel mode or in a town), they can travel through other dungeons by completing the orange dungeon targets or shooting the center spinner to spot them. When available, the center spinner will start flashing orange (or on the Premium / LE, the pop-up scoop will raise).
20 seconds of ball save are given at the start of each level. Shoot the orange shots to travel through it, and purple shots to select the next path using either flipper button or the action button. The player can come across battles, traps that end their run, stairs to the next dungeon crawl level (up to level 5), or even legendary artifacts on levels 2 through 5. Every battle found during a dungeon crawl scores 5M+, and every battle won scores 10M+ and lights the left eject for treasure chest.
The dungeon maps for each level reset every Sunday and remain consistent across all players.
Dragon Multiball
Shoot the 3-bank targets to spell DRAGON and light this multiball at the right orbit or side ramp (the latter only if a mode isn’t running). The multiball becomes tougher to start every time it is completed – at level 3 you’ll need to complete DRAGON in one ball without draining! Players using Insider Connected will be able to save their dragon multiball level across games, until the campaign is completed.
This is a frenzied 6-ball multiball that will constantly send balls to the plunger until either the player has defeated Rath or drained the number of balls seen on the display. Shoot the 3-bank to spell DRAGON, lower Rath and allow the player to shoot his head to deal damage. All the while, jackpots are lit at the major shots going from 1x to 3x, with a super jackpot available at the upper loop after scoring a jackpot at each shot. The first battle requires 9 hits to the dragon on 14 drains to win, and these numbers increase every time the multiball is won successfully.
Once Rath has been defeated, the ball save will start to expire and town celebration multiball will start. All shots are lit for victory laps with a super jackpot available at the upper loop lit for scoring them all; their value is based on the number of jackpots the player scored during dragon multiball, and the number of balls that drained while trying to defeat Rath. Once the player exits out of the multiball, the next item they purchase at Fizmo’s will be 50% off.
Gelatinous Cube Multiball
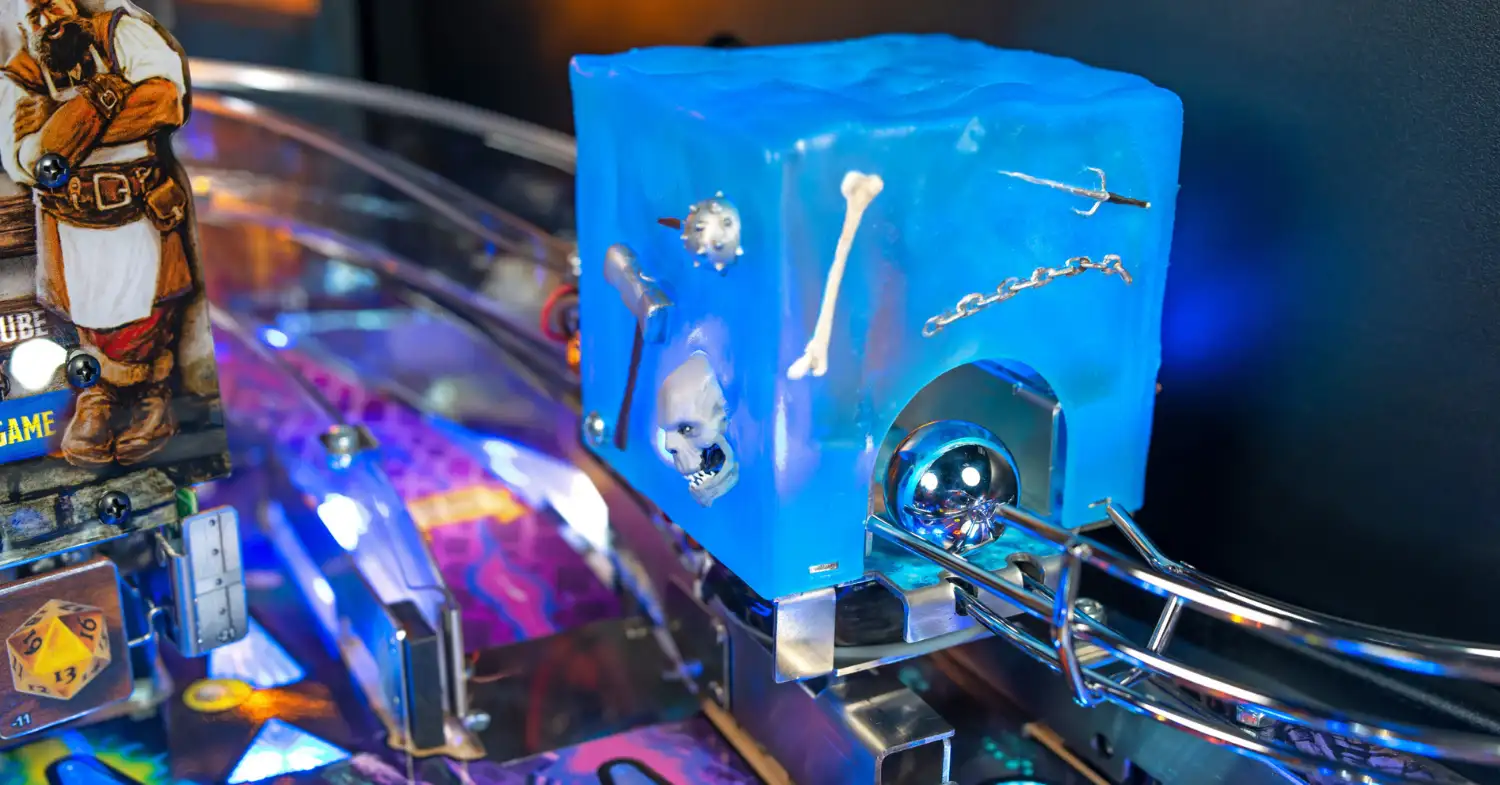
This multiball is tougher to start than the Dragon Multiball described above but can be incredibly valuable. Shoot the left orbit to lower the ramp in front of it, then shoot the ramp to send the ball through the cube. The ramp shots required to start gelatinous cube change on a weekly basis and can be anywhere from one to four shots.
While the ball is being held at the lock, a second ball can be locked at the magnet near the upper flipper, and the player can then release the held balls with a shot to them or can hit the left ramp to start the multiball with a 4th ball in play. All the while, a hurry-up value is counting down, and will be locked in as soon as the balls are released.
During the multiball, all lit teal shots score jackpots worth the locked-in hurry-up value + 3M for every jackpot scored, to a max of 25M. Scoring them all lights the upper loop for a super jackpot worth a set 20M. After playing the multiball once, it can only be lit again by completing a map mode. A good way to ensure you can play gelatinous cube multiball often is by stacking it with a map mode so that the multiball is qualified again after exiting the mode.
Tavern Brawl
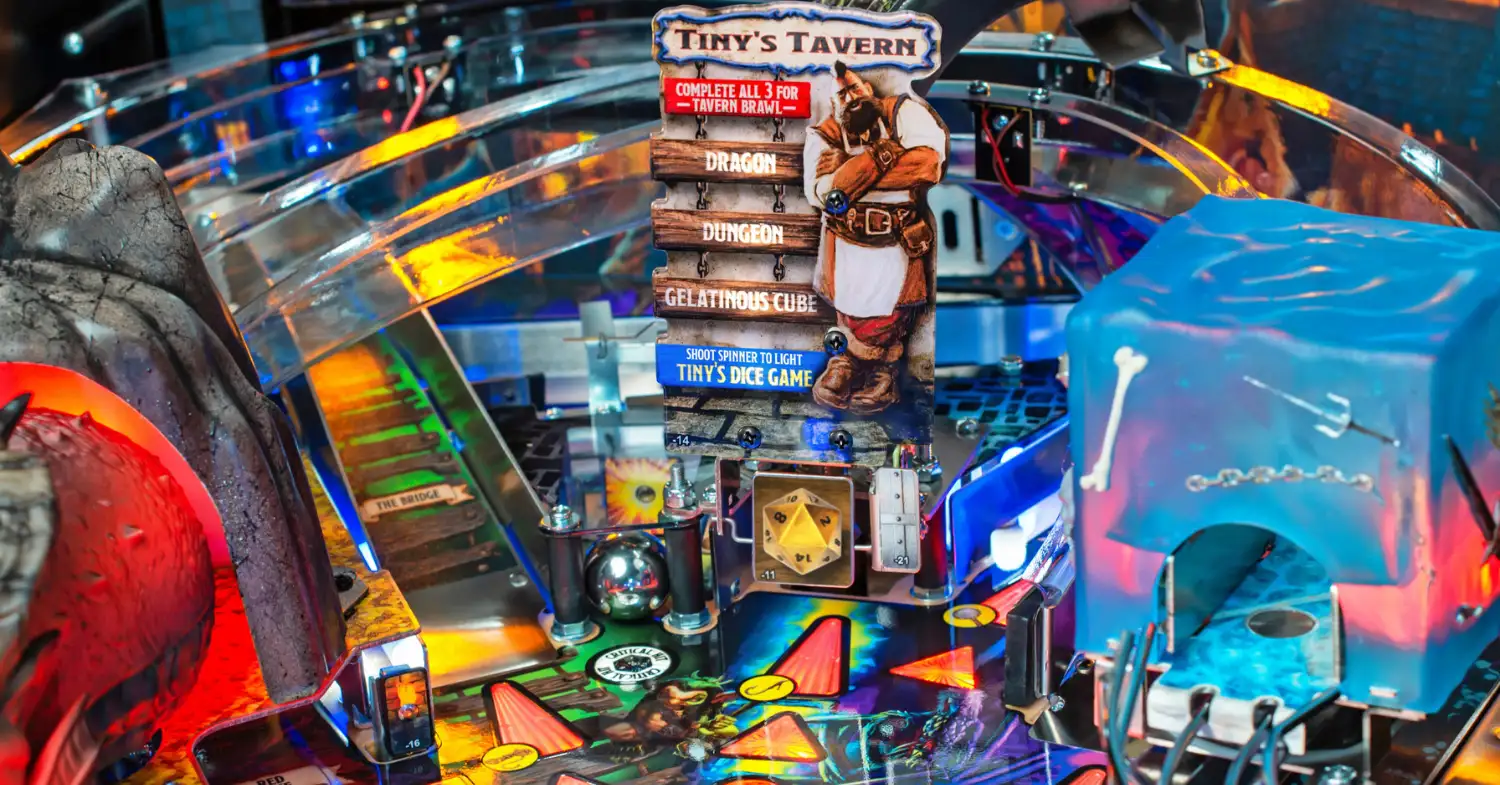
This mini-wizard mode is available once the player has completed all three of the tasks listed above: started Dragon and Gelatinous Cube multiballs, and successfully crawled through one dungeon, meaning the player gets only one "legit" Tavern Brawl per game. The center spinner starts Tavern Brawl so long as another mode isn’t currently running. If the spinner is lit for both Tiny's Dice Game and Tavern Brawl, the latter will take priority.
Tavern Brawl can also be lit if the player is lucky enough to find it in Fizmo's wares for 1250 gold. The player can light Tavern Brawl this way an unlimited number of times.
Starting out as a 2-ball multiball, many features are active during this mode. All switches score 10k a hit, the 3-bank can be hit to light an add-a-ball at the shortcut mini-loop (or light the pop-up scoop to enable the super jackpot on Prem / LE), and all shots are lit for jackpots that start at 6M a piece and increase with each jackpot scored. The super jackpot is worth 3x the normal jackpot award.
There is also a way to enable the left ramp for looping jackpots during this multiball. Just shoot the center spinner 3 times and the ramp will lower allowing repeated shots to the ramp for 1x, 2x, then 3x jackpots. The ramp will raise again if the 20-second timer runs out and it must be lowered with more spinner shots (ie. 4 for the second looping ramp jackpot).
On some copies, trapping the ball with the shield and holding it on the right flipper can set you up for repeated shots to the left ramp, making Tavern Brawl a reliable source of points if played well!
Tiny’s Dice Game
This is another mini-wizard mode that becomes available at the center spinner once 3 of any mode have been played (the plastic claims otherwise but it lies). This can include any location mode or town dungeon but does not account for multiballs or dungeon crawls. It can only be started if no other modes are running.
This mode is all about hitting the center spinner as much as possible to score points per spin based on the dice number, which ranges from 1 to 20 and increases as spins are made. The timer for the mode can be increased by 10 seconds by hitting other shots throughout the playfield. As soon as the dice number reaches 20, the timer can no longer be increased, but the spinner will be worth 500k per spin until time runs out.
Dice game is slightly different on the Prem / LE models and heavily utilizes the pop-up scoop. Shooting the pop-up scoop when it is raised will increase the spinner value instead of shooting the spinner. As a result, Tiny's dice game is significantly lower scoring on the Prem / LE than it is on the Pro. To ensure good value from this mode, hit purple shots and alternate them with the spinner or the pop-up scoop.
Fizmo’s Shop
Whenever the player is in a town and a mode isn’t currently running, the player can shoot the left eject to exchange gold they have earned from battles or dungeon crawls for Fizmo’s goods. All Fizmo’s locations have four items, and each town has a different set of items that reset every Sunday.
Memorize which locations have which items for the week! Items like magical armor, weapons, or trinkets are often available, but you’ll need to figure out which store is selling them first. Trinkets are disabled during competitive mode and replaced with other items, but will give perks that last for the entirety of this game and all subsequent games if chosen; they cost large amounts of gold.
Once dragon multiball has been completed (ie. town celebration multiball was started), the next visit to Fizmo's will have items for sale at half price, making this a good option to buy items that would otherwise be out of reach.
Critical Hits
The captive ball might look unassuming but can seriously help the player when hit. If the player hits the captive ball twice in succession, a critical hit / natural 20 will be scored and progress will be made towards both multiballs *and* starting 2x scoring! If the player is in a battle then critical hits serve a different purpose, they will spot a battle shot without having to hit it directly. It will also spot jackpots during dragon / town celebration multiballs.
The best way to hit the captive ball is from the lower right flipper, though early shots from the upper right flipper can also hit it.
2x Scoring

2x Scoring is often started by accident and requires shots to the secret door target and “hidden temple” lane behind the upper flipper to start. While this lane can be hit directly with a shot to it from the left flipper, the player will be more likely to bounce into it after shooting the 3-bank or Rath’s head.
Shoot the secret door or hidden temple lane to light the lane to start 2x scoring for 20 seconds. The timer can be reset and extended by rolling through the hidden temple lane while 2x scoring is already active.
Shield
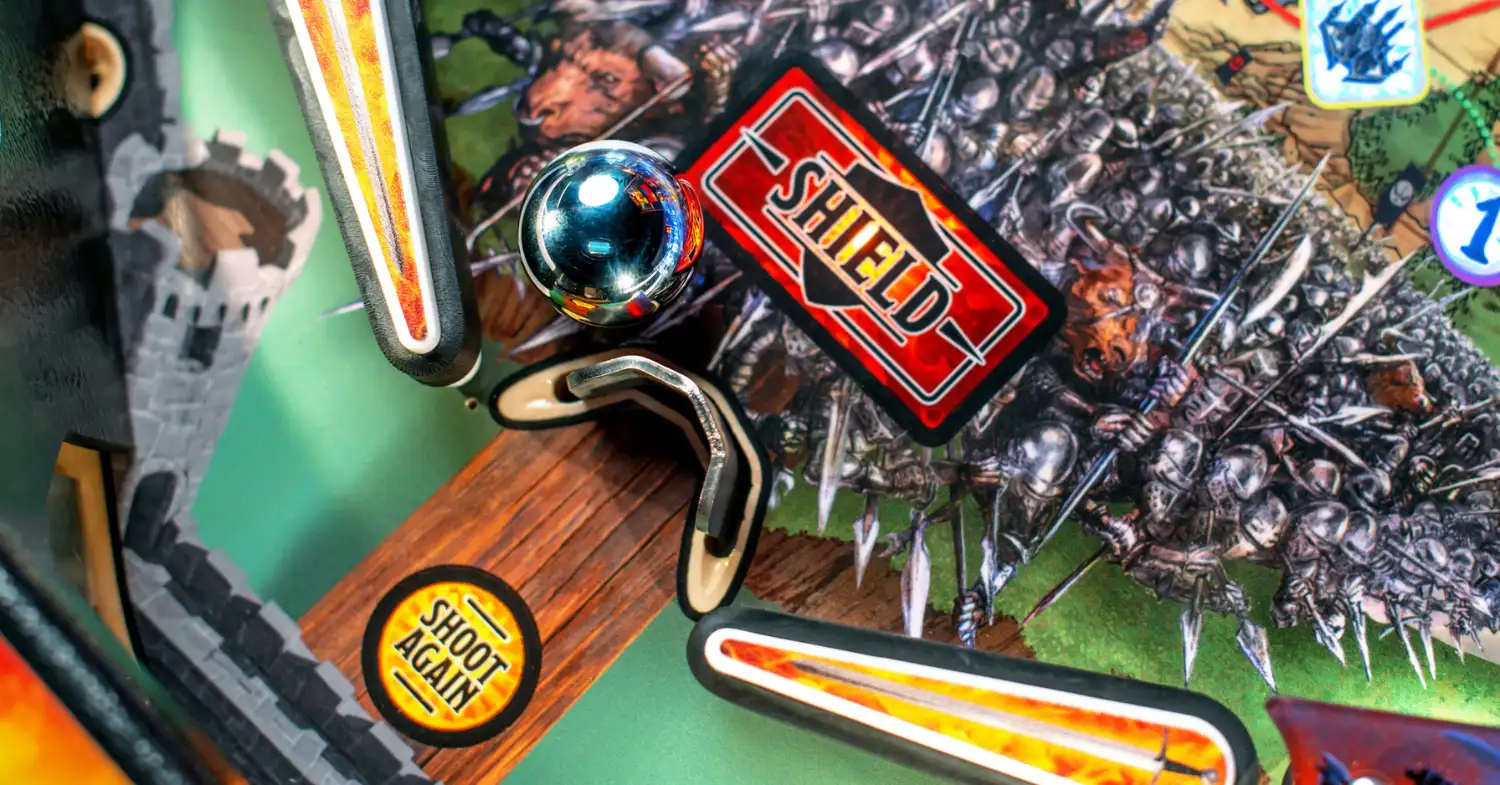
The game’s gotta have more than one use of the action button so here it is! The shield is located between the lower flippers and raises whenever the lit action button is pressed, though there is a slight delay between the button press and the shield raising. After the timer expires (and the “shield” insert is no longer flashing), the post will lower. Requalify the shield by completing sets of return lanes; the number increases every time the shield is used, to a maximum of 5.
You can also use the shield to “shield stage” or slow down the ball to hit certain shots easier than otherwise. Experiment with your local copies to see which shots can be made this way – the most consistent ones for me are the left orbit / left ramp and the right ramp.
Noah's Strats
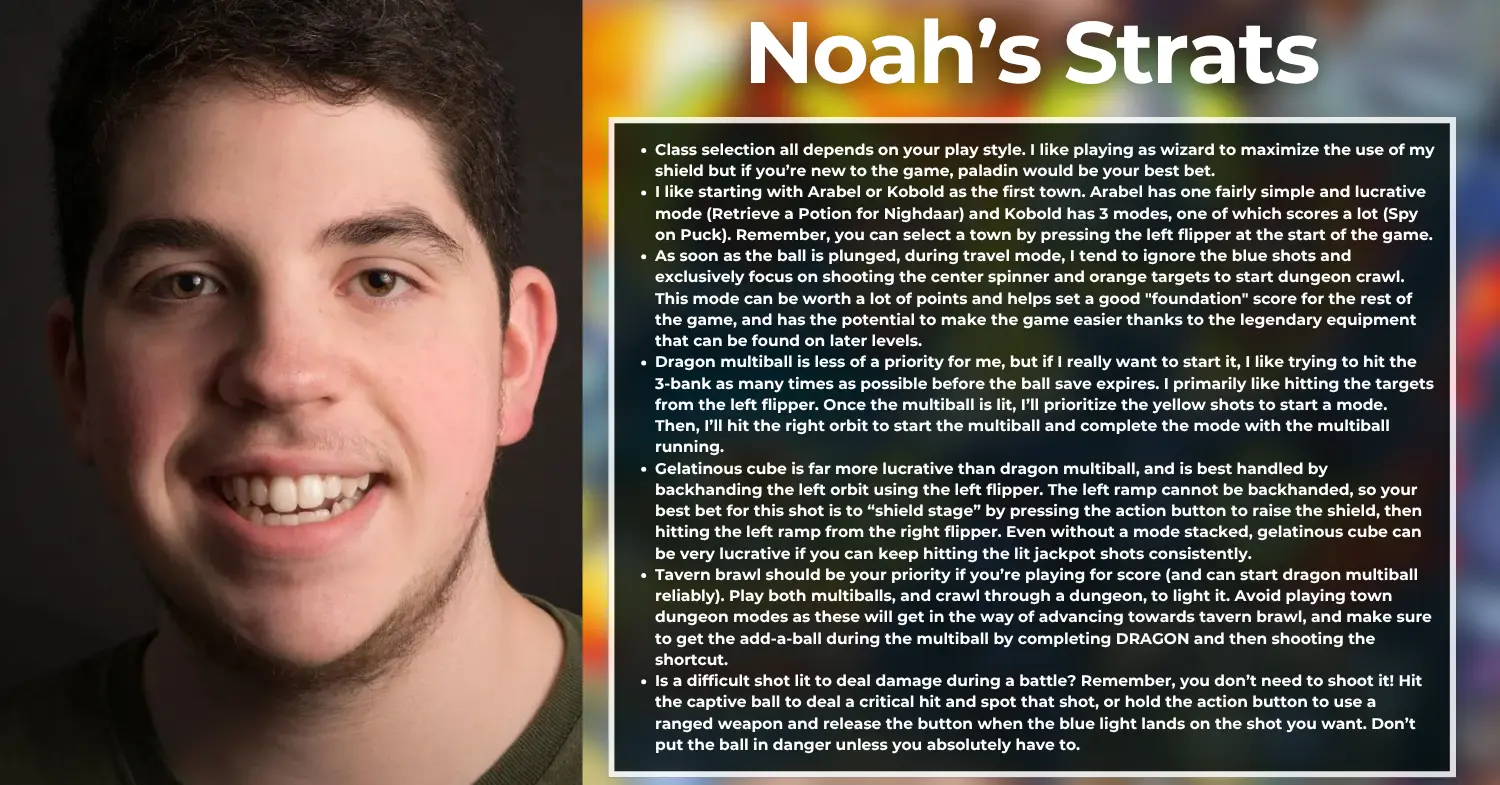
- Class selection all depends on your play style. I like playing as wizard to maximize the use of my shield but if you’re new to the game, paladin would be your best bet.
- I like starting with Arabel or Kobold as the first town. Arabel has one fairly simple and lucrative mode (Retrieve a Potion for Nighdaar) and Kobold has 3 modes, one of which scores a lot (Rescue Missing Miners) and another of which is safe to complete (Spy on Puck). Remember, you can select a town by pressing the left flipper at the start of the game.
- As soon as the ball is plunged, during travel mode, I tend to ignore the blue shots and exclusively focus on shooting the center spinner and orange targets to start dungeon crawl. This mode can be worth a lot of points and helps set a good "foundation" score for the rest of the game, and has the potential to make the game easier thanks to the legendary equipment that can be found on later levels.
- Dragon multiball is less of a priority for me, but if I really want to start it, I like trying to hit the 3-bank as many times as possible before the ball save expires. I primarily like hitting the targets from the left flipper. Once the multiball is lit, I’ll prioritize the yellow shots to start a mode. Then, I’ll hit the right orbit to start the multiball and complete the mode with the multiball running.
- Gelatinous cube is far more lucrative than dragon multiball, and is best handled by backhanding the left orbit using the left flipper. The left ramp cannot be backhanded, so your best bet for this shot is to “shield stage” by pressing the action button to raise the shield, then hitting the left ramp from the right flipper. Even without a mode stacked, gelatinous cube can be very lucrative if you can keep hitting the lit jackpot shots consistently.
- Tavern brawl should be your priority if you’re playing for score (and can start dragon multiball reliably). Play both multiballs, and crawl through a dungeon, to light it. Avoid playing town dungeon modes as these will get in the way of advancing towards tavern brawl, and make sure to get the add-a-ball during the multiball by completing DRAGON and then shooting the shortcut.
- Is a difficult shot lit to deal damage during a battle? Remember, you don’t need to shoot it! Hit the captive ball to deal a critical hit and spot that shot, or hold the action button to use a ranged weapon and release the button when the blue light lands on the shot you want. Don’t put the ball in danger unless you absolutely have to.

VHS collector, media archivist, and pinball rules aficionado, Noah has been invested in the hobby since he was a teenager - much to the surprise of his parents and others his age. As an expert on brand new machines he’s the guy to call if you’re new to the hobby, or an experienced player who wants some help. Noah hopes to participate in and perhaps even win major tournaments like INDISC as his skills improve and desires for pinball to become a more inclusive hobby.
Like what you're reading?
Get pinball news, analysis, and deep dives delivered to your inbox.
Related Posts
More in Pinball Tutorial or browse all topics.