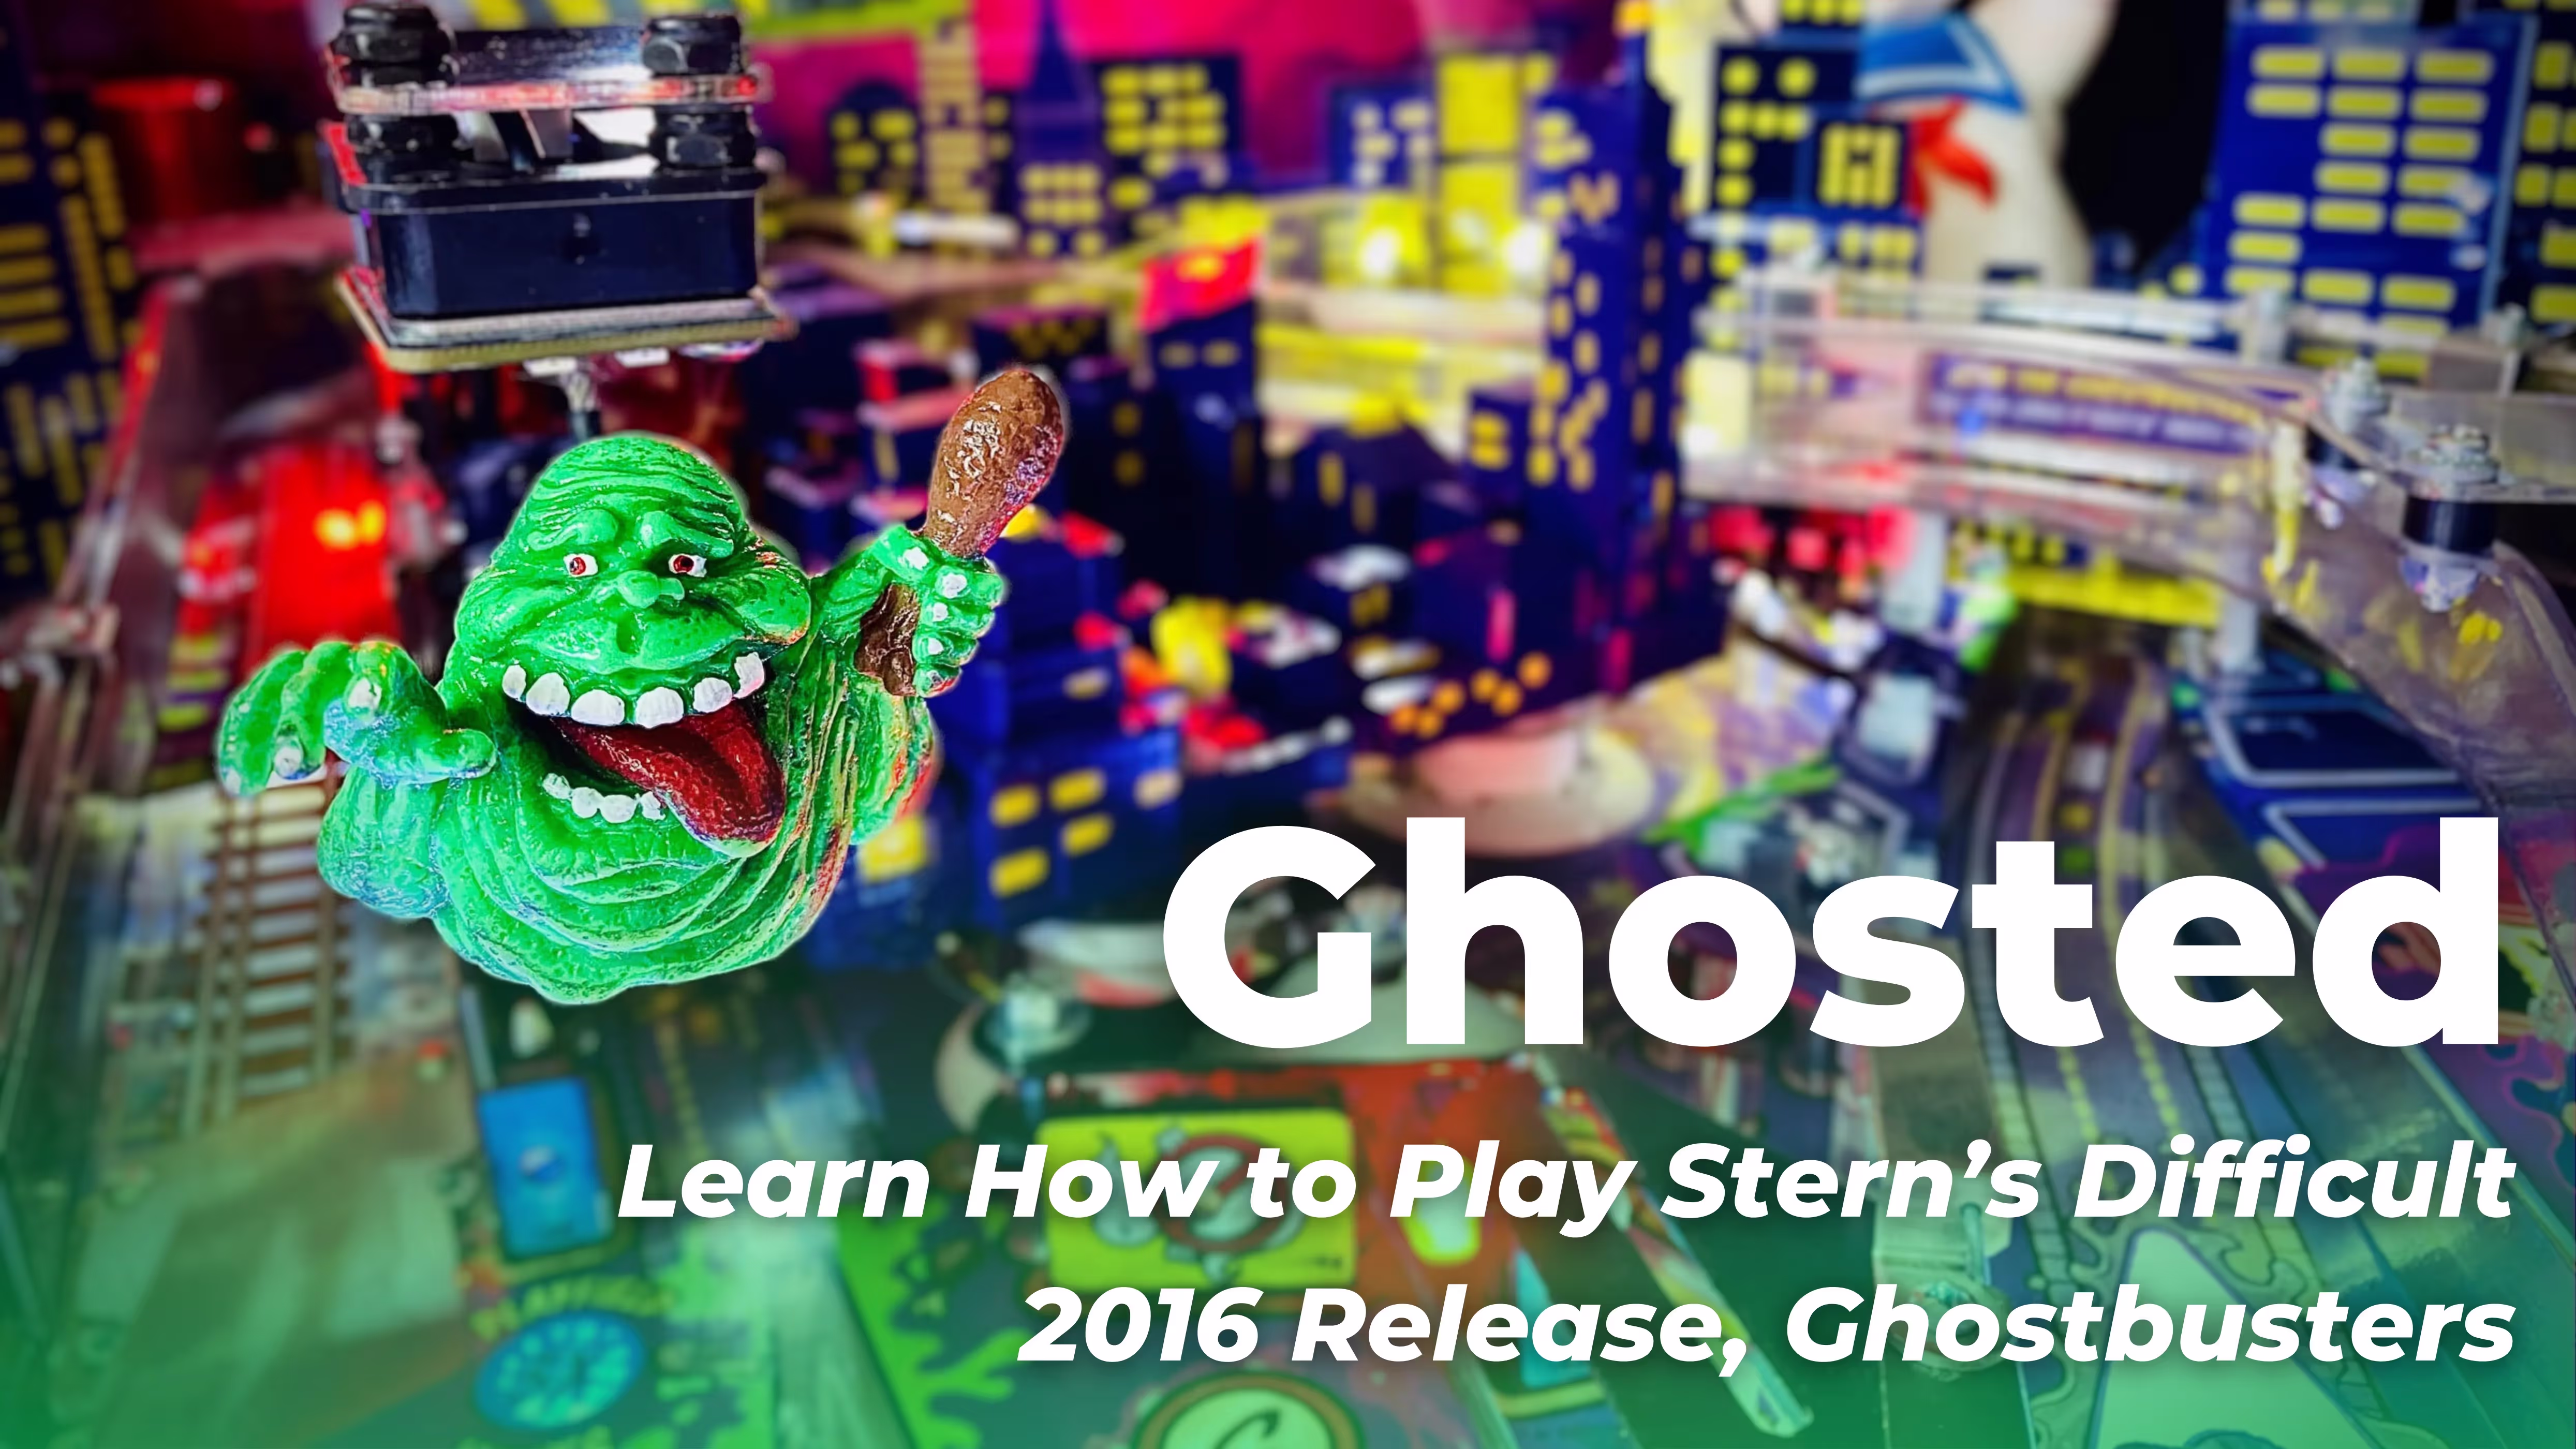
Ghosted: Learn How to Play Stern's Difficult 2016 Release, Ghostbusters
Released around the same time as the 2016 film of the same name, it's pretty clear that Ghostbusters was intended to capitalize on a renewed interest in the franchise which dominated pop culture throughout the late 1980s. Unfortunately, the 2016 film was....let's just say "controversial,” and leave it at that. The franchise was soft-rebooted again five years later to more favorable (albeit lukewarm) reviews, and a sequel is slated for release later this March.
But for many - myself included - nothing really tops the original. Thankfully, the pinball machine draws about 90% of its content from the original film and the other 10% from Ghostbusters II, refreshing the 80’s veneer with a great original artwork package. Unfortunately, Ghostbusters wasn't kept afloat by its theming alone and is often vilified due to its punishing layout, steep learning curve, and misleading ruleset. Playing Ghostbusters without knowing anything about the game is a truly disorienting experience, so let's try to get to the bottom of some of these rules.
About Ghostbusters Pinball
Ghostbusters Pinball was released by Stern Pinball in 2016. It was their last cornerstone game to use a DMD display and kicked off Stern’s relationship with artist Jeremy Packer, who continues to work with the company to this day.
Game Credits:
- Design: John Trudeau
- Code: Dwight Sullivan, Tanio Klyce, Corey Stup
- Mechanics: Elliot Eismin
- Art: Jeremy Packer
- Animation: Mark Galvez
- Sound/Music: Jerry Thompson, Shawn Myers
Ghostbusters Playfield Overview
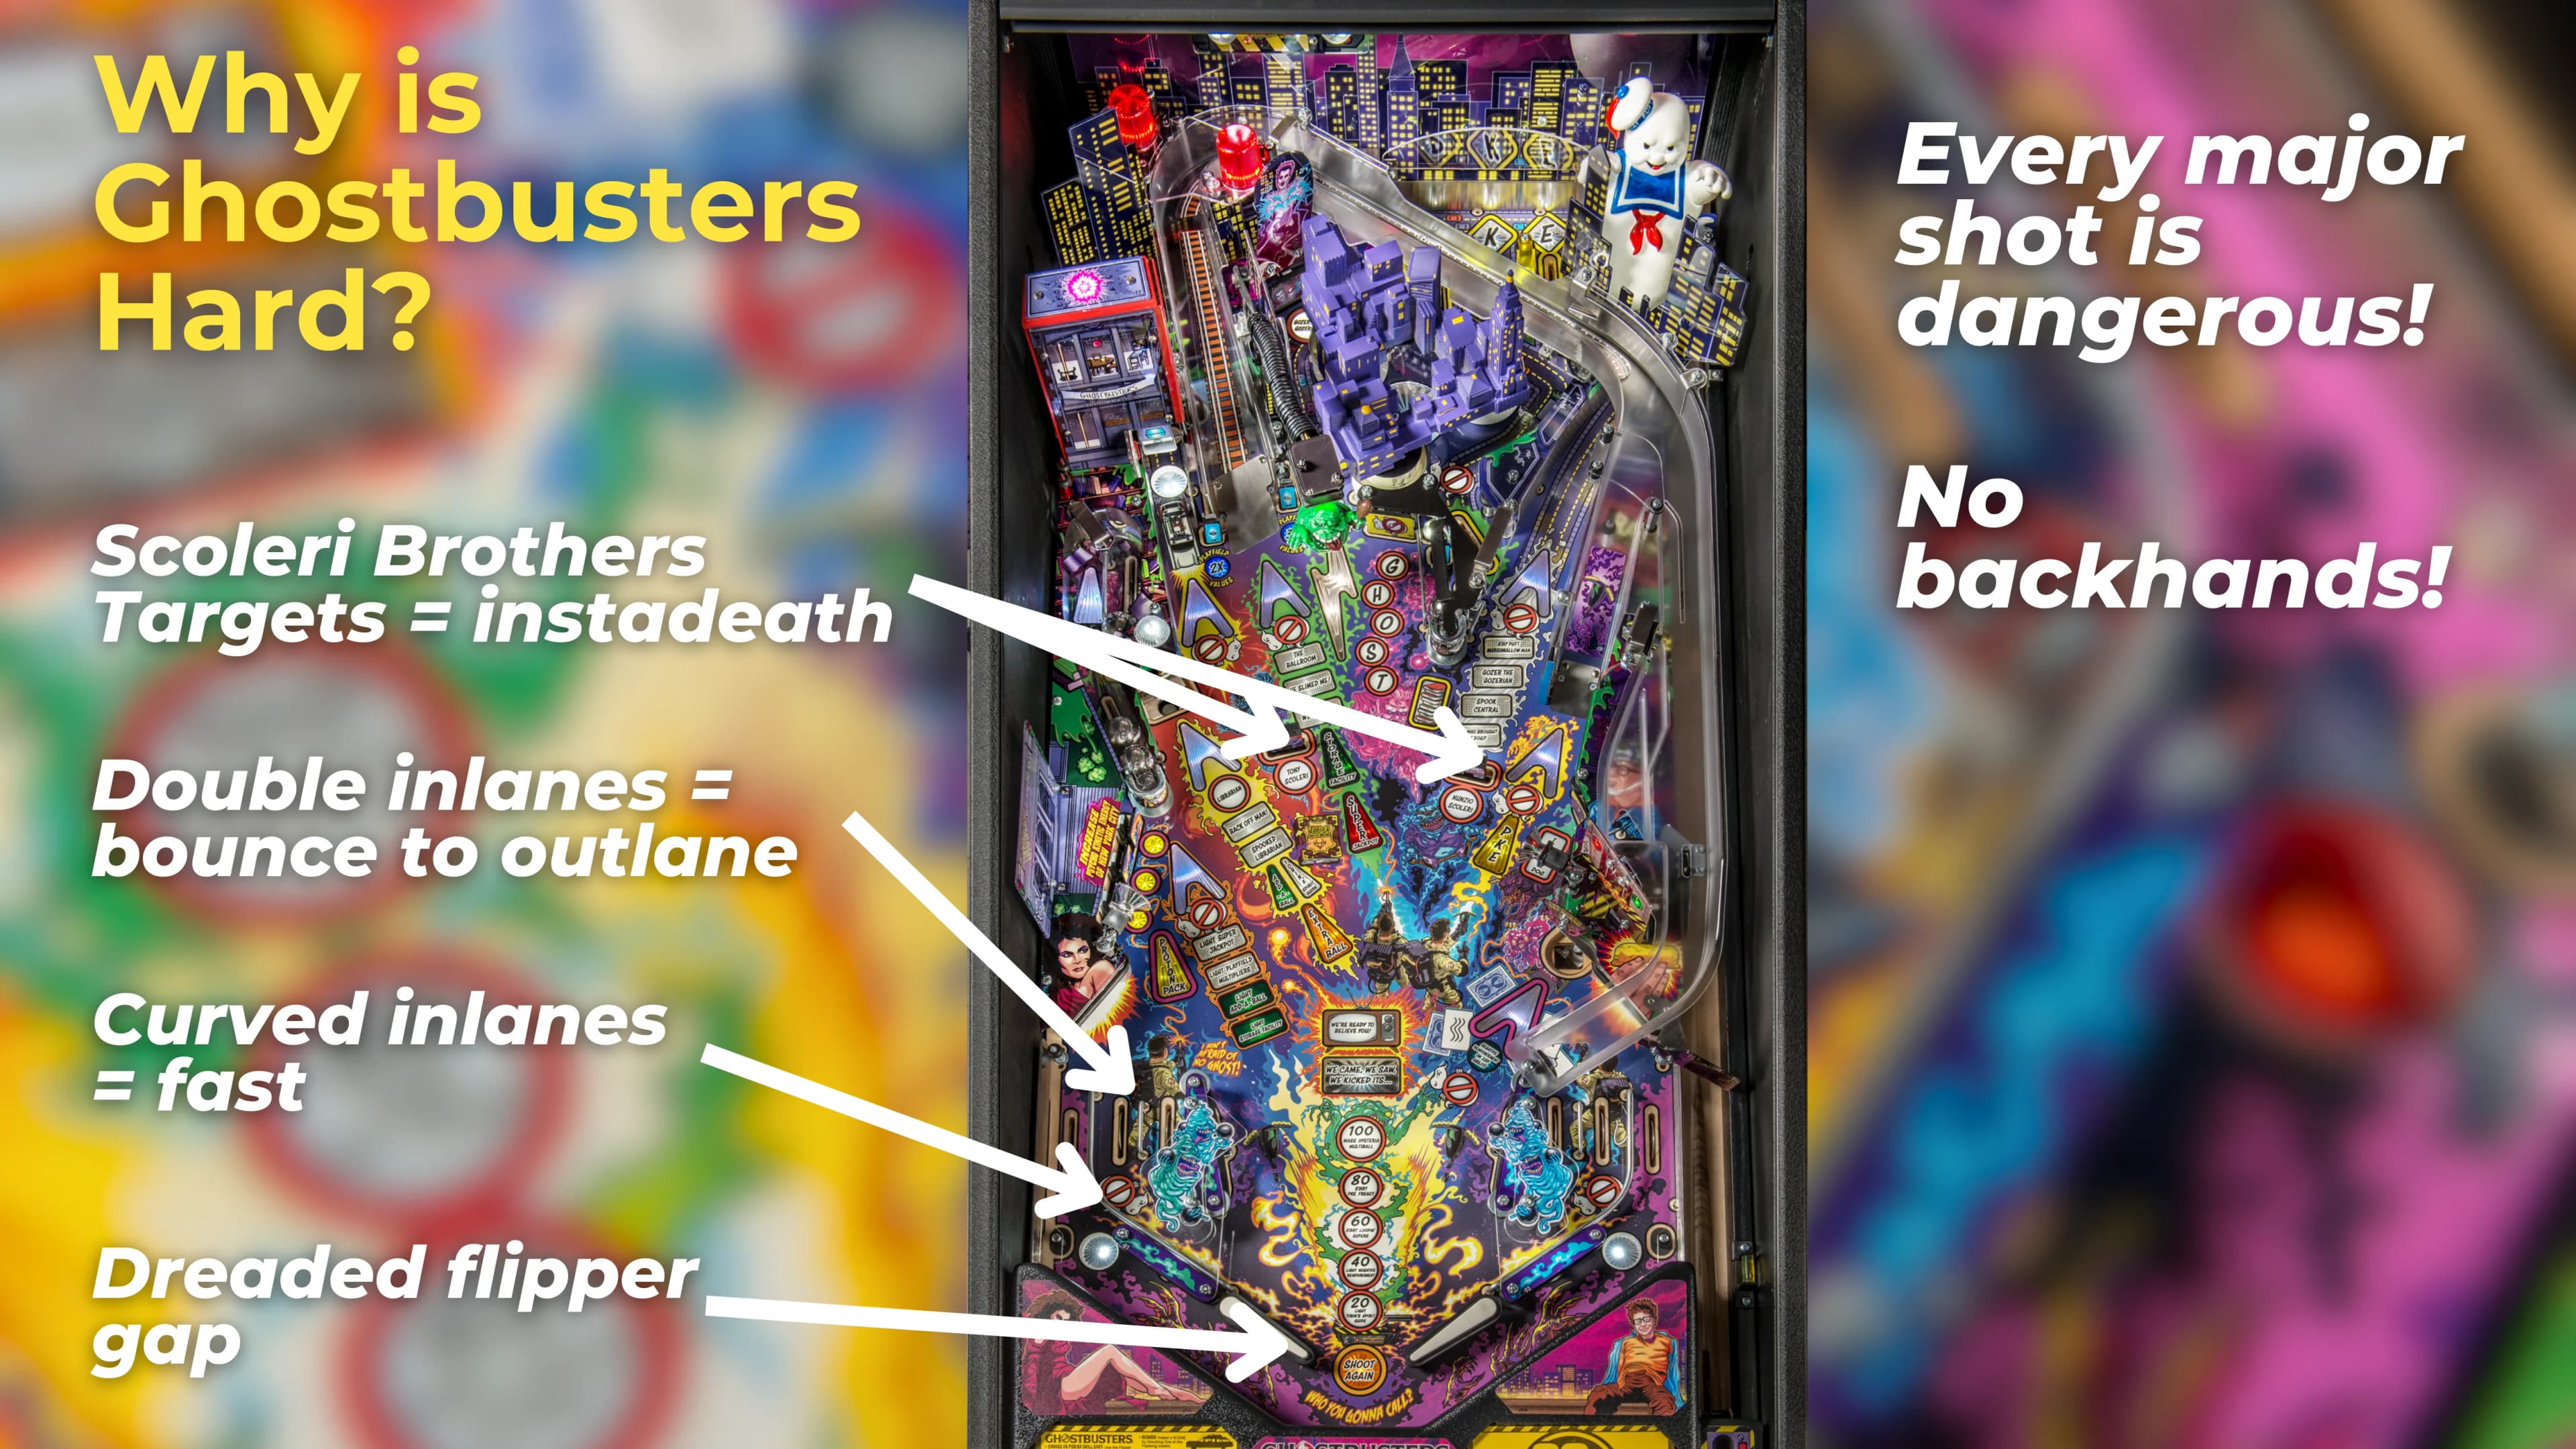
As mentioned above, Ghostbusters has a notoriously brutal layout. The difficulty was so reviled that a code update released a few years after the game’s release that just gave you a second ball save at the start of the ball to balance things out. Good news, I guess? It doesn’t help all that much since there are many reasons why this game is hard:
- The flipper gap is significantly wider than it is on most machines.
- There are double inlanes on both sides of the playfield. This might sound nice as you have a 2:1 inlane-outlane ratio, but in practice, the center rail between the inlanes will bounce the ball over to the outlane about half of the time.
- Speaking of inlanes, the rails are very gently curved to keep the ball rolling fast when it's coming through the inlanes. So, it's tough to slow down and compose yourself, even when you do get a lucky inlane.
- Nearly every major shot is either far off to the side or doesn't return the ball to the flippers in a predictable way. So not only are the shots difficult, but they often kill you on successful shots. Even the left ramp - which should return the ball to the right flipper via a habitrail - can sometimes just drop it on top of that center inlane post and into the outlane.
- No shots are backhandable. Maybe the right orbit from the right flipper, but that’s a stretch.
- The Scoleri Brothers targets, which pop up at various points of the game like the bad guys in Cactus Canyon or the Trolls in Medieval Madness, are lined up perfectly to send the ball straight down the middle on a dead-center shot. (If you have to hit these, graze them on the side so the ball goes past them and not back towards you. But you never really have to hit them except to get them out of the way.)
On high-difficulty layouts such as this, being able to regain control is significantly more important than being able to make a shot. Balls come out of the bumpers an awful lot on Ghostbusters, typically out of the wide gap above the lightning-shaped insert or out of the right orbit. Get comfy with how these return. Similarly, many balls will come out of the saucer on the lower right side of the playfield (it's a very shallow saucer), so being able to get control of those balls immediately will prolong your playtime.

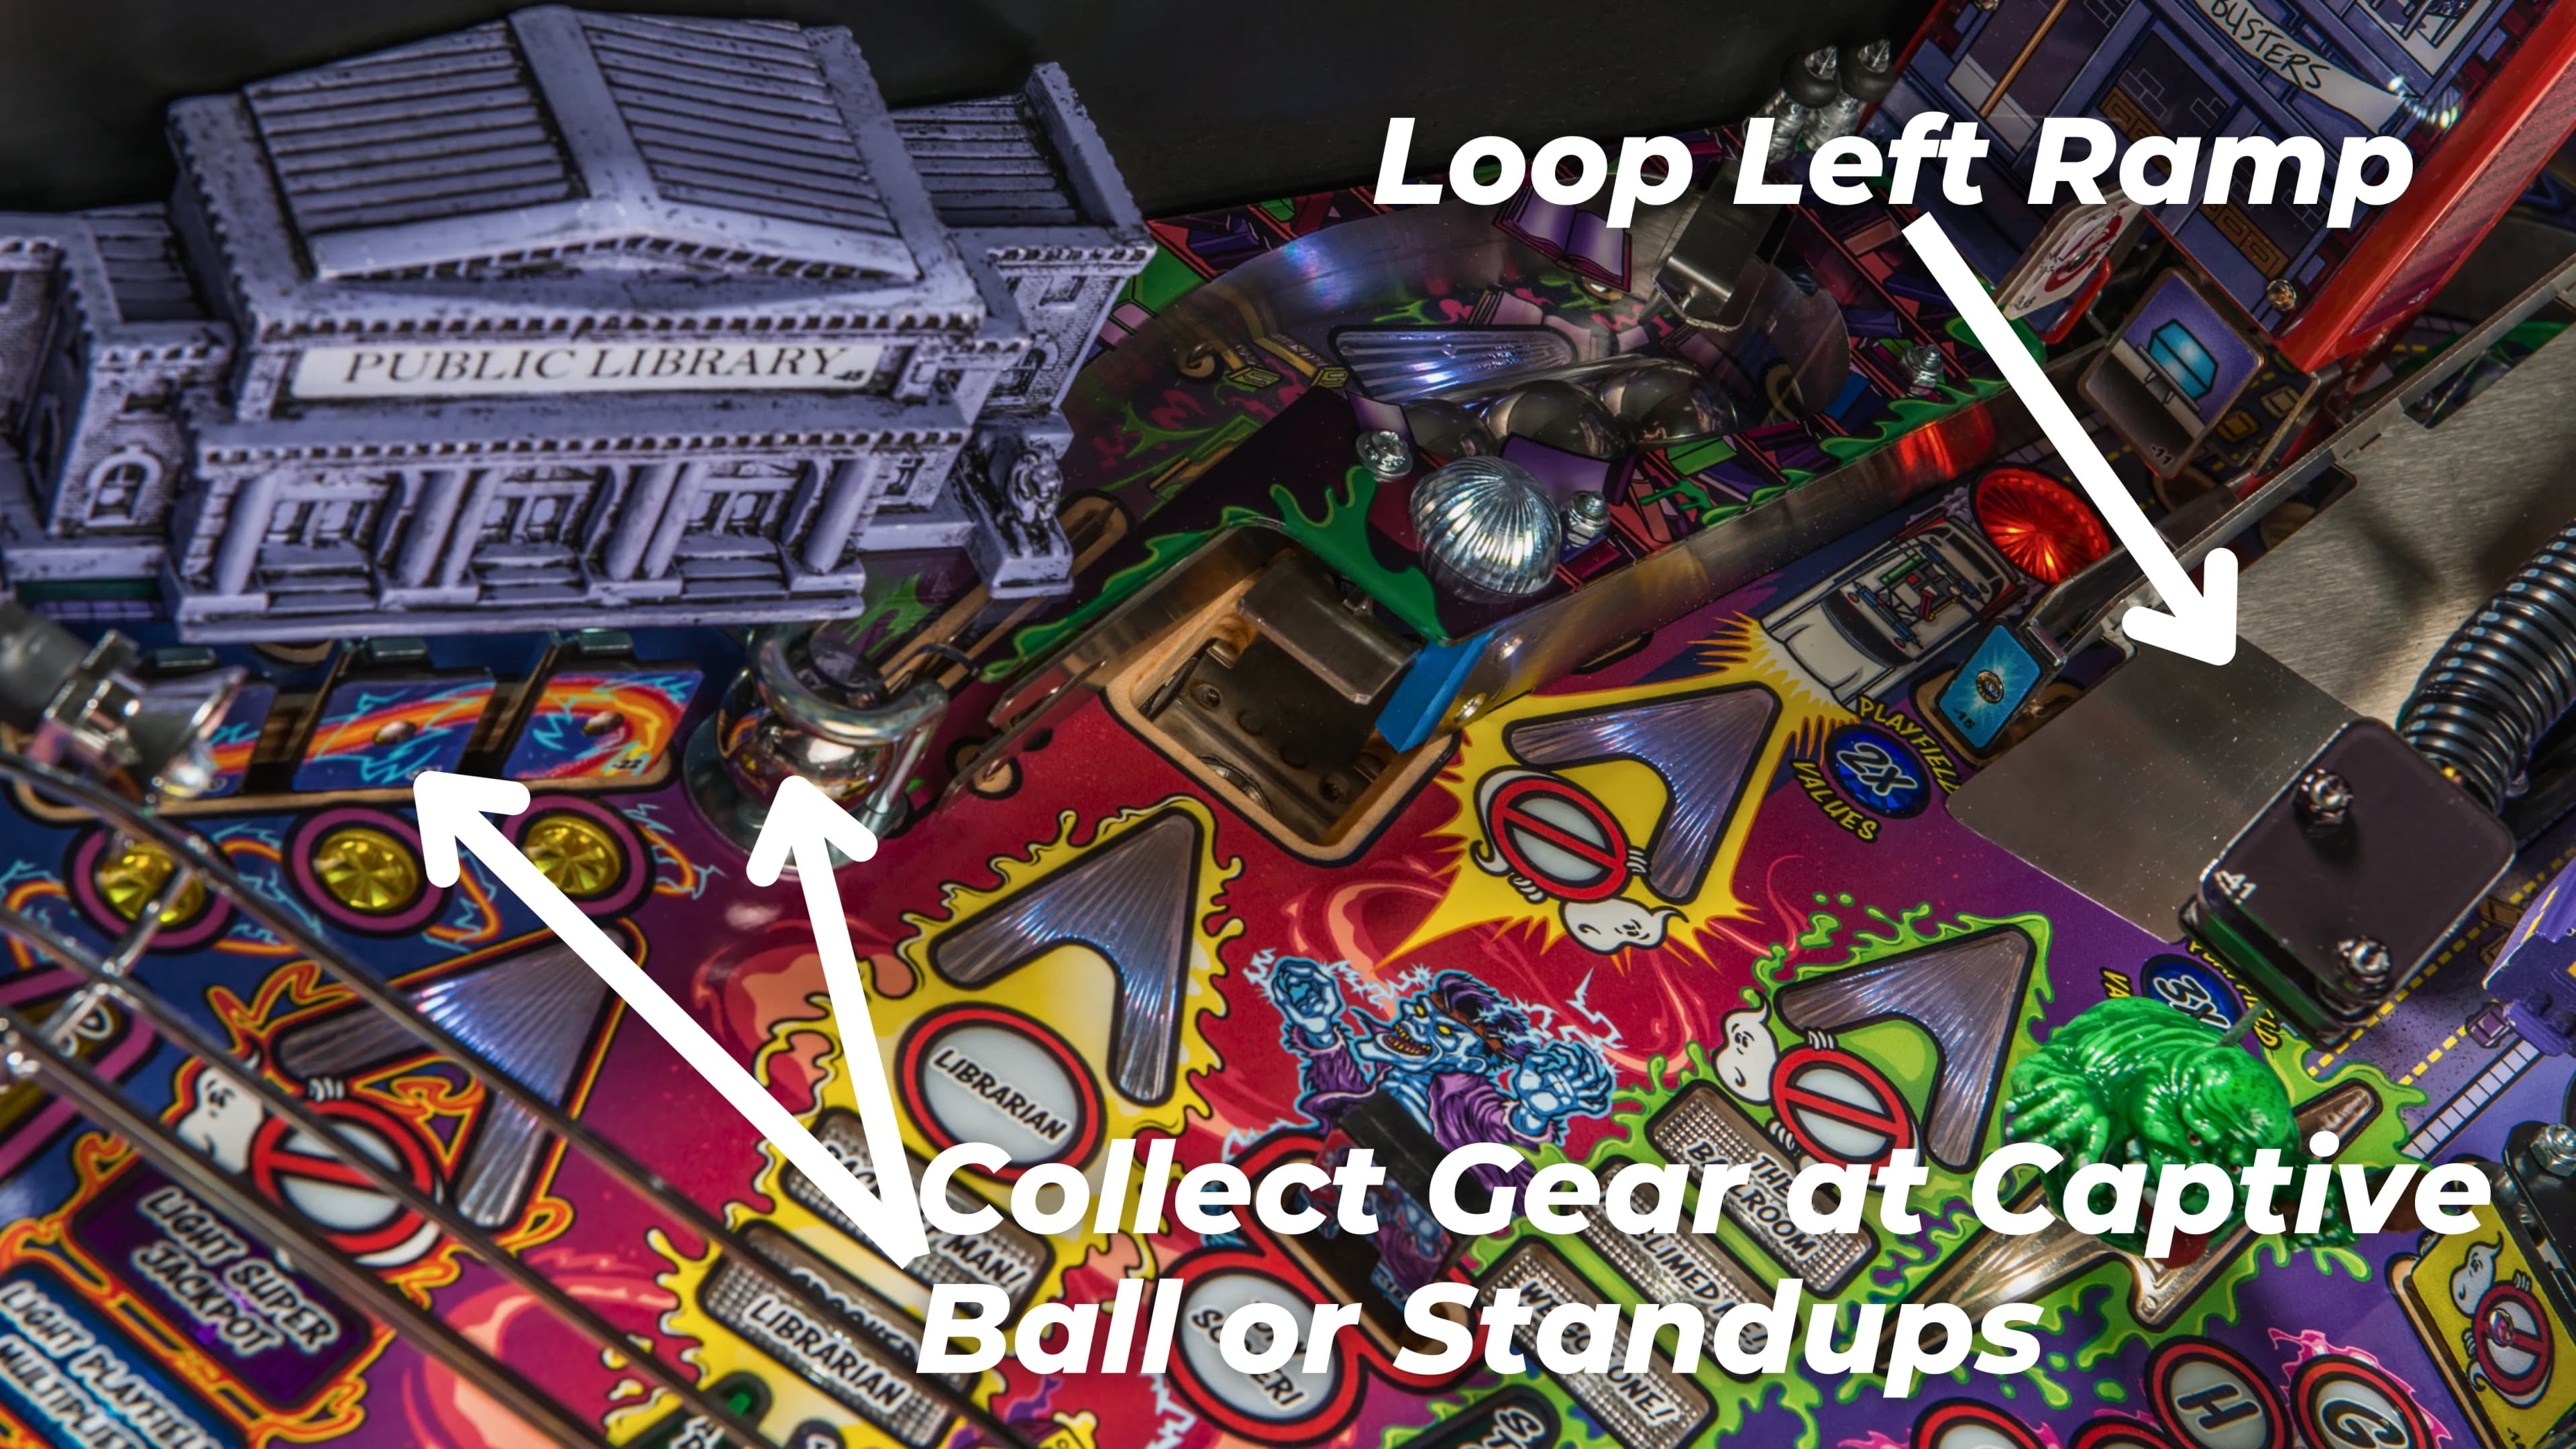
The most important shot, by far, is the left ramp. The good news is that it’s the easiest shot, so it’s not too hard to figure out, but try to get comfortable looping the ramp repeatedly and hitting it from a trap. Other major shots are worth figuring out, too: the two orbits are often lit for mode shots, as is the tiny ramp over to the right. The right ramp is the most difficult shot at the table, but rarely is it a necessary shot. More often, it’s lit to start some late-game scoring modes, so you don’t need to shoot it that much.
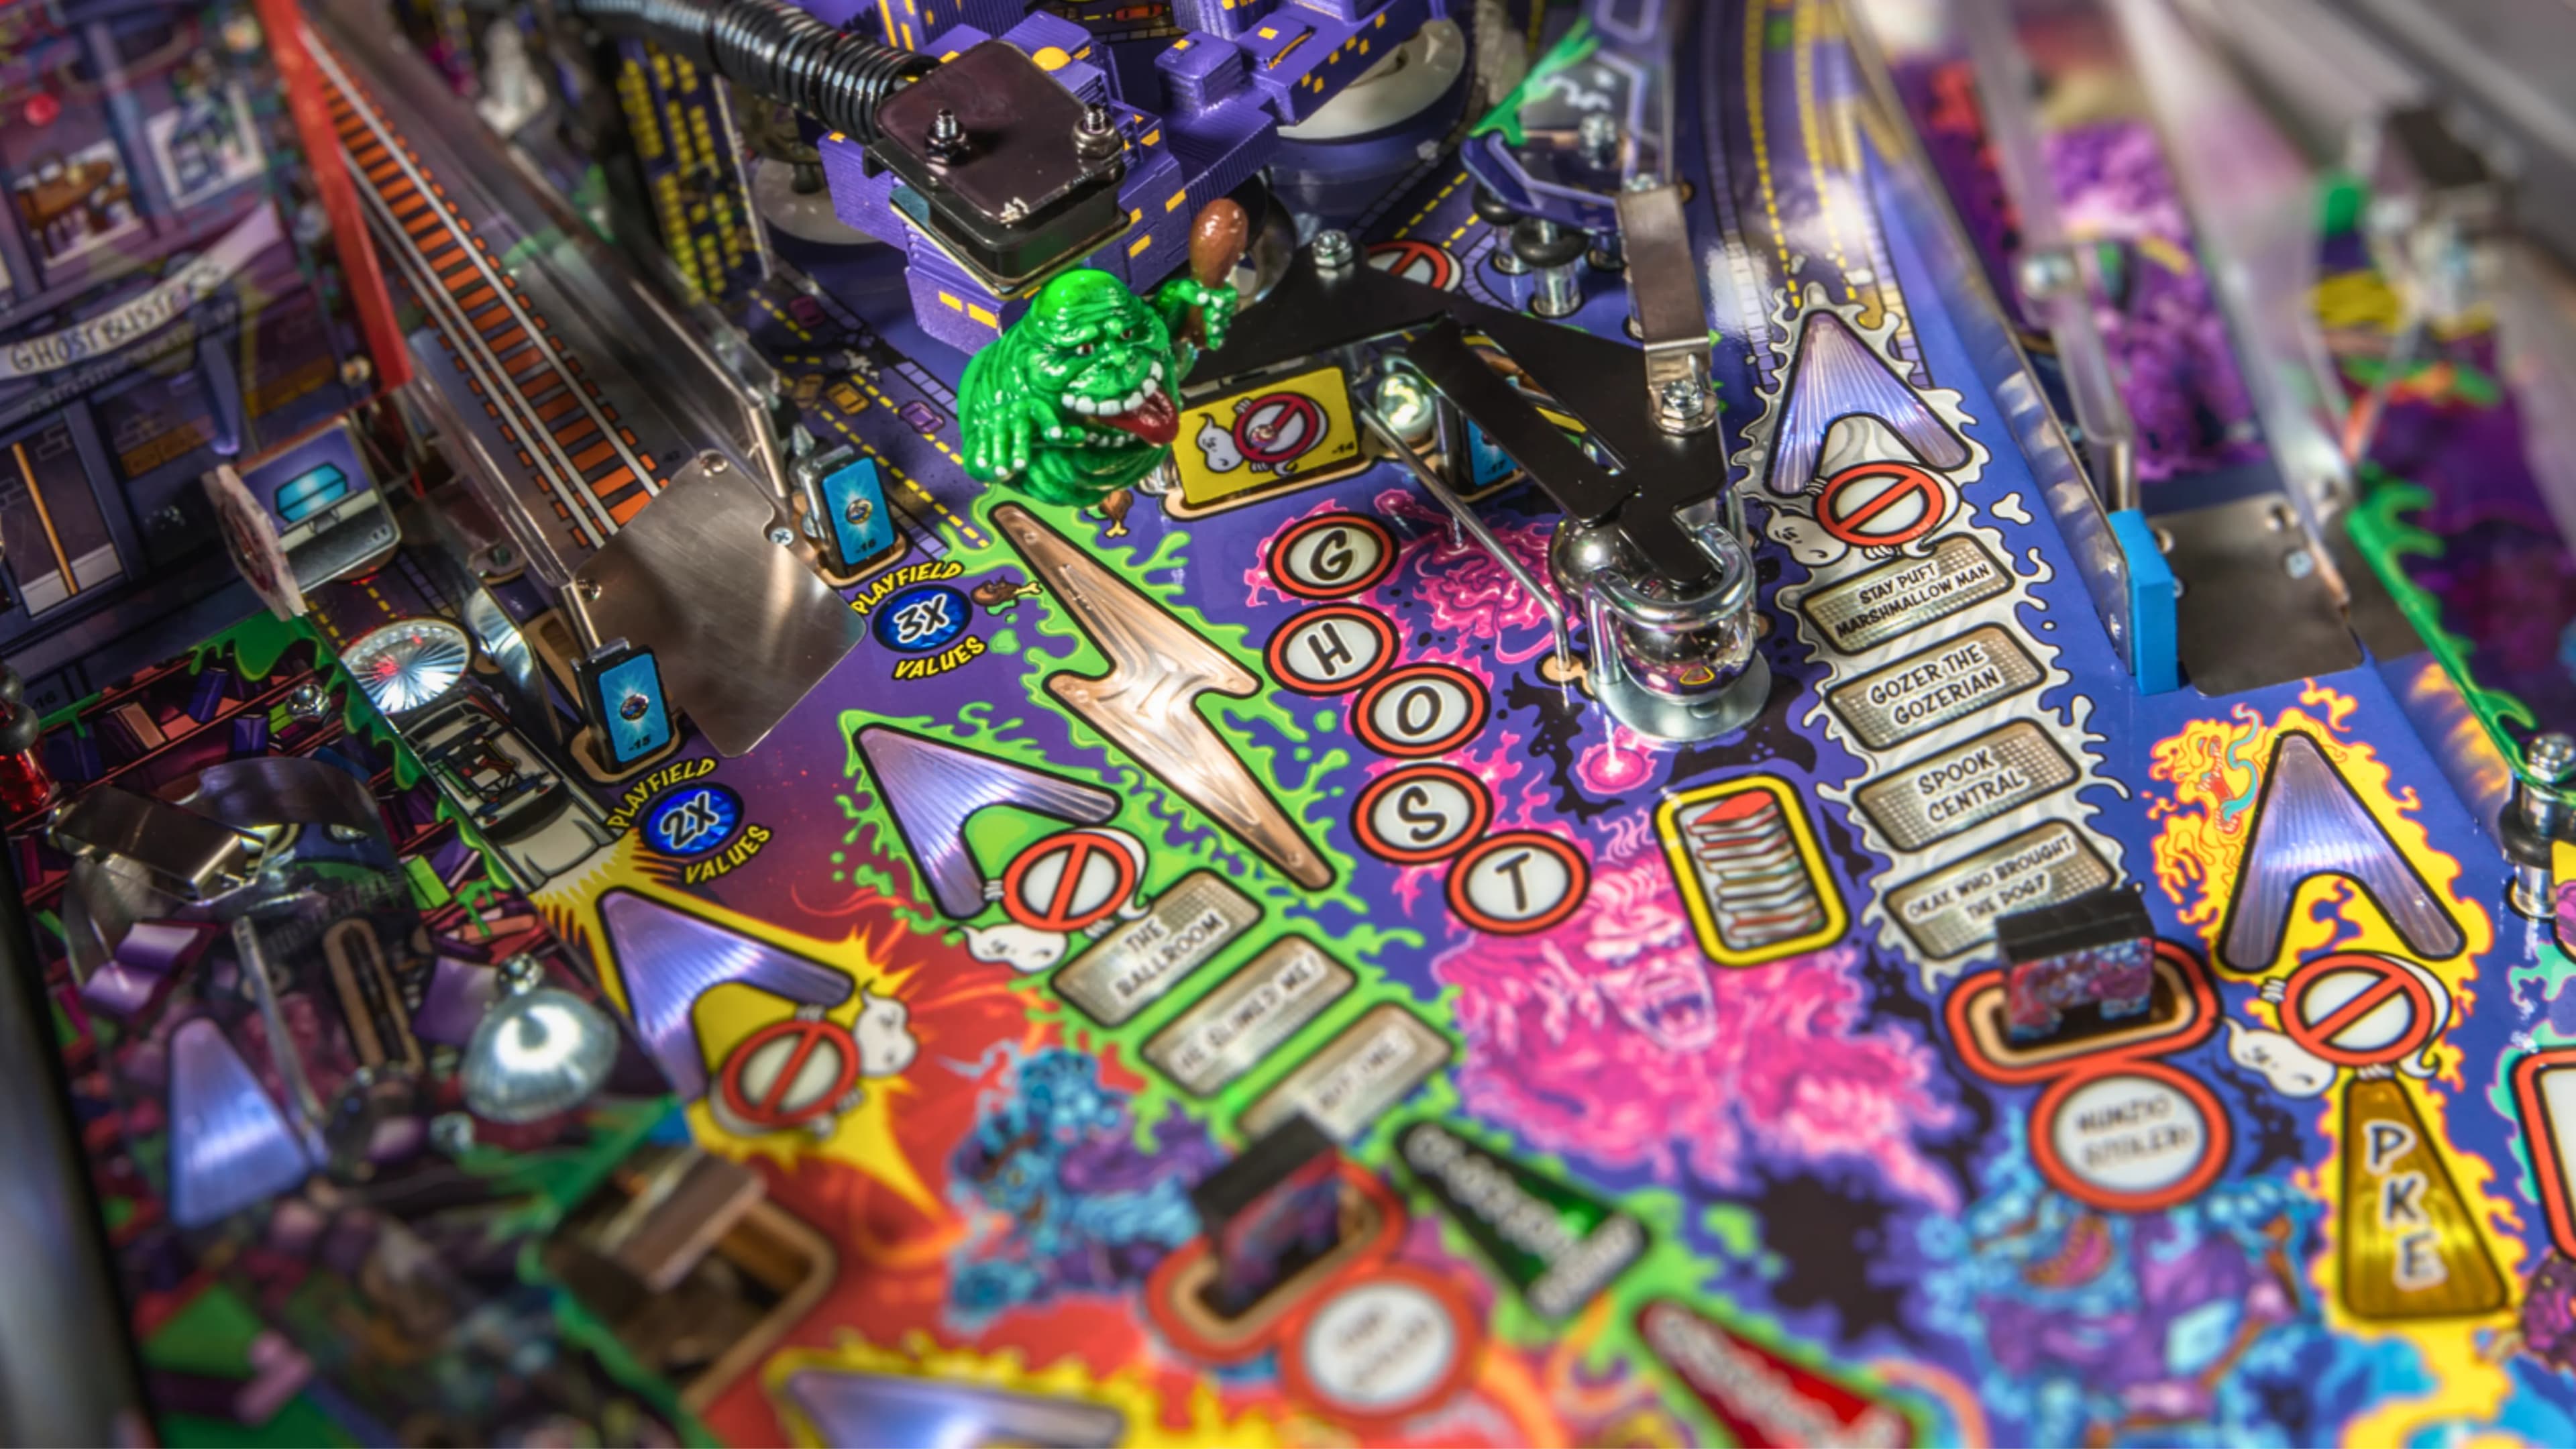
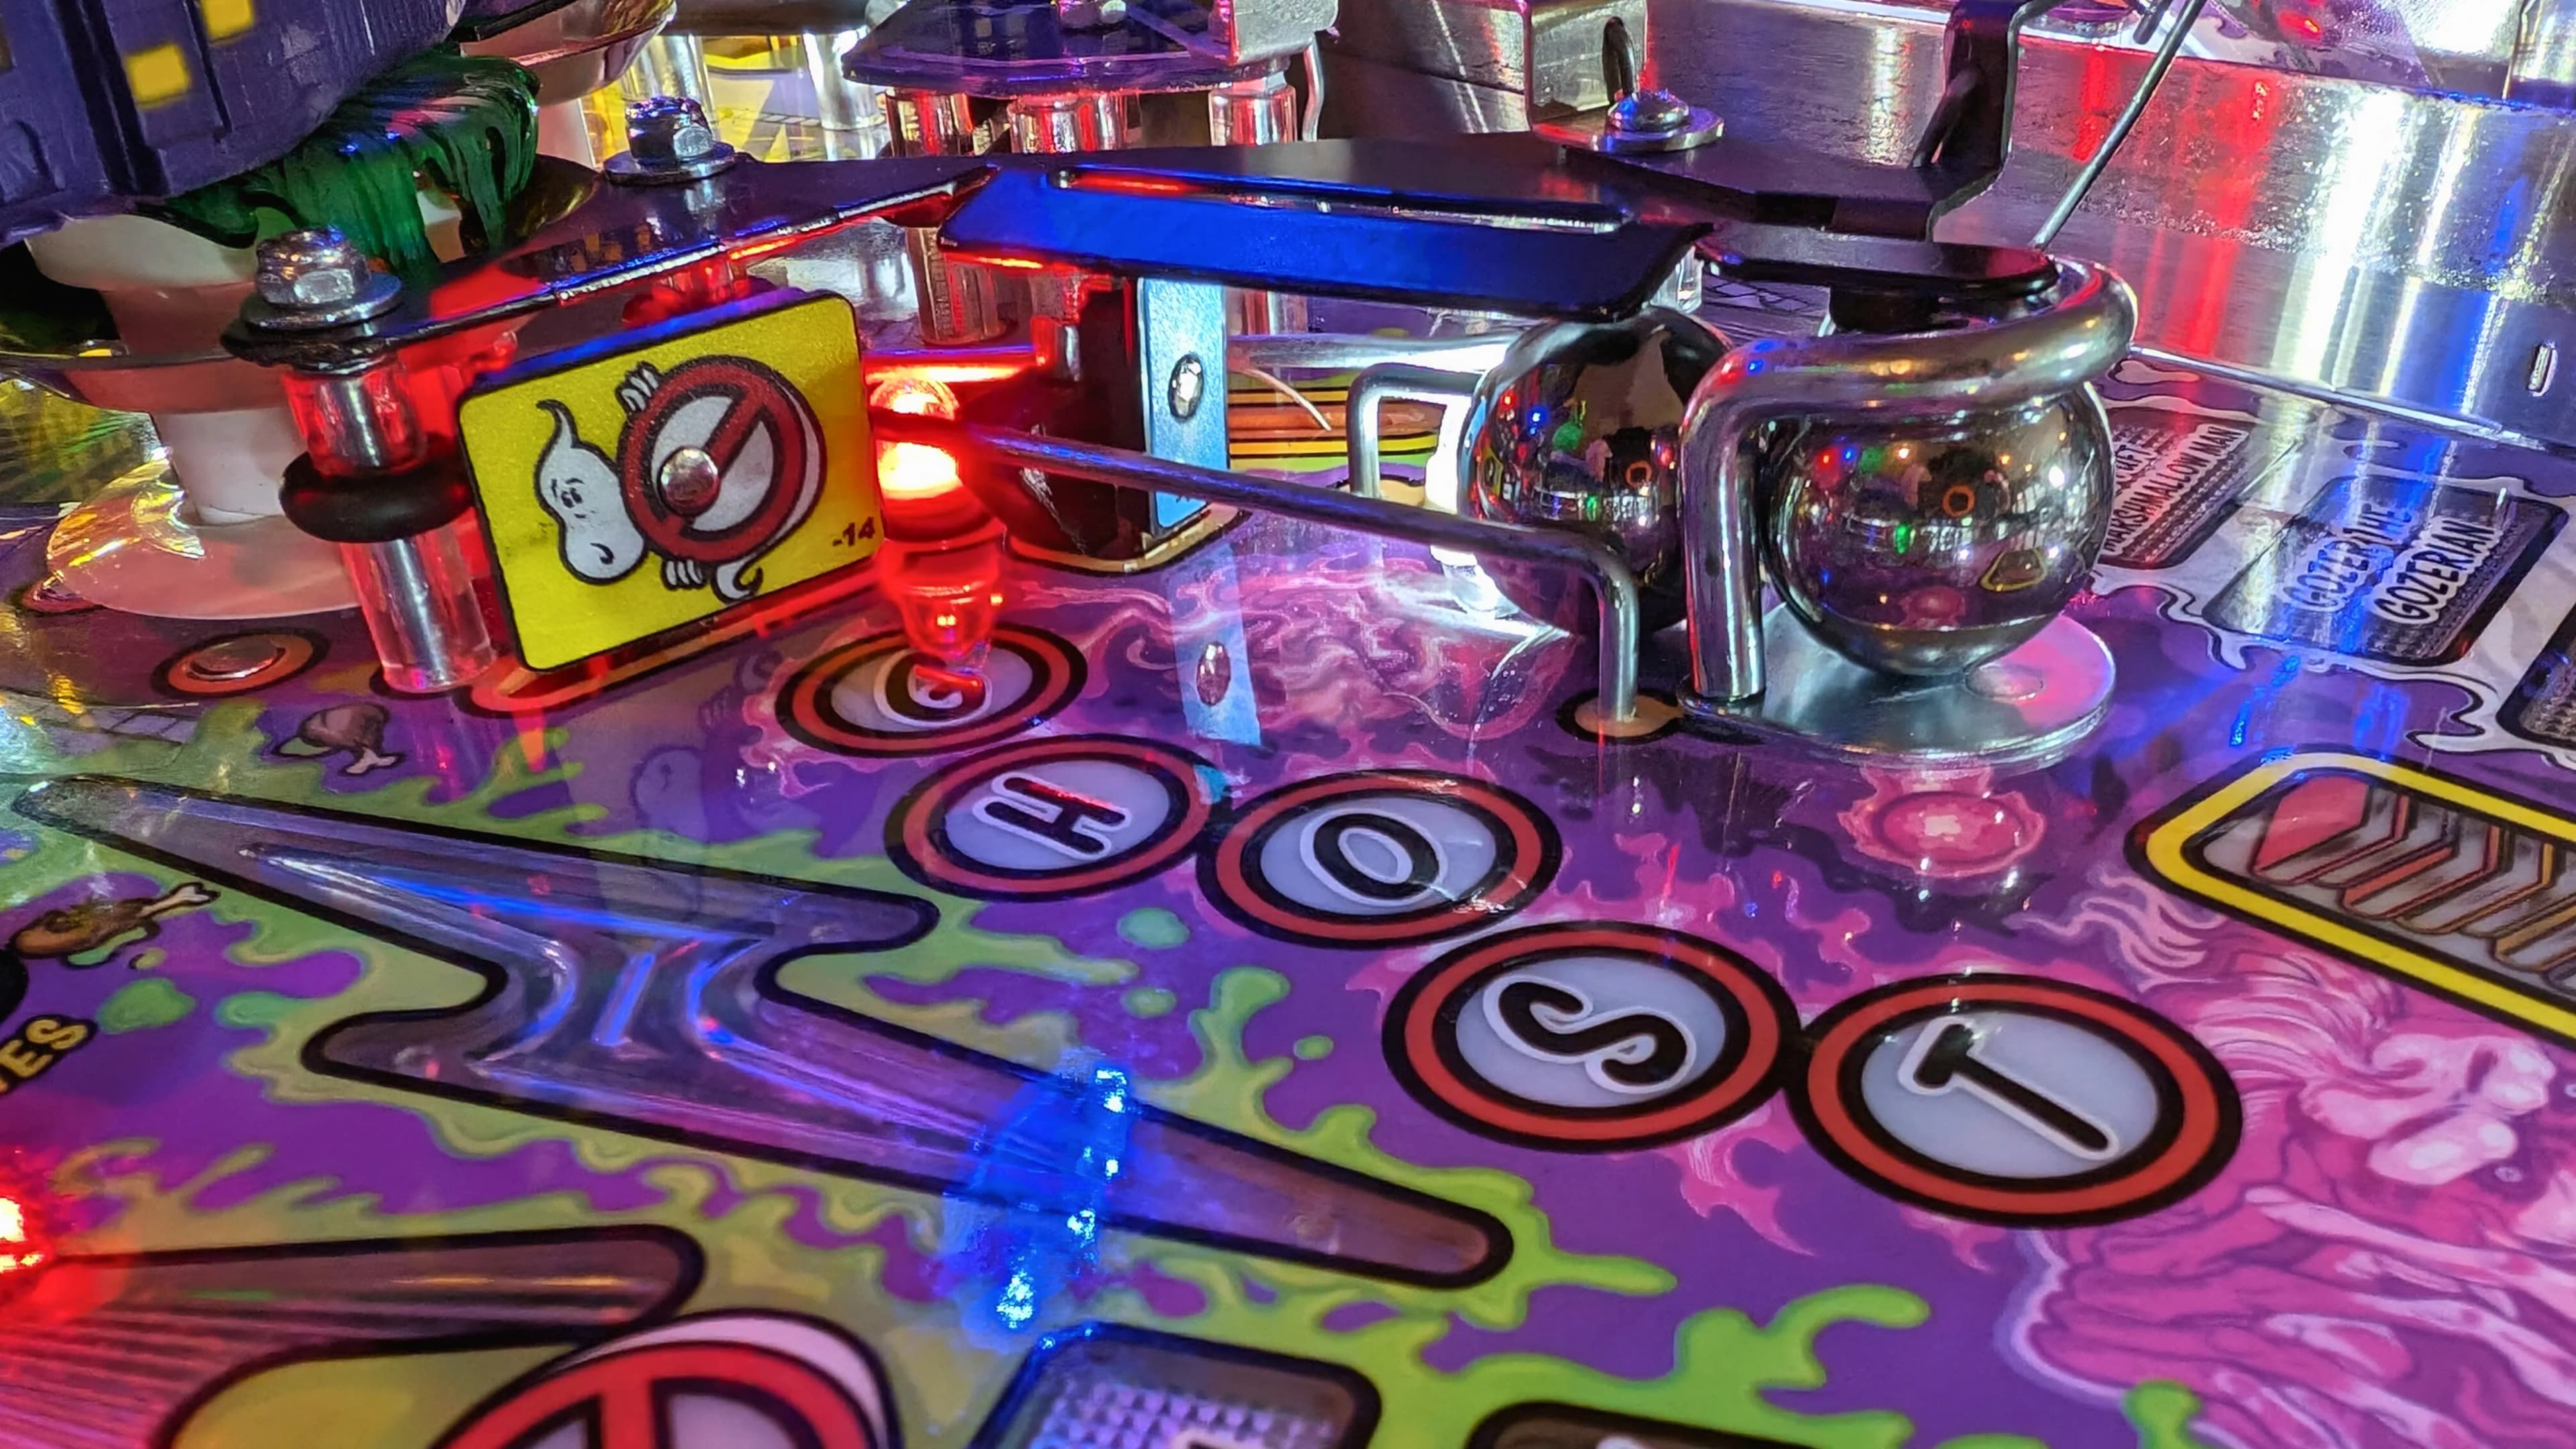
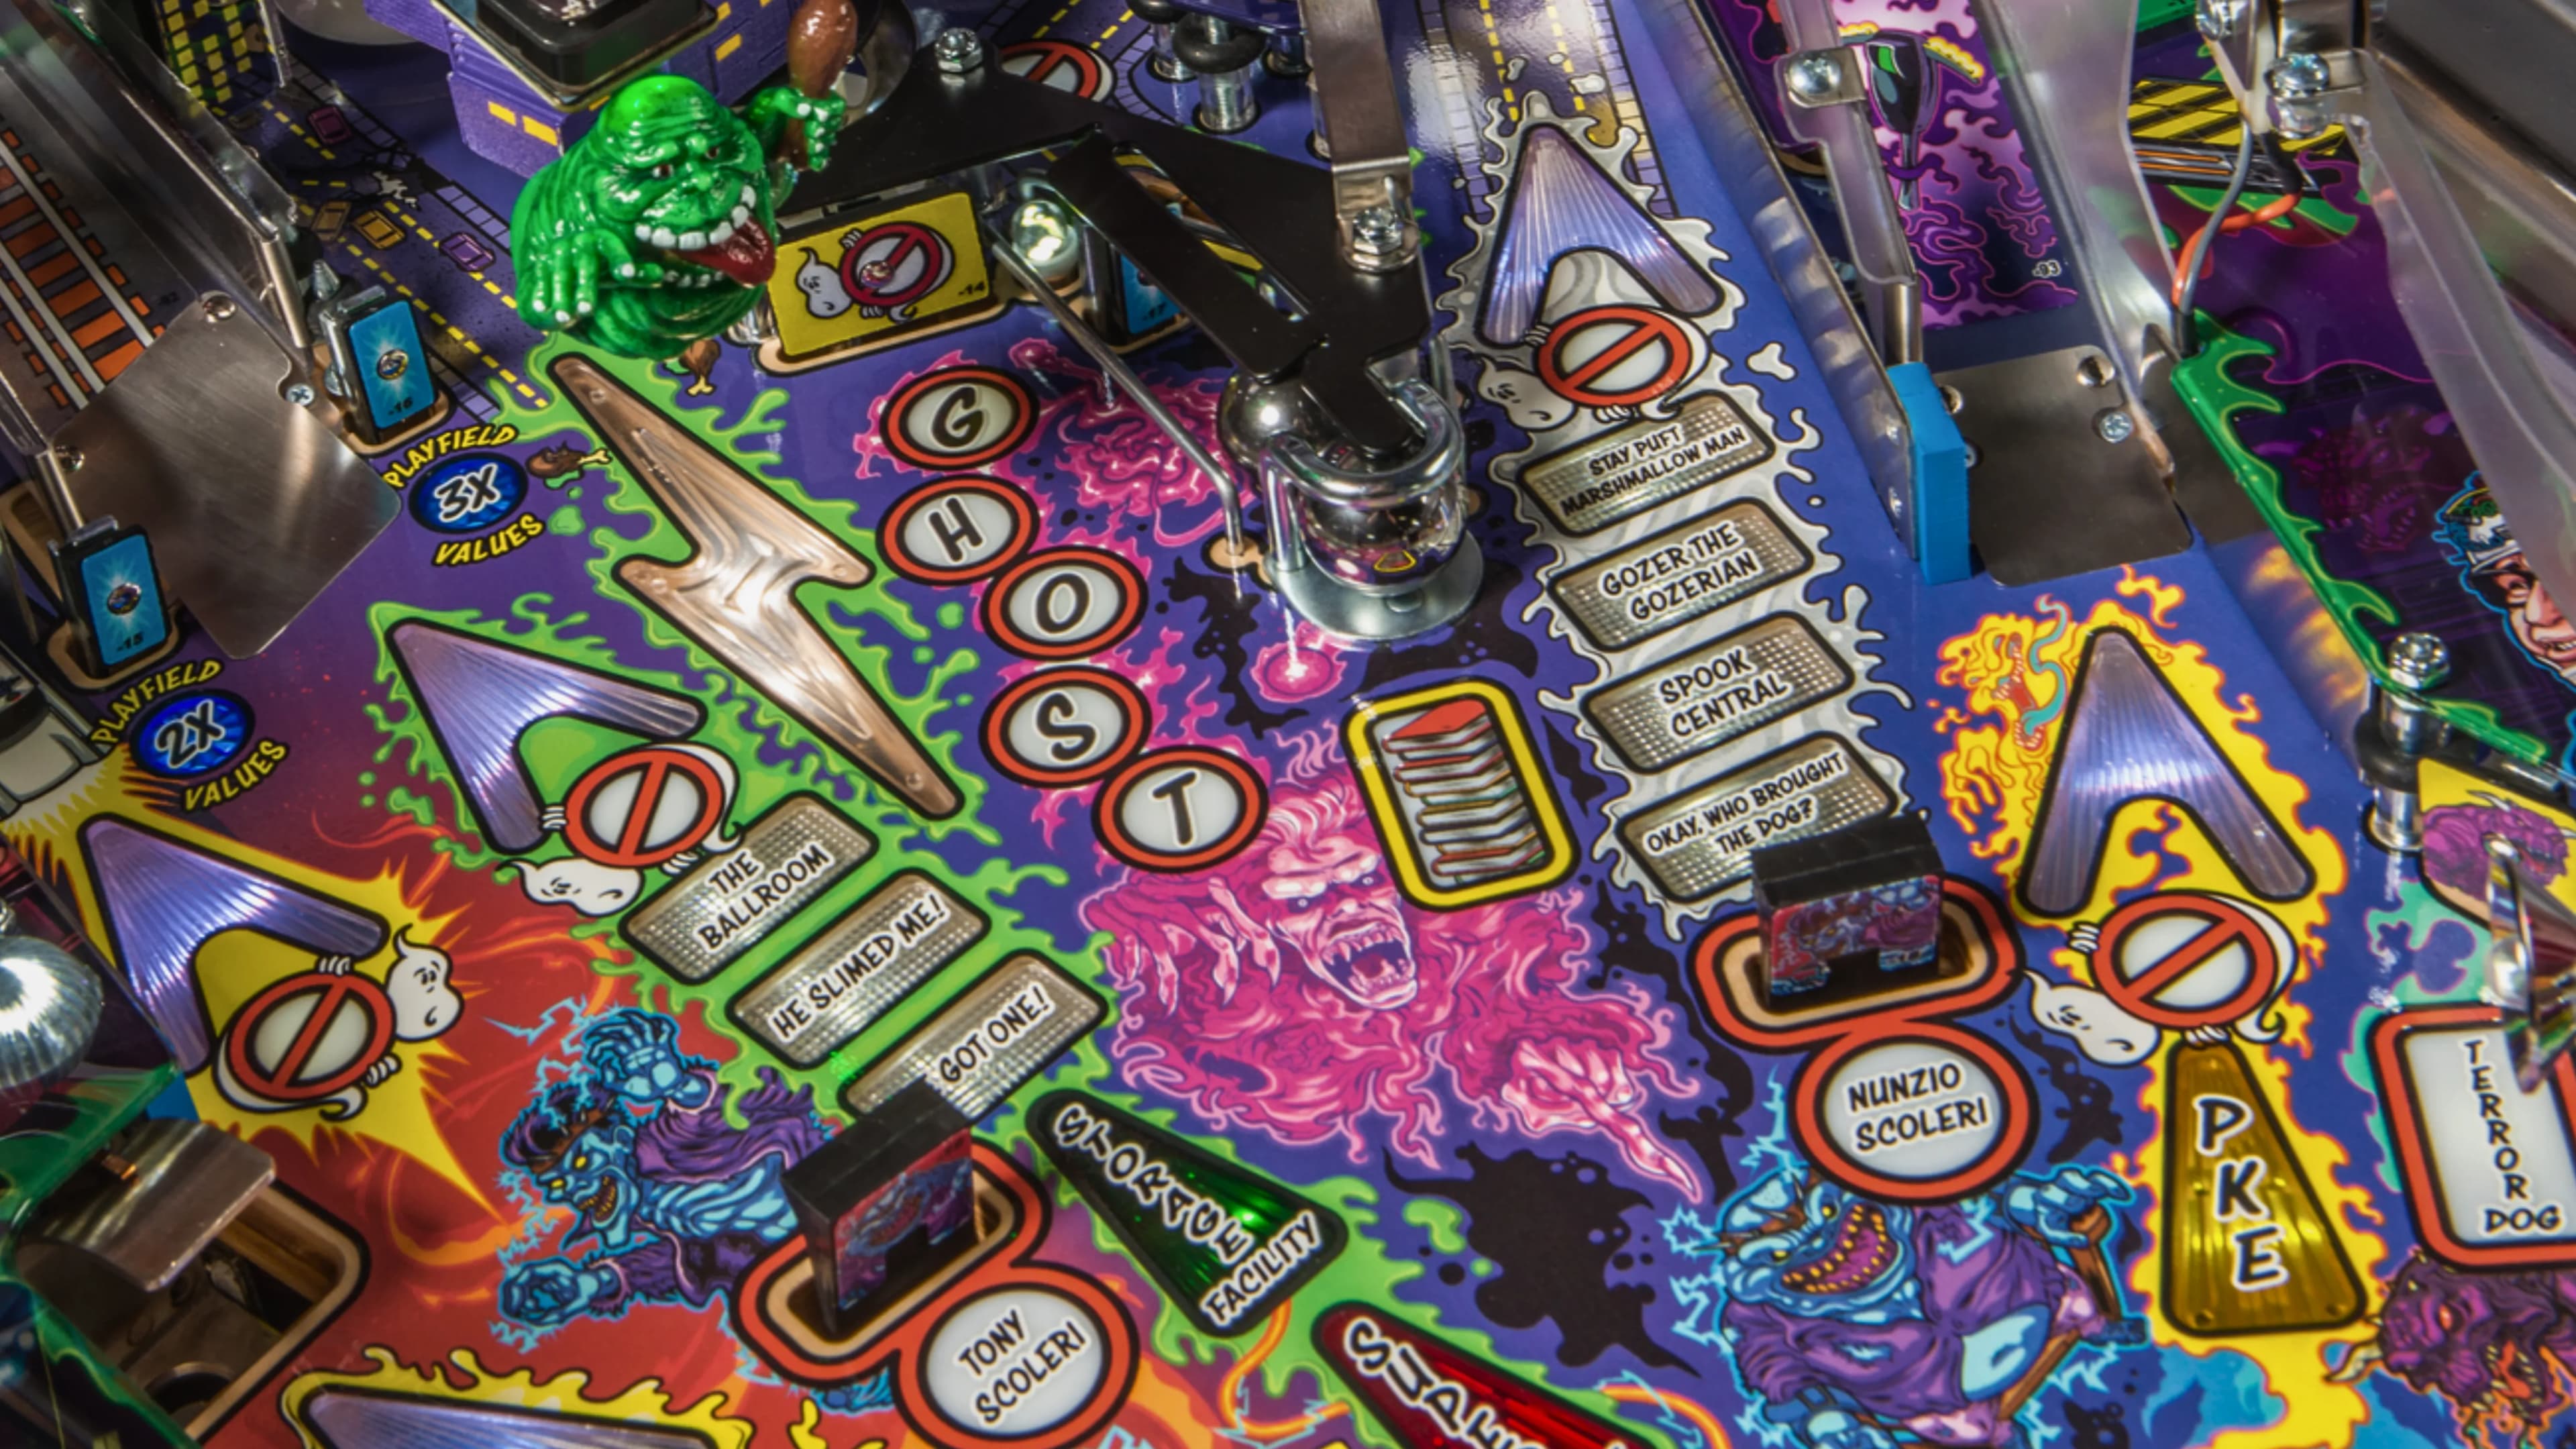
But Ghostbusters isn’t just about major shots - there are several random targets that are big for scoring. Most notably, the GHOST target right up the middle and the captive balls on the left side (and the three-bank of targets right beneath it) are extremely significant for high scores, as they light modes and playfield multipliers, respectively. We’ll go over how in due time, but my point is that they get much more attention than their innocuity would imply.
As with all Stern games of this era, there are two models of Ghostbusters: a Pro and a Premium/LE. The good news is that there are basically no rule differences between the Pro and the Premium; all differences are more or less physical. The Premium has the following changes:
- The right ramp is on a separate rail and will return to the left flipper. (It's also much harder to shoot.)
- The left ramp feeds a subway which can lock balls.
- The right saucer is replaced with a scoop.
- The slingshots are magnets instead of solenoids (in case you need even more chaos-induced).
- Slimer, a ghost who swings down onto the playfield, only moves up and down on the Pro. On the Premium, he also can move left and right. (Functionally, this is the biggest difference.)
The scoring potential is extremely contingent on how nasty the game is acting. If it's being extra mean, you'll be happy you scored 50,000,000. If you have a fighting chance, scoring a billion or more is absolutely possible. Like many recent Dwight Sullivan games, the rules can be very cryptic at times, meaning that the better you understand the game, the better off your scores will be.
Also, I should probably mention the infamous “scare” feature. Sometimes, hitting a scoop will cause the game to go dark for about a second before screaming bloody murder at maximum volume. This has no impact on the game - it happens entirely at random and means nothing more than “Boo! Hahaha!” This may be disabled by the operator, too - but if not, just know that it’s only there to scare you. It does a good job at it, though - it is unbelievably loud.
Getting Started with Ghostbusters Pinball
- Ghostbusters features a very elaborate skill shot which factors into scoring tremendously:
- There are two available shots: a selected top lane and a selected major shot. Plunge the flashing lane, or shoot the flashing major shot to collect the skill shot.
- You choose which shot you want by flipping the flippers before plunging. Different shots/lanes have different awards available.
- Without getting too much into detail, “Start Scene” is usually the best choice early on.
- There are three “sequences” of modes, each started at different shots. Start modes either via a Start Scene skill shot, or by hitting the GHOST target and smashing Slimer a whole bunch.
- Most modes boil down to “shoot flashing shots.” Try to complete all of the modes in one sequence instead of jumping around between sequences, as doing so starts a multiball.
- Gear Combos are made by shooting the left ramp, then the left Captive Ball/bank of targets. Successful Gear Combos light Playfield Multipliers at left ramp targets for 2X, 3X, or a combined 6X playfield.
- 6X playfield is crucial for high scores. A good mode at 6X playfield will be worth more than an entire game at 1X playfield.
- Gear Combos can be worth a lot on their own, too. Repeatedly loop the left ramp before collecting to build up the value.
- Collecting ghosts (at the various Ghost inserts) lights locks for Storage Facility Multiball, which is great for big scores and stacking with modes.
- Ghost collecting also lights other major scoring features, such as video modes, Loopin’ Supers, and PKE Frenzy.
- Super Jackpots will frequently light at the completion of various scoring objectives, even during single-ball play. Contrary to how important - or lucrative - they may seem, they’re seldom worth many points outside of 6X playfield or Loopin’ Supers.
Skill Shots
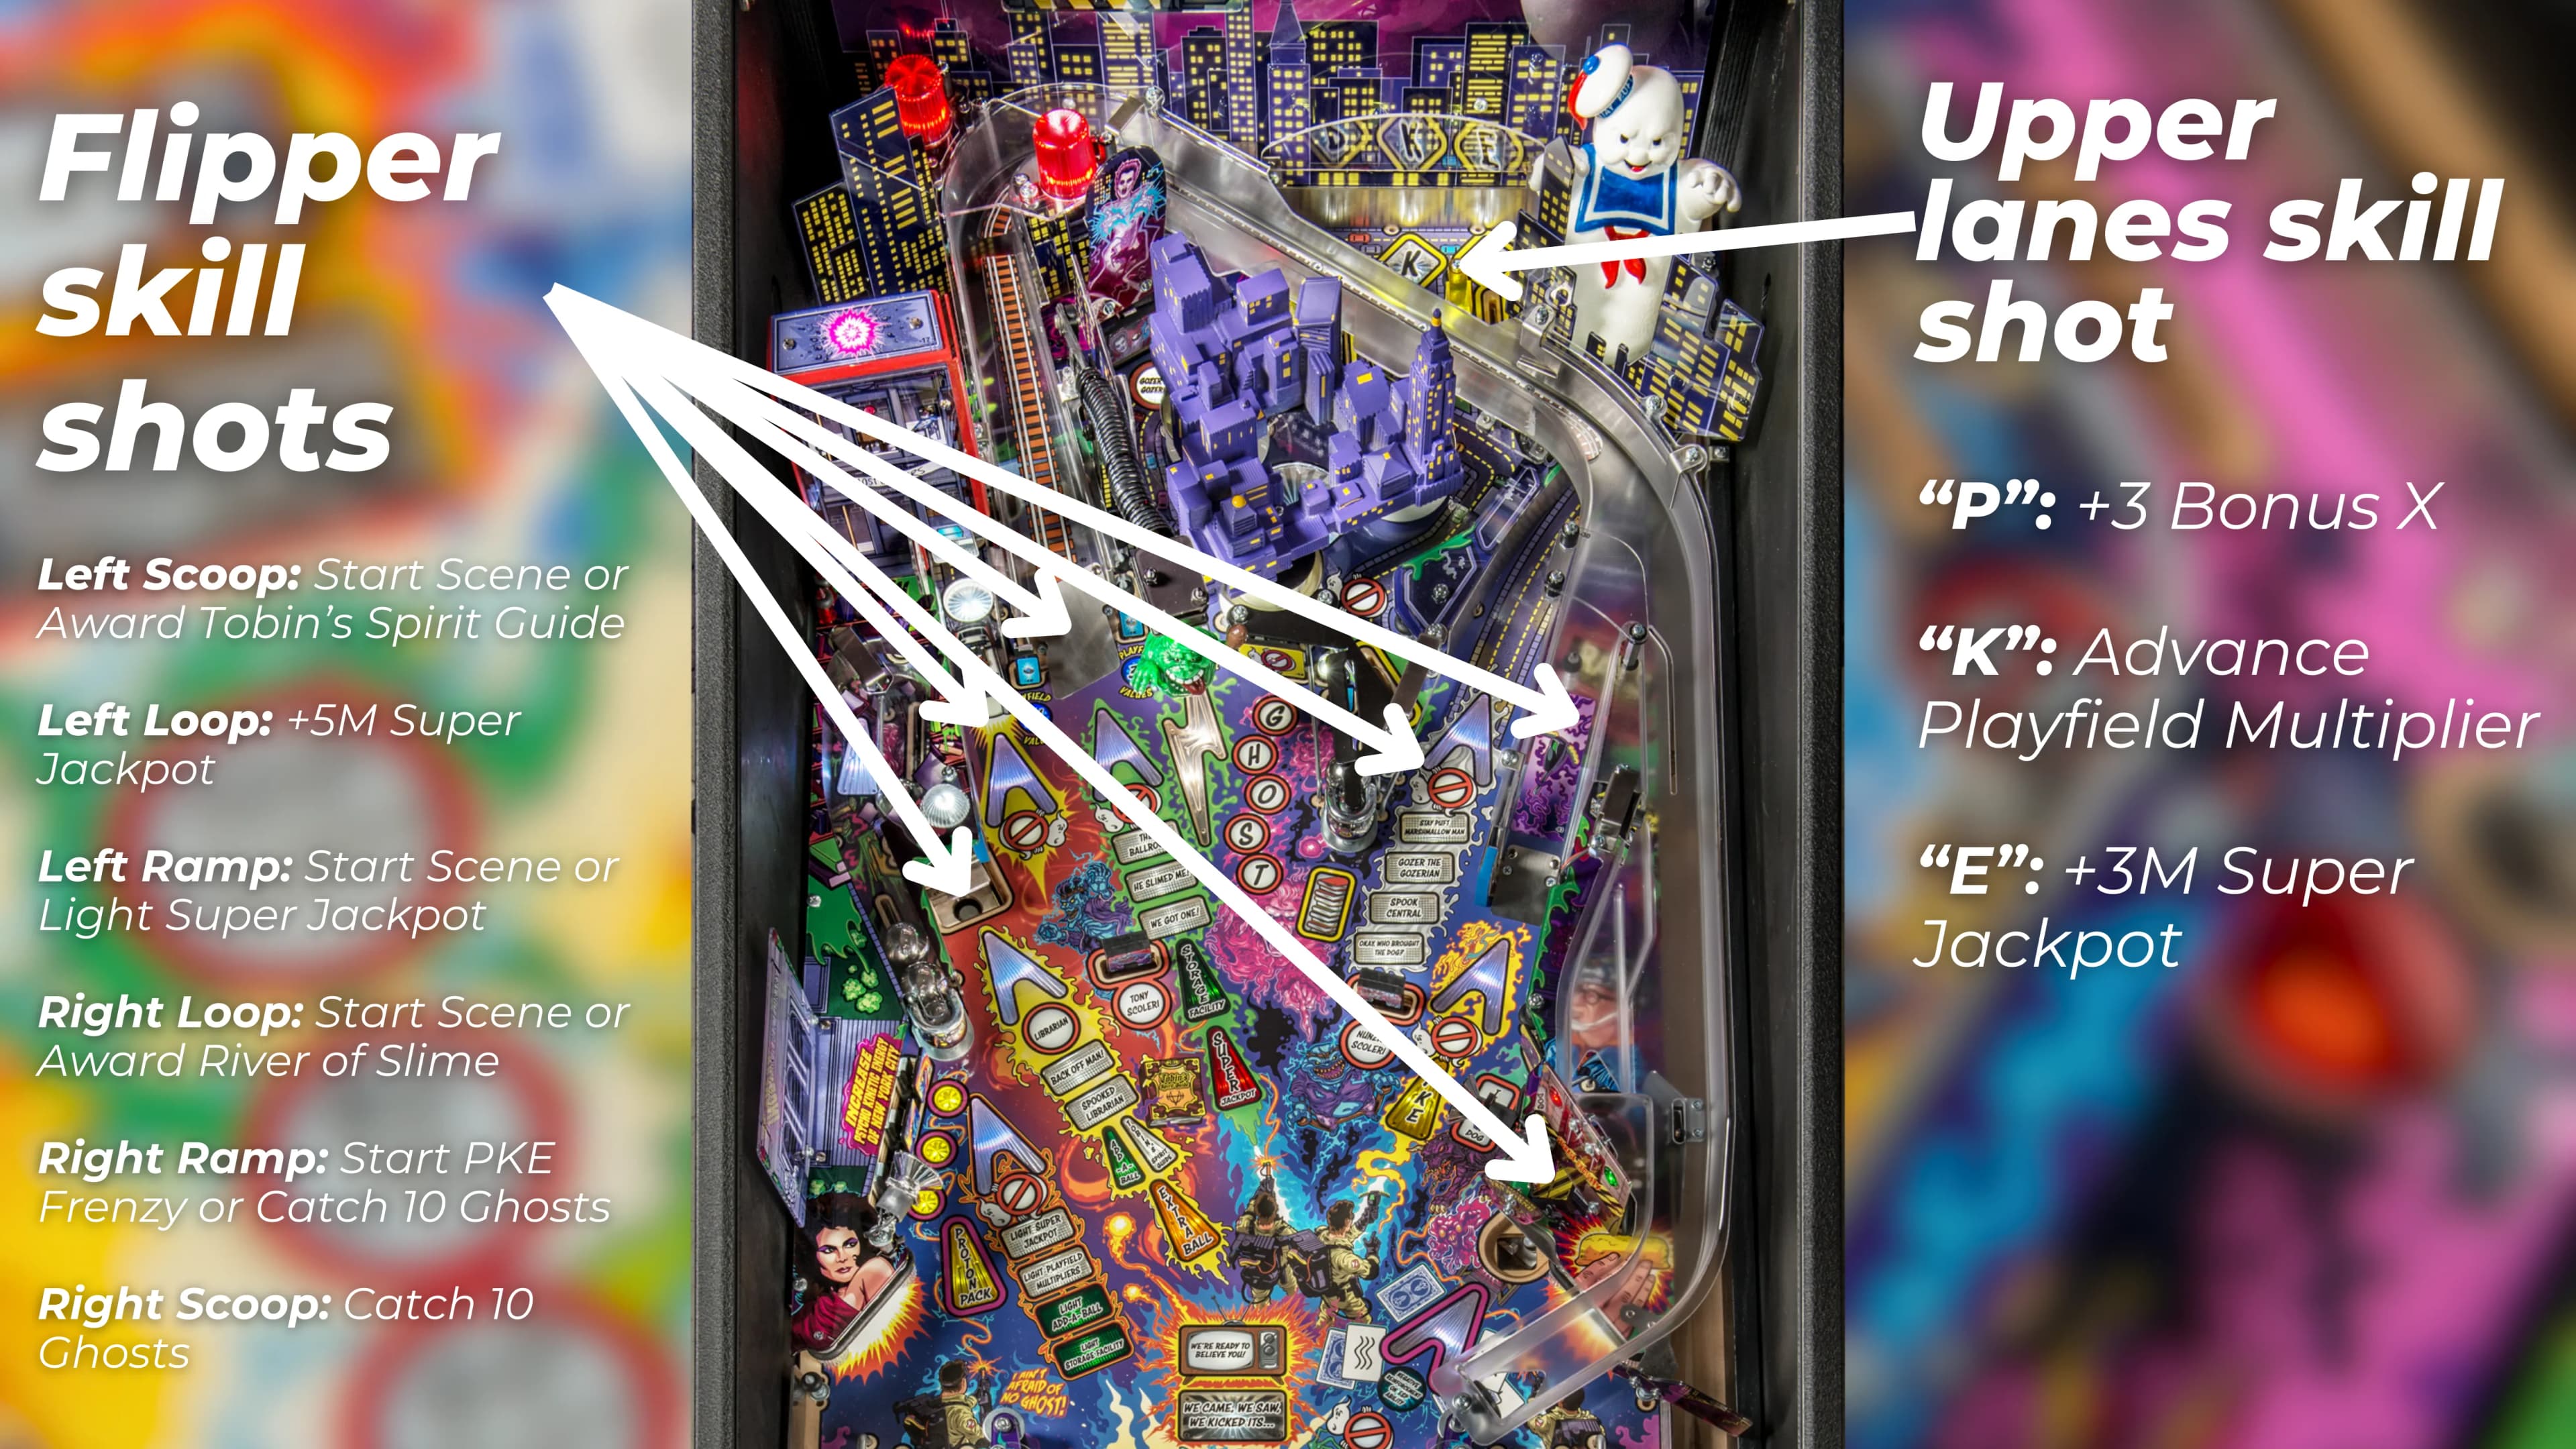
Ghostbusters features the most complicated skill shot in all of pinball. It's also incredibly significant for setting up a good early game, as it allows you to easily light features that are otherwise very difficult to light. The game will tell you to use your flippers to choose your skill shot. If you flip around for a bit, you'll see a blue arrow move around on the playfield, and then you'll most likely ask yourself what the hell is going on. I'll try my best to explain, but bear with me for a minute here, because this is complicated! First off, understand that there are two available skill shots: a top lane skill shot and a flipper skill shot. Let's start with the flipper skill shot.
Flipping the right flipper will move this blue arrow around the playfield. Whichever shot you pick will be lit for a skill shot. After you plunge the ball, if the first major shot you make is to the lit shot, you'll be awarded a skill shot. Otherwise, you miss out on the skill shot. This is not based on time - if you trap up and hold the ball for ten minutes (or if you just flail around without hitting anything), the skill shot will still be lit on the shot you chose. So, you pick a shot, full plunge around, and then make that shot as the first shot of the ball. Easy enough, right?
The complication is that each shot has different awards tied to them. To give an example, the left ramp's award will usually be "Start Scene" (i.e. mode), which means if you pick the left ramp skill shot and make it, you'll start a mode. The left loop will have "+5M Super Jackpot," meaning if you pick the left loop and make that, you'll get that award instead. So it's not just about picking the shot you think you can make, it's about picking a shot which has an award you actually want. We'll go over what you can get from a skill shot as we go, as anything you can get via a skill shot can be collected in some other way.
The top lane skill shot is extremely similar to the major shot ones, but you pick a lane from the top P-K-E lanes instead. Again, each one has a different award tied to it. As is the case with the flipper shot, you can only change the skill shot you’ve selected if the ball is sitting in the shooter lane. So, if you pick P, you have to land in the P lane for the award, and can’t switch to K if it’s looking like it’ll fall in there instead. If you roll over an unlit lane for the skill shot, this will count as missing the shot, so you won't be able to make a flipper shot for the skill shot, either. The reverse is also true - if you miss (or collect) a lower skill shot, you won't be able to collect the top lane skill shot.
In addition to the award shown on the display, a skill shot is also worth a million points, plus 5% of your score. So, if you have 5,000,000 points, your skill shot will be worth 1,250,000, which isn’t super significant. If you have 500,000,000 points, now your skill shot is worth 26,000,000 points. This percentage-based scoring rule causes a rich-get-richer thing to happen - the more points you have, the faster your score will go up. This happens a bunch on Ghostbusters - don’t let a massive scoring deficit intimidate (or comfort) you!
As for the skill shot you should aim for...well, it's pretty subjective, but you have some options. Here's my advice:
- The top lane skill shot is significantly harder than the lower playfield skill shot, namely because it's much tougher to control. The K lane, which lights playfield multipliers, is usually the most valuable skill shot of the three, so if you're gonna go for the lanes, go big or go home.
- If you're shooting to the left (i.e. with the right flipper), consider soft plunging so the ball comes out of the right orbit instead of the left. If you're shooting to the right, full plunge to get the ball around to the left flipper - live catching is better here.
- On some Ghostbusters, if you full plunge and leave both flippers down, the ball will bounce off the left flipper, onto the right, and up into the right saucer. If you want safe points, and that sequence is working, go for that. (This skill shot used to start a very lucrative video mode, that is no longer the case.)
"Start Scene" is a great award as it'll start a mode which is otherwise difficult to start. "Start PKE Frenzy" starts a switch frenzy round which is worth more the later in the game you are, but it's a good way to go for broke if you're desperate for points. Beware that it's on the right ramp, the most difficult shot at the table. To be honest, there's okay value in just about everything else, except for the copious "increase super jackpot" or "light super jackpot" options which are borderline worthless and should be ignored.
Other Constraints
I think before we get into anything else, let's cover some rules which you'll be exposed to regardless of what you're going for.

First off, there are Super Jackpots. Ghostbusters Super Jackpots light at numerous points throughout the game, not just during multiballs. They’re lit by completing various features, which I'll mention as we go, and are collected at the left ramp. The value of the Super starts at 5,000,000 and is increased through skill shots, various mystery awards, and hitting the spinner. While the value of the spinner resets to 5,000,000 at the start of each ball, collecting a super doesn't reset the value. It maxes out at 30,000,000, so it can get to be pretty valuable if you play long enough, but it rarely ever goes that high.
The reason I mention this now is because the game makes a huge deal out of super jackpots despite them rarely being worth anything. 5,000,000 points isn’t nothing, but it’s not exactly substantial. Certainly, not enough value to warrant how big of a deal the game makes of them - the game will scream at you when one is lit, will give you a crazy light show when you collect one, and constantly displays the current value of the super at the bottom of the screen. So, despite how it may seem, supers are not very important for high scores, even though you can boost the value pretty high.
The other thing that's always present are the playfield multipliers. They will light at the two standups next to the left ramp. Hitting the 2X target when lit will start double scoring for about 30 seconds, the 3X target is the same but with triple scoring. A running multiplier is indicated by the target flashing - hitting the target while the multiplier is running will extend the multiplier's time. If you have both multipliers running simultaneously, they multiply each other for 6X playfield scoring.
These are lit in a few ways. The K lane skill shot, as mentioned above, will light one, but it is extremely difficult to make. The easier way to advance multipliers is to complete a Gear Combo by shooting the left ramp and then immediately one-timing the Captive Ball or flashing yellow Gear targets to collect it. Doing so will light the 2X multiplier if it’s not lit and the 3X multiplier otherwise. You can also light multipliers by just repeatedly bashing the captive ball, but it’s a risky shot to make multiple times - best to just hit it once or twice via Gear Combos.
And while I’m at it, those Gear Combos are no joke. You can make a combo with just one ramp, but repeatedly looping the ramp will cause the value of the combo to shoot up very high. While I’d say that it’s not the best strategy if you want those huge scores - especially considering how you relinquish control in order to hit the captive ball - there are players out there who do nothing but shoot Gear Combos and put up great scores. It is a viable strategy, just not one that I’d argue in favor of.
But I digress. If it's not obvious, you want those playfield multipliers running as frequently as possible. Obviously, you don't want to get yourself killed by lighting a multiplier you don't use, but these are so powerful that you need to keep them in your pocket. A decent mode or multiball played at 6X playfield is often worth more than an entire game - a good game, mind you - played at 1X playfield.
One other thing to pay attention to are the pop bumpers and PKE lanes. The pop bumpers award mystery awards every so many hits, which can actually be pretty valuable. It's not worth putting the ball into the bumpers deliberately, but during multiball play, you can get some cool stuff just by parking balls up there. Similarly, completing the PKE lanes advances your bonus multiplier, which can actually be pretty substantial, especially considering the bumpers frequently increase bonus value and bonus X. So, keep completing those lanes when you get the chance.
Starting Scenes
Okay, once I have control of the ball, I like to get started on my modes. Ghostbusters has nine modes called "scenes," which - as one should expect by now - can be very obtuse. Most scenes are pretty straightforward and basically boil down to "shoot blinking shots," though some have complex rules surrounding them for scoring huge values. Scenes cannot be stacked and usually require three or four shots to complete. They also don't usually end by draining, but your progress will be reset if you drain. (So, you don't have to start the mode again if you drain, but you'll have to basically play through the entire mode from scratch.) Modes can, however, time out, which will require you to start them again.
The most unusual aspect of the modes is that they exist as three distinct "sequences," with each sequence representing one act of the film. Each sequence is started at different shots:
- Left Scoop: Spooked Librarian -> Back Off, Man!
- Left Ramp: We Got One! -> He Slimed Me! -> The Ballroom
- Right Orbit: Okay, Who Brought the Dog? -> Spook Central -> Gozer the Gozerian -> Stay Puft Marshmallow Man
You can play the sequences in whatever order you like, but each sequence must be played from bottom to top. For example, you have to complete We Got One before you can start He Slimed Me, but you don't have to play any other modes before you play We Got One. You are also allowed to change sequences without completing one: just because you play We Got One doesn't mean the next mode you play needs to be He Slimed Me - it could be from one of the other two sequences instead. (But, you don't want to do this. We'll go over why in a minute.)
Modes are lit in a couple of ways. The easiest method is by collecting a “Start Scene'' skill shot, which will start whatever mode is next lit at that shot (e.g., collecting a left ramp Start Scene skill shot will start the next left ramp mode), so many players will opt for that as their initial skill shot. You also light a new mode by completing a mode, so as long as you don't time any modes out, you can keep your mode train rolling. (As a heads up: the last mode in each sequence will need to be restarted if drained, but you won't have to relight a mode.) If neither of those work - i.e., you missed your Start Scene skill shot - you'll have to fight Slimer, which you want to avoid doing since it’s the most difficult method.
Hitting the GHOST target when you don’t have a mode lit will cause Slimer to lower onto the table. Hit him enough times, and your modes will light. (On the Pro, Slimer will always hang out in front of the left ramp. On the Premium, he moves around a bunch and can occasionally appear in the AR "Ecto Goggles" over the right orbit.) Aside from lighting your modes, hitting Slimer also causes slime to appear on the playfield (i.e., shots will light up green), and clearing all of the slime up (hitting all green shots) will light a super jackpot.
With Slimer, it's all about how you follow through your shots. Avoid shooting into the GHOST target since it's a dangerous shot. The bumpers are a little better, but still risky with that left feed. The best way to handle Slimer is to follow through on the left ramp - not only is this relatively loopable, it's a safe way to keep control. Of course, it's best to just avoid needing Slimer in the first place, hence why getting that Start Scene skill shot is so important.
The detailed mode descriptions are included below for anyone who's interested, but the general idea is "shoot blinking lights to progress," and starting modes should be sufficient in most contexts. Try to keep your modes running at all times, since you'll squeeze some extra value out of everything you have running. Moreover, try to complete those sequences, as completing any sequence starts a multiball worth considerable value. (Just as a heads-up: the number of balls in the multiball is equal to the number of modes in the sequence you finished. So, even though the 2-mode sequence seems easy enough to get to the multiball, it's also the multiball with the fewest balls in play.)
To reiterate: light modes either through skill shots, completing modes, or by fighting Slimer (which you start by hitting the GHOST target). Try to beat all of the modes in one sequence so you can get to the multiball at the end.
Storage Facility Multiball
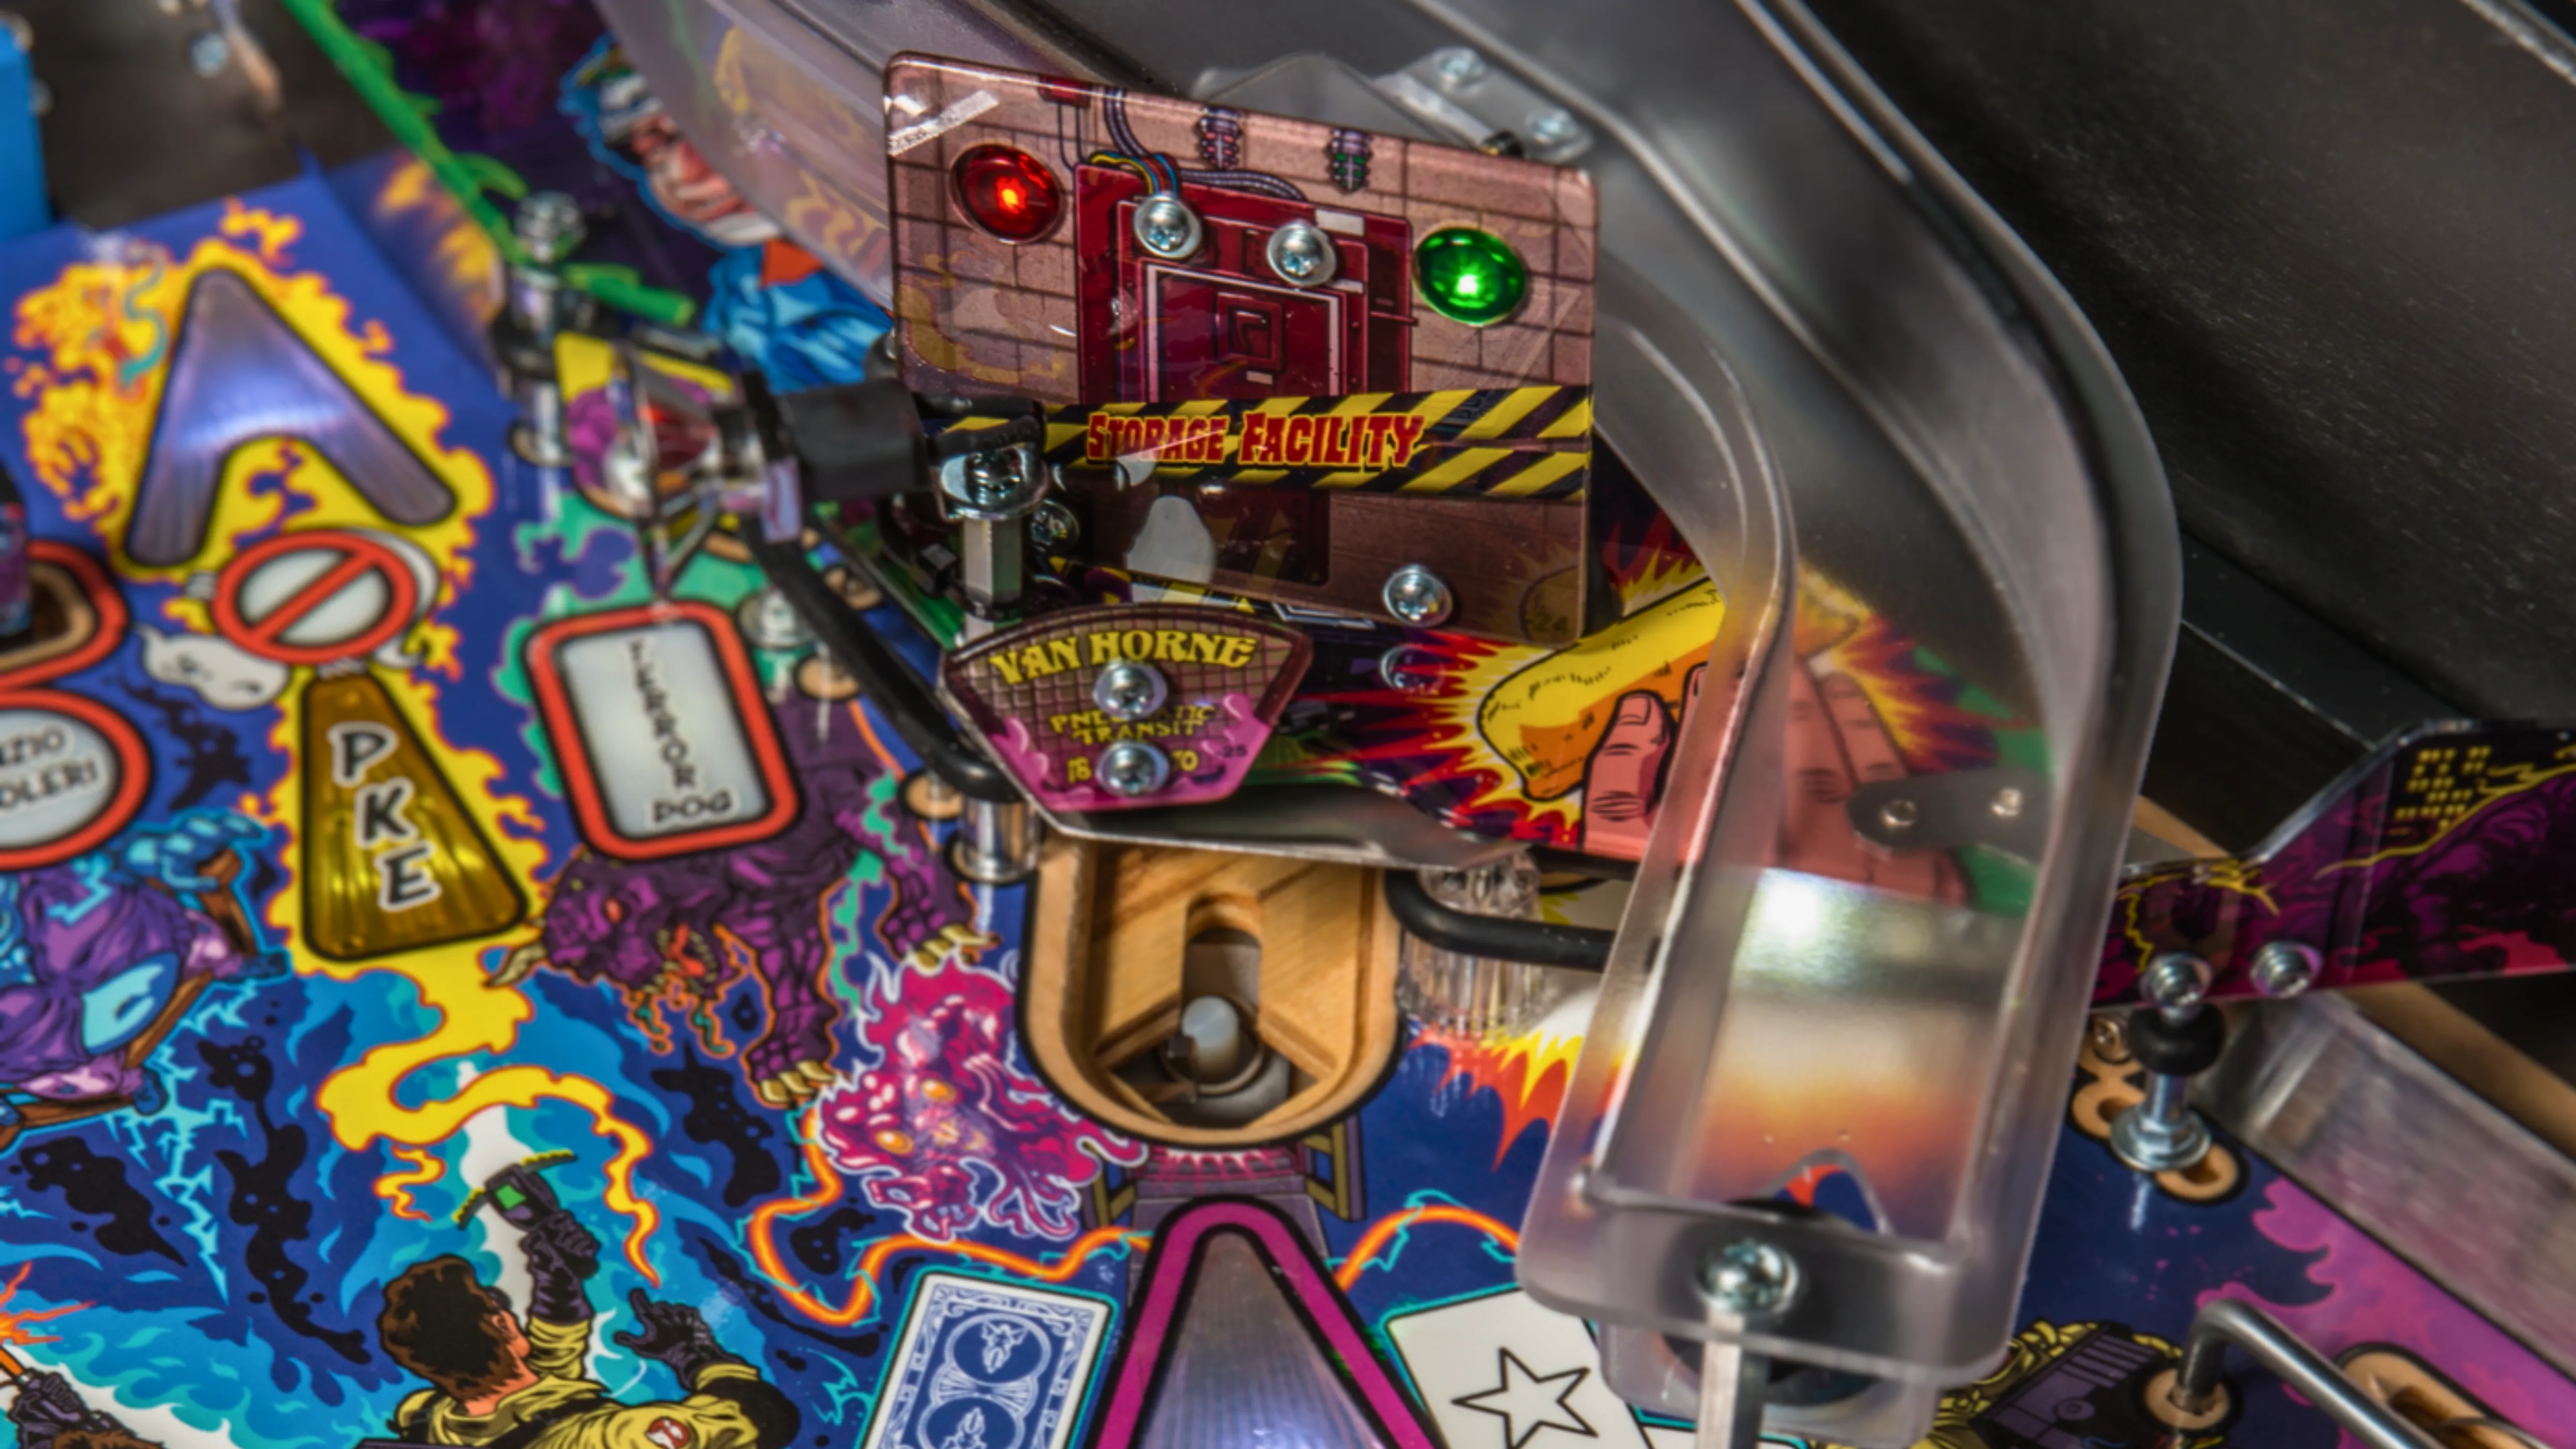
This is the main multiball of the game, and there are two ways to light locks for it. Method 1 is by repeatedly bashing the captive balls on the left side of the playfield until locks light. Method 2 is by collecting ghosts. Scattered around the playfield are these Ghostbuster logo inserts, hitting a lit one will catch a ghost. It's kinda like the Walkers from The Walking Dead, except Ghosts give more varied awards. I believe the easiest way to light ghosts is to hit the center captive ball, but I usually just find ghosts are constantly getting lit all over the place just through random bounces, so I don't ever really run out of them or anything. Anyway, collecting ten ghosts lights a lock, as does every twenty ghosts after that (so 30, 50, 70...), which can be safer than shooting the captive balls on the left.
In any case, you can stack as many locks as you like and collect them on the left ramp. During Storage Facility, all lit ghosts are jackpots (and still count as ghosts), collecting all of the jackpots lights three supers at the left ramp and relights all jackpots. You can light an add-a-ball at the scoop, again, by hitting the captive balls.
Storage Facility really doesn’t have very much strategy to it. It’s basically a frenzy of jackpots, which if you’re at 3X or 6X playfield, will typically be more valuable than a 1X super. Personally I just like to flail around for a minute, then shoot at whatever ghosts I can get. Definitely take your time to focus on those captive balls, though - the add-a-ball is nice, but you’re also going to progress to those playfield multipliers which you should definitely have running at the same time.
You can bring a scene into Storage Facility, as you probably should, but completing a scene during Storage Facility won’t light more scenes until Storage Facility ends.
Other Ghost Awards
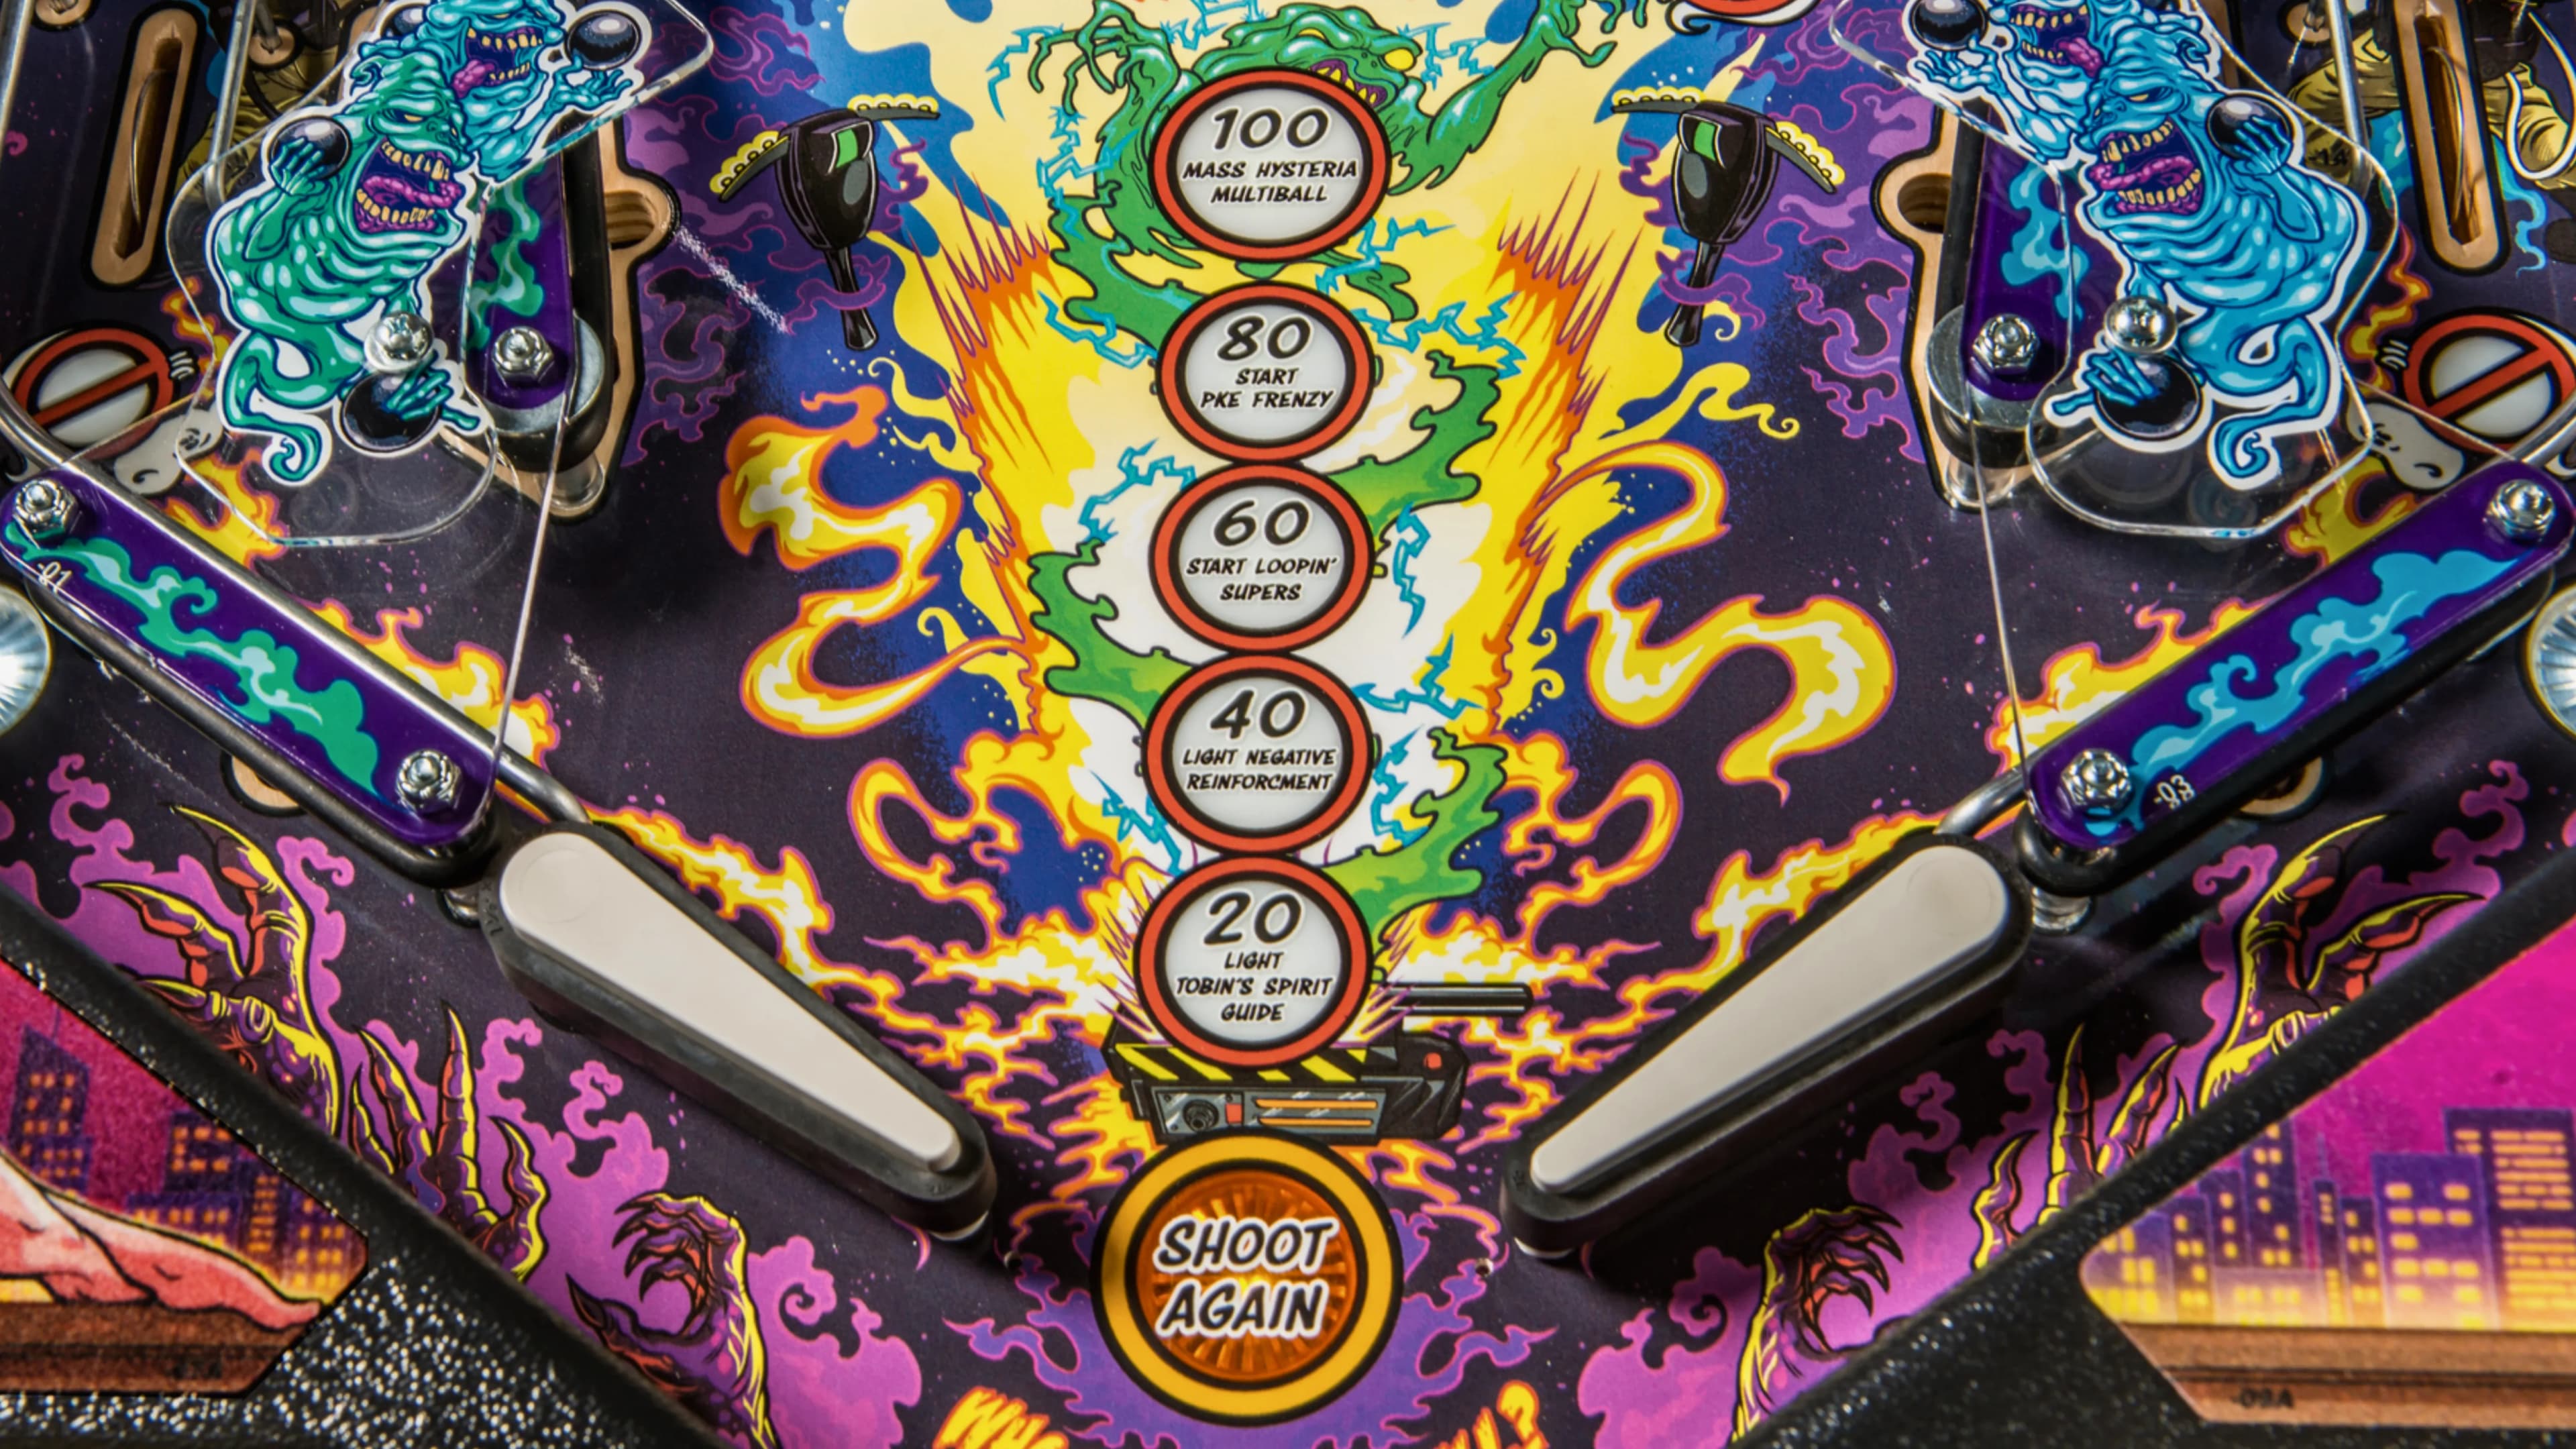
The playfield inserts above the flippers count up in increments of 20, each one listing a different award. These are referring to the number of ghosts you’ve collected. Many of these awards can be collected through other means, but it’s good to be aware of these five bonuses since they can be pretty nice from time to time.
At 20, you get Tobin’s Spirit Guide, which is a mystery award collected at the left scoop. This mystery award is a bit weird, it’ll flip through a few different possible awards (like many mystery awards do) and stop on one page listing three to five different things. What’s not clear is that it gives you all of them, so it’s a pretty nice pile of bonuses. Some of them are pretty useless (increase spinner value), some are pretty great (light Storage Facility), and one award just relights Tobin’s Spirit Guide which I find very funny. You can also get this award on a skill shot to the left scoop when a scene is running, or if you’ve completed all left scoop scenes.
At 40, you get Negative Reinforcement on ESP Ability, which is a video mode started at the right saucer/scoop. However, you get a choice of two different video modes, both of which are actually pretty fun!
- Option 1 is Don’t Cross the Streams which involves flipping the flippers to move two streams inward and catch ghosts. If a ghost stays on screen for too long, you lose. The trick here is to not overreach, have each flipper be responsible for one half of the screen and cross your fingers that ghosts don’t show up and block you from getting to an older ghost. Completing the mode is worth ~60,000,000, which is a pretty nice payday, but it takes a little bit of practice.
- Option 2 is Negative Reinforcement on ESP Ability which has you pick cards to determine your psychic prowess. The mode will set a value of 250,000 and repeatedly ask you to pick one of two cards, or to cash out and collect the value. If you pick the correct card, the value will double, and the process will repeat. If you pick the wrong card, you lose everything. There’s no way to determine which one is the correct card; it’s all random chance. In order for it to be comparably valuable to Don’t Cross The Streams, you need to get it correct 8 times in a row, which you have less than a 1% chance of happening, so pick Streams every time.some text
- Unless, of course, the game is set to competition mode. In that case, you’re guaranteed one correct guess plus an extra correct guess for every 10 ghosts you’ve collected. At 70 ghosts, that’s a guaranteed 64,000,000 points, which makes it the better choice if you’re that far along. Be sure to note how many ghosts you’ve collected before guessing, though - the game sure won’t tell you anything.
At 60, you get Loopin’ Supers, which is a timed mode during which the left ramp is lit for infinite supers. Even though supers aren’t as important as the game implies, being able to loop the most loopable shot in the game for supers is extremely lucrative, even if the super’s at a minimum value of 5,000,000 points. Besides, Loopin’ Supers locks you out of just about everything else, so what else were you going to do anyway? Loop some supes! (And bring in some multipliers if you can help it.)
At 80, you get PKE Frenzy, a timed switch frenzy that can be worth solid points. The value of the switches are determined by your PKE Level, which is mainly increased through bumper hits. There’s also a multiplier which increases with rapid switch hits and which decays over time, meaning the more switches you’re hitting, the higher the multiplier will grow. PKE Frenzy becomes significantly more valuable the later in the game you get, especially after a particularly active multiball. But otherwise, there’s not too much to it: shoot the spinner to feed the bumpers and hope you get a lot of hits. Jackpots will light at the right ramp, so pick those off when you can.
As mentioned earlier, PKE Frenzy is also available as a skill shot to the right ramp. I’ve seen many players - myself included - who are unfamiliar with the game often go after PKE Frenzy off of the skill shot in situations where they’re desperate for points, but it’s not really the best idea. If you have less than 20 or 30 million points on the board, PKE is unlikely to be worth very much. If you’re trying to get a foothold, take a skill shot for a scene instead - they’re worth more and are easier skill shots, anyway! That said, if you start it via 80 ghosts, your PKE level is likely going to be high enough for it to be very lucrative, even more so if you stack it with a Storage Facility multiball. Definitely be sure to capitalize on it as much as you can.
At 100, you get Mass Hysteria Multiball, a multiball with conventional flashing jackpots available around the table. Less conventionally, the flipper buttons will be reversed as you play it - the left button will control the right flipper, and the right will control the left. If you’re familiar with The Simpsons Pinball Party’s Mystery Spot, you’ll know that the strategy to surviving a flipper reversal is to cross your arms - put your left hand on the right flipper button and vice-versa - which tricks your brain into flipping correctly. To make this multiball more annoying, hits to the captive ball will fix the flipper reversal temporarily, meaning you’ll have to cross and uncross to make it work.
Mass Hysteria could probably be considered a mini-wizard mode - reaching it is no easy task. After playing it, the “ghost meter” up the middle of the playfield will reset, and you can progress through all of the awards again.
Detailed Scene Descriptions
For those who are interested in learning the nitty-gritty of the scene rules, this is for you. But honestly, I don’t think it’s that important to learn considering that you’re unlikely to play most scenes anyway, most scenes boil down to “shoot blinking lights,” and it’s far more important to play scenes in sequence than it is to play the most valuable scene available. (Generally speaking, though, the further up the ladder you get, the more lucrative the scenes become.)
To reiterate, there are three sequences of scenes, which must be played in order. You can jump from sequence to sequence, but it’s better to complete an entire sequence as you get a mini-wizard mode for doing so. Depending on how the game is set, it is possible for modes to “chain,” meaning that the final shot of one mode can start another mode if there are modes available at that shot. (For instance, if you made the last shot for Spooked Librarian to the right orbit, Okay, Who Brought The Dog could immediately start.) This is not the default setting, but if the game is set that way, avoid chaining modes in different sequences.
It’s also possible for modes to carry over from ball to ball if incomplete, meaning if you drain with a mode running, you’ll still be playing that mode at the start of your next ball. By default, this only happens for the last mode in each sequence, but the game can be set to do it for all modes or for none of them. In any case, it’s not exactly something you’d rely on, but it’s good to be aware of it.
- Act I scenes - Left Scoop
- The first mode here is Spooked Librarian, which lights various shots for points. Flashing shots are worth more, three shots finishes the mode.
- Second is Back Off, Man!, which will light a whole bunch of shots, then shots on the right side, back and forth. The shots on the right side will gradually move to the left, hitting the left scoop will finish the mode.
- Act II scenes - Left Rampsome text
- First is We Got One!, which has you alternate left shots and right shots three times to finish the mode.
- Second is He Slimed Me, which is reminiscent of the Stark mode from Game of Thrones: shoot the ramp repeatedly to build up a jackpot value, three ramps lights the collect at either loop.
- Finally, there’s The Ballroom which is a rather elaborate shot sequence.some text
- Shoot all flashing major shots for points.
- Slimer will come down; hit him three times. Each hit lights a super jackpot, but those aren’t required for completion and do not stack.
- Shoot the spinner and right ramp.
- Shoot the left ramp to complete.
- Act III scenes - Right Loopsome text
- Okay, Who Brought The Dog? lights the left loop, left ramp, and right loop for points. Hit all three to finish the mode.
- Next is Spook Central, which starts with a hurry-up on the left ramp. Collecting the hurry-up establishes the shot value for four remaining shots, collect all four to finish the mode. Kinda like TNG’s Asteroid Threat, Spider-Man’s Bank Bust/Ock’s Oscorp Outing, Kiss’ Love Gun, etc.
- Third is Gozer the Gozerian, which is a bit contrived, but similar to He Slimed Me. It consists of three phases.some text
- Phase 1 has you shoot the right orbit or Terror Dog target (between the right saucer and right ramp) to build the value, then shoot the right ramp to collect.
- Phase 2 has you shoot the left ramp to build the value, then shoot the Gozer target (in the rear left of the bumper area) to collect.
- Phase 3 has you shoot all lit shots, then collect at Gozer again to complete.
- Finally, we have the climactic Stay Puft Marshmallow Man battle. This mode has four phases.some text
- Phase 1 has you shoot one of any four lit shots, each one corresponding to a multiplier which will be applied to the entire value of the mode. Try to pick off a high multiplier quickly - they decay until collected.
- Phase 2 lights all shots for points, with each shot increasing the value of the next shot in the mode. Lasts for 20 seconds. If you drain during Phase 2, it’ll start over (with 20 seconds on the clock) at the start of the next ball.
- Phase 3 starts immediately afterwards, during which you have to make all three lit shots to complete. The shot value is preserved from phase 2 - so the more shots you make there, the more valuable these shots will be, too.
- Phase 4 has you shoot the right loop, which will trap the ball, then prompt you to shoot the right loop again to collect a hurry-up and finish the mode.
Yes, it’s a lot to go over. But again, I’d argue that memorizing these sequences isn’t super important. Shoot blinking shots and prioritize completing a sequence over playing the most lucrative mode. You want to complete sequences as doing so starts....
We Came, We Saw, We Kicked Its...
(....its what?)
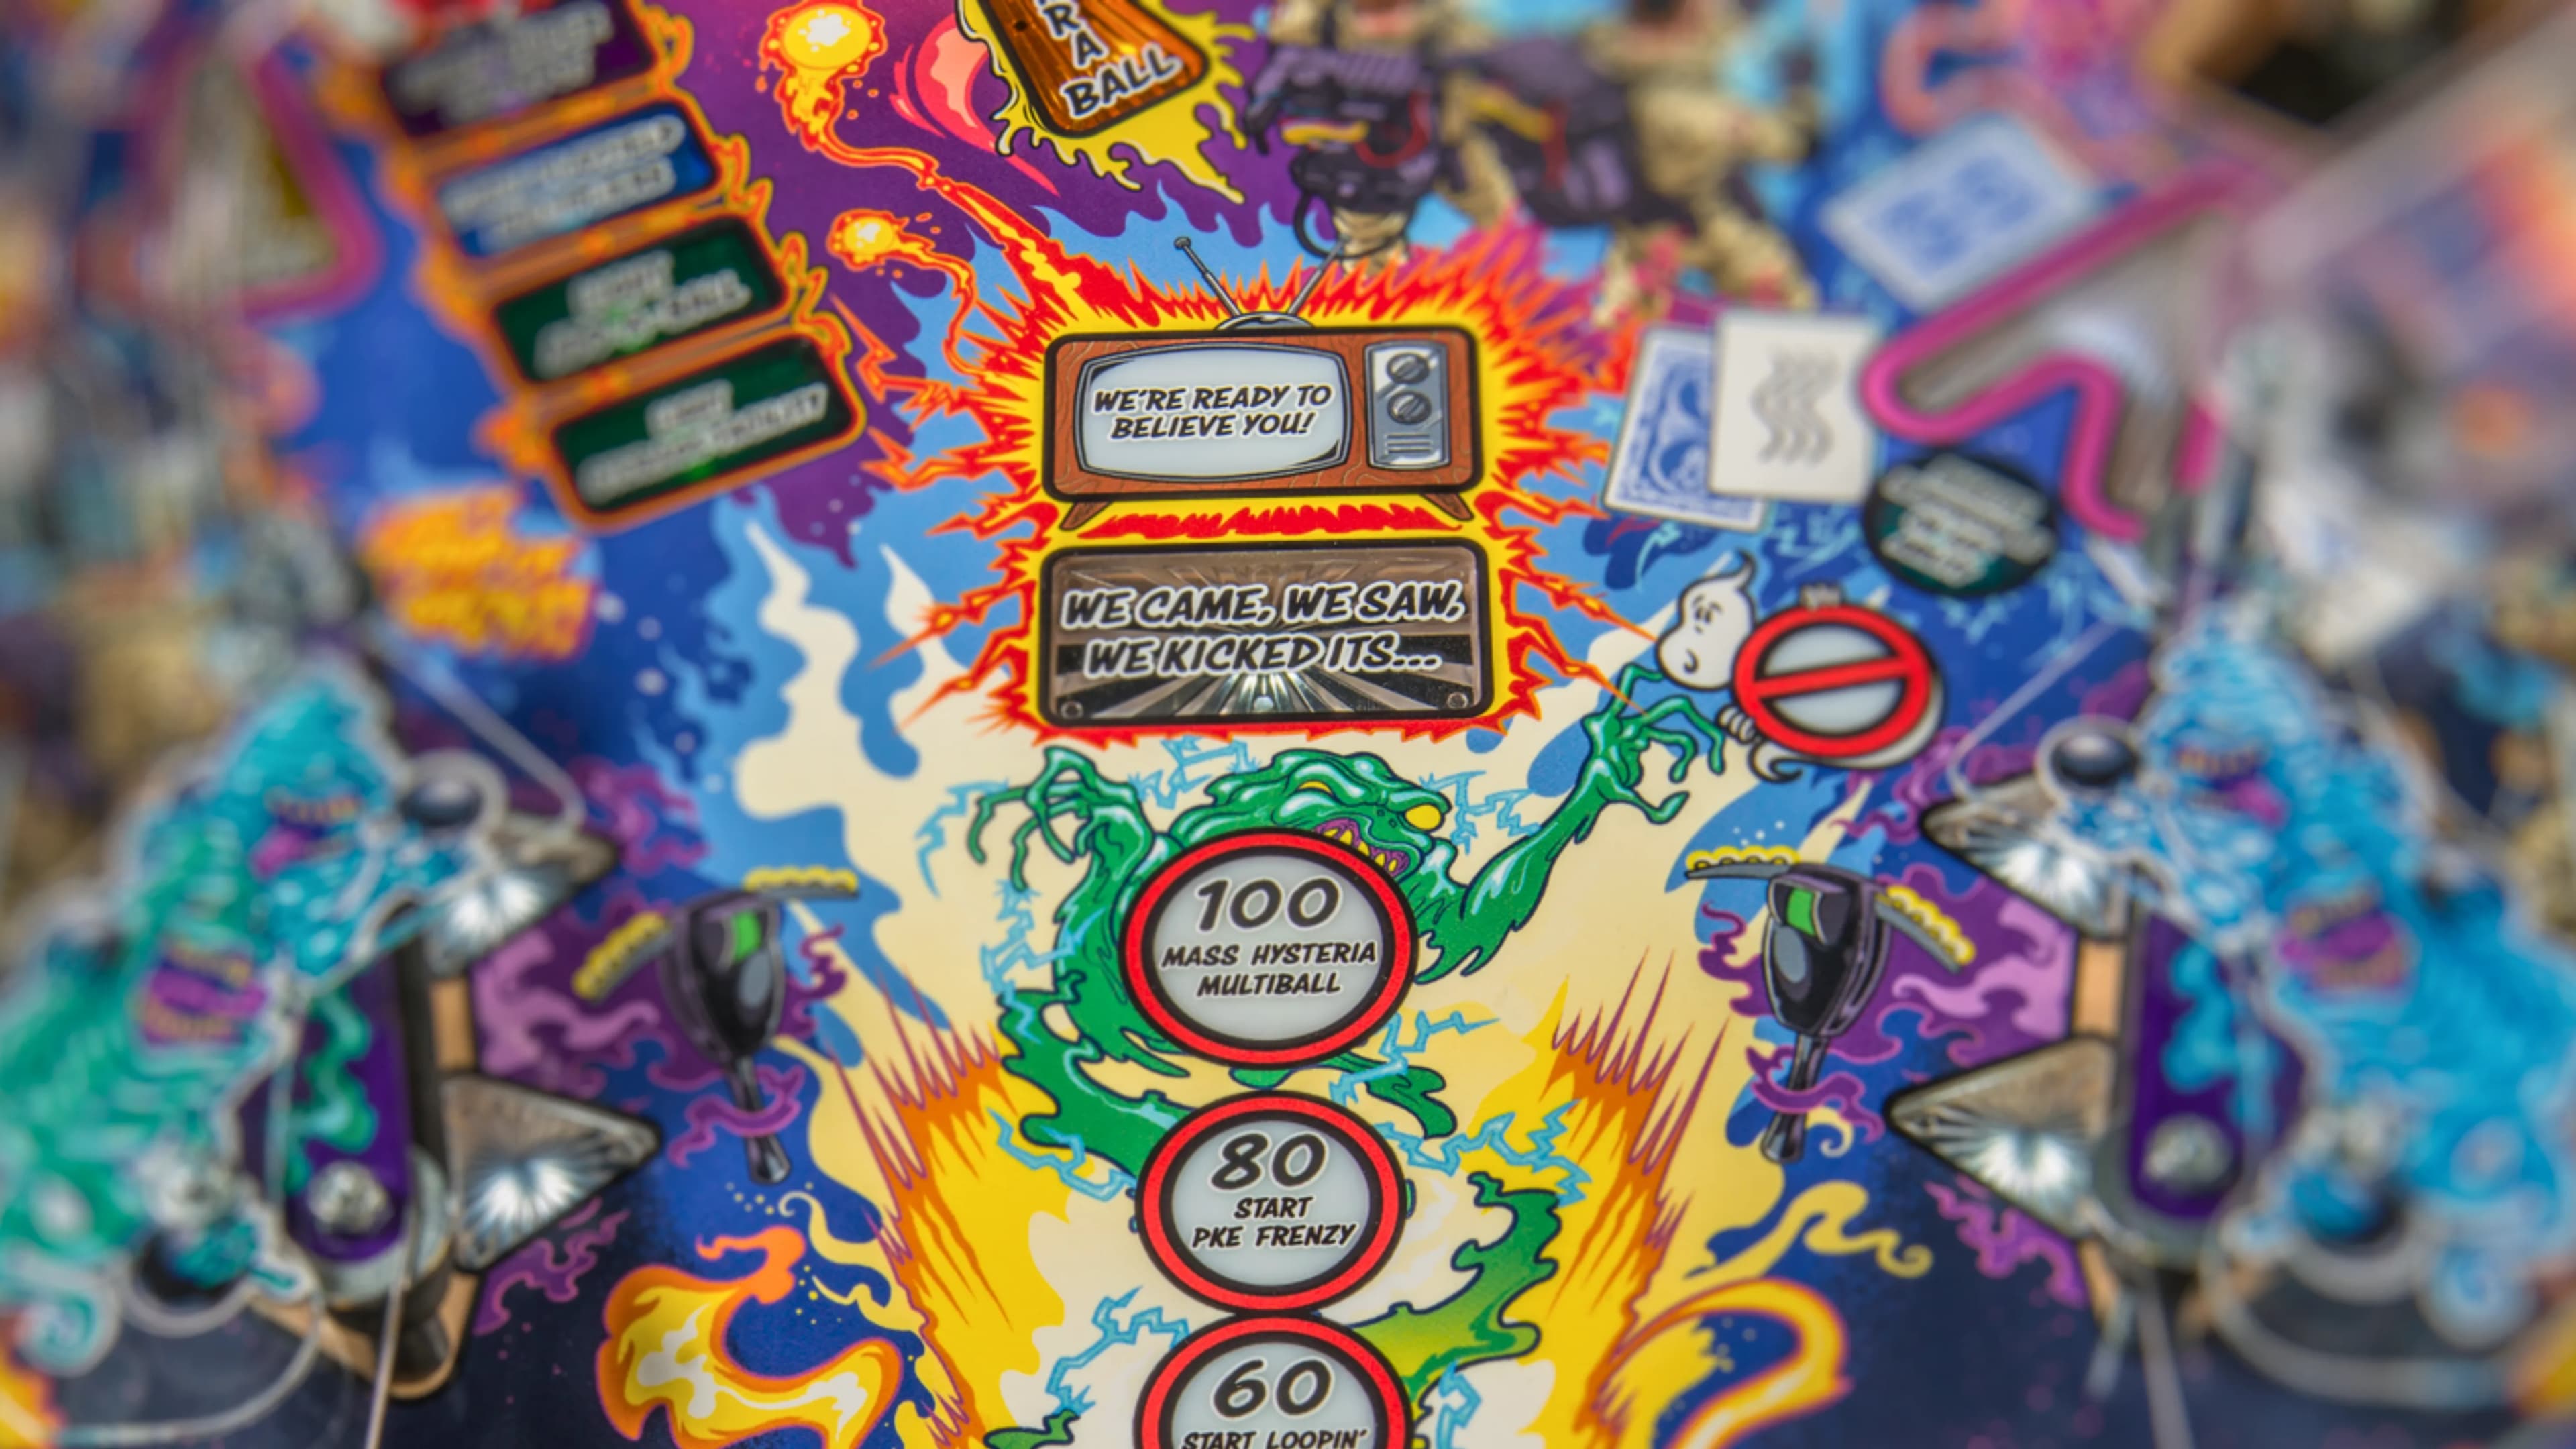
We Came, We Saw is a mini-wizard mode that will automatically start at the completion of the final mode in a sequence. It’s a pretty typical jackpot bonanza multiball during which all shots are lit for pretty lucrative jackpots - this mode is often worth 100,000,000 or more without any playfield multipliers.
There’s not a whole lot of strategy. Shoot flashing jackpots, keep the balls in play, light and start your playfield multipliers when you can. It’s not super complicated. The only real complication of this mode is that the number of balls you get in play is equal to the number of modes required for the sequence - so if you complete the left scoop scenes, this will be a two-ball multiball, as there were two modes in that sequence. So, it’s a bit of a risk-reward scenario - the more modes you complete, the more lucrative your multiball will end up being.
While it might seem like the left scoop is the way to go, as it requires the fewest modes, I’ve been leaning more toward the left ramp as of late. I have a few reasons as to why:
- The left ramp skill shot is the easiest flipper skill shot, so it’s the easiest sequence to start.
- A four-ball multiball isn’t much better than a three-ball multiball, but a three-ball multiball is way better than a two-ball multiball.
- The modes on the left ramp are much more lucrative than the modes on the left scoop.
But, to each their own. You might find it easier to finish a different sequence, and I think that you should do whatever you feel is best. You’ll play We Came, We Saw the first two times you complete a mode sequence. The third time - i.e., when you’ve completed all nine modes - you’ll start a different feature instead.
We’re Ready to Believe You!
This is Ghostbusters’ major wizard mode. It’s a timed four-ball frenzy during which you’re prompted to collect as many lit ghosts as possible within 60 seconds. Hitting the center captive ball will extend the timer up to a maximum of 60 seconds. The display will tell you how many ghosts you need to improve your “rank” - for instance, your first rank up happens at 30 ghosts - and each rank up will add another ball into play. These occur at 30, 50, 70, 80, and 90 ghosts.
If you manage to collect 100 ghosts, you will begin the game’s true final mode, Are You a God? I’ll be fully honest, I’ve never seen this mode. (I guess I’ve never really seen We’re Ready To Believe You, either.) From what I understand, Are You a God prompts you to shoot various combos and shot sequences, eventually culminating in a billion-point jackpot and a victory multiball, during which everything is lit for jackpots.
I feel it’s important to mention at this point that reaching We Came, We Saw once is a pretty remarkable achievement, let alone getting there three times. It’s unlikely you’ll see someone getting more than one We Came, We Saw in competitive play, but I wouldn’t exactly call reaching it an instant victory. Again, those playfield multipliers factor into scoring big time, and there are a ton of scoring opportunities available which don’t require getting to any major modes.
Oh, and if you were curious - you can just start We’re Ready To Believe you with a credit, if you’re so inclined. Admittedly, I’ve never done it, but more because I’ve spent my time on the table trying to figure out the rules in the regular game and just trying to figure out my way around the table in general, just like many others. But hopefully, now you have a map to help you navigate through this tricky table, and perhaps you even have a way to reach Are You a God without skipping right to it. Best of luck!
Like what you're reading?
Get pinball news, analysis, and deep dives delivered to your inbox.
Related Posts
More in Pinball Tutorial or browse all topics.