Of all the common undertakings in the pinball hobby, from buying your first machine to breaking your first piece of playfield glass, none is more universal, or back-breaking, than moving a 300-pound machine. Be that bringing home a new acquisition, rearranging the game room, or loading up for a pinball show, the process of moving a game is a clumsy, strenuous affair. While dedicated pinball dollies exist, they often come with a high price tag and limited functionality.
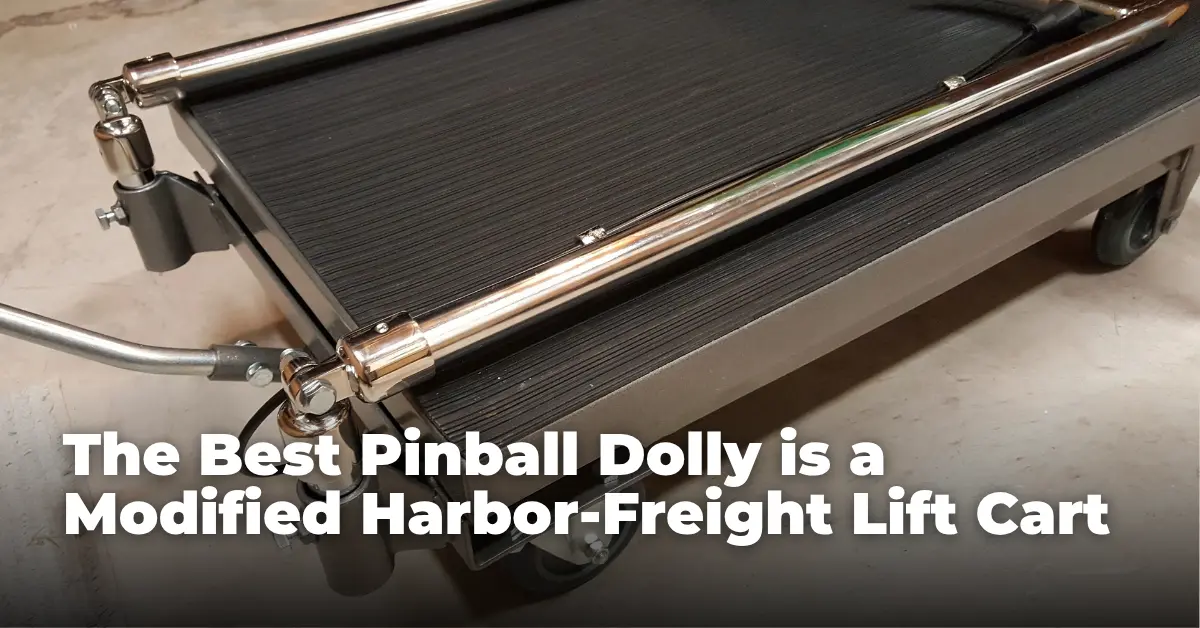
Enter the humble Harbor Freight 500 lb. hydraulic lift cart. It’s a workhorse that’s almost perfect for the job, capable of lifting a game high enough to slide into a vehicle or low enough to comfortably work on. It has just one critical flaw: its rigid, upright handle prevents it from sliding completely under a pinball cabinet, leaving the game precariously balanced.
Like what you're reading?
Get pinball news, analysis, and deep dives delivered to your inbox.
Related Posts
For years, the pinball community has tackled this problem with the kind of ingenuity you’d expect from a group of mechanically inclined tinkerers. Forum threads are filled with mods involving welded pipes, clunky hinges, and complex flagpole brackets. But after years of trial and error, the people have spoken. One method has emerged as the clear champion for its simplicity, low cost, and professional results: the Bimini cap modification.
This guide will walk you through turning the Harbor Freight lift cart into what is, frankly, the best pinball dolly you can buy.
Why the Bimini Cap Mod Reigns Supreme
Before we break out the tools, it's worth noting why this specific mod is the one to beat. Other attempts often require invasive, destructive changes like welding or permanently altering the handle, or they use parts that show signs of bending under pressure. The Bimini method is different.
It’s simple & minimally invasive: While this modification requires cutting the handle tubes, it is the only permanent alteration involved. The key benefit is that it requires absolutely no welding or grinding on the cart's main body. Should you ever need to, the handle can be reassembled back to its original upright, functional form.
It’s cheap: The entire modification can be done for not much additional spend.
It’s clean: The finished product looks professional, almost like it was designed that way from the factory.
It’s practical: The handle folds down neatly, allowing you to store the entire cart under a pinball machine when not in use.
The Shopping List: What You'll Need
First things first, you need the cart itself. Make sure to get the 500 lb. Capacity Hydraulic Table Cart from Harbor Freight. The 1000 lb. version is tempting, but its base is too tall to fit under most standard cabinets. With a 20% off coupon, which are frequently available, you can often get the cart for a great price.
Parts:
4x Bimini Top Eye End Caps (1-inch inner diameter): These are the key to the whole operation. They are typically made of marine-grade stainless steel. You can find a four-pack on Amazon or eBay for around $25-$30.
2x Hex Bolts (1/4"-20): 1-inch length works well.
2x Stop Nuts (1/4"-20): You can also use wing nuts for easier, tool-free adjustments on the fly.
4x Flat Washers (1/4")
4x Nylon Flat Washers (1/4"): Make sure they are nylon, not rubber. The nylon provides a smooth, durable surface for the hinge to pivot on.
Tools:
Hacksaw or a pipe cutter
Tape measure and a Sharpie
Wrenches or a socket set to fit your bolts and nuts (e.g., 7/16" or 1/4")
A set of metric Allen/hex keys (a size 3 is often needed for the Bimini cap set screws)
Step-by-Step: The 30-Minute Modification
With your parts gathered, you’re less than half an hour away from a better pinball-moving experience.
Step 1: Cut the Handle
Measure 3.5 inches up from the very bottom of each of the two handle tubes and make a clear mark with your Sharpie. This measurement has been proven to be the sweet spot, allowing the handle to fold down completely without interfering with the cart's platform. Using your hacksaw or pipe cutter, make a straight, clean cut at your mark on both tubes.
Step 2: Re-attach the Bottom Pieces
Take the two short 3.5-inch pieces you just cut off—the ones with the original mounting brackets—and reinstall them into the handle mounts on the cart.
Step 3: Assemble the Bimini Hinges
Now, create your two hinge joints. The order of assembly is crucial for a smooth and sturdy pivot. For each hinge, stack your parts in the following order:
Bolt > Flat Washer > Nylon Washer > Bimini Cap > Nylon Washer > Second Bimini Cap > Flat Washer > Stop Nut
Tighten the nut so that the joint is secure but can still pivot with firm pressure. You don't want it so loose that it wobbles, but not so tight that it sticks. The nylon washers will compress slightly to create the perfect amount of friction.
Step 4: Connect the Handle
With your hinges assembled, it's time to put it all together.
Loosen the small Allen set screws on all four Bimini caps.
On one side, slide one cap of your assembled hinge over the 3.5-inch tube stub on the cart.
Slide the other cap of that same hinge over the bottom of the long handle piece you cut earlier.
Make sure the handle is straight and level, then firmly tighten the Allen set screws on both caps to lock them in place.
Repeat the process for the other side.
A helpful tip: some users have found the small set screws can fall out over time. For a more permanent solution, you can replace them with short bolts of the same thread.
Final Touches and Pro Tips
Your modified cart is now ready to go. As you lift your first game, you’ll immediately see the difference. The cart will slide effortlessly underneath the cabinet, centering the load securely.
A couple of final tips for best use:
Manage the cable: Keep an eye on the hydraulic release cable. It can sometimes get snagged or pinched as you fold the handle. A simple zip tie or velcro strap can keep it neatly attached to the handle and out of the way.
Protect your cabinet: Always place a thick piece of cardboard or a moving blanket on the cart’s platform. This protects your cabinet decals from scratches and makes it easier to slide the machine on and off.
That's it. For a minimal investment of time and money, you’ve created the best pinball dolly that makes one of the most dreaded tasks in pinball almost enjoyable. It’s a testament to the community's collaborative spirit and a perfect example of how a little ingenuity can save a lot of back pain.
Colin is the chief pixel pusher at Kineticist. He's a lifetime gamer who became enamored with pinball after taking in a family copy of the 1979 classic Joker Poker (the EM version). Since then he's bought, sold and repaired many machines, competed in all kinds of tournaments, and contributes to This Week in Pinball, the New England Pinball League, and Pin-Masters of New England. Previously, Colin spent over a decade working in marketing for agencies and tech startups. He also started and ran a music blog, happy hour website, and wrote a regular craft beer review column for Central Track in Dallas. Once aspired to be an artsy film director.


No comments yet. Sign in to be the first.