Rock Monster: Learn to Play Williams Monster Bash Pinball
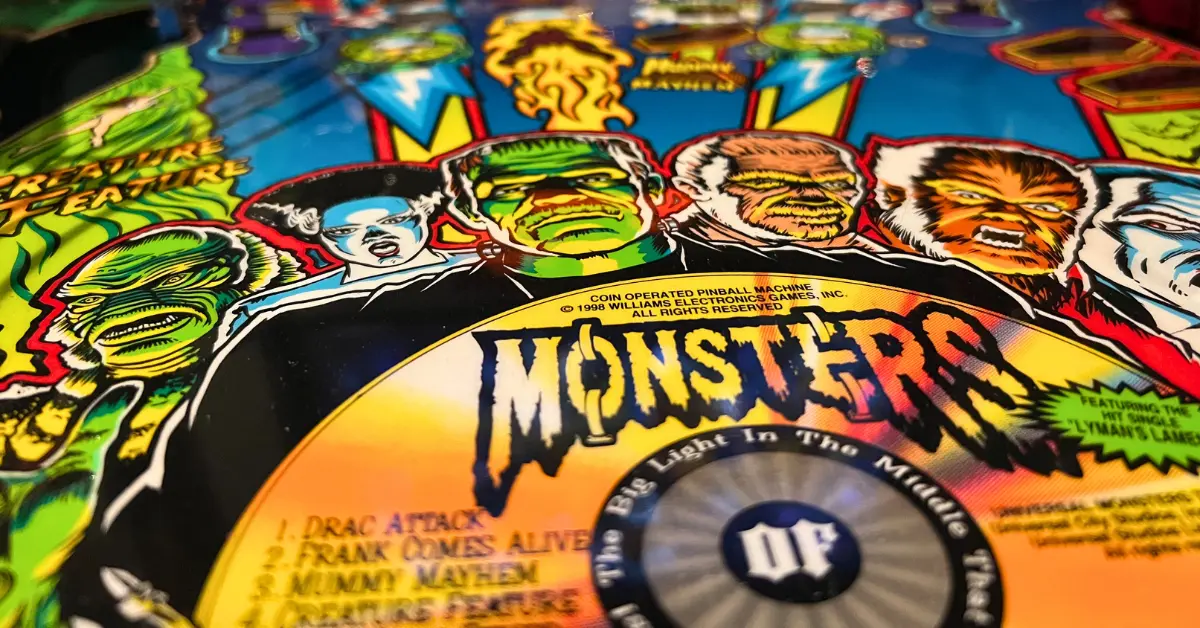
If you're unfamiliar with the horror scene of the early 20th century, you may not know how many times novels like Dracula or Frankenstein have been adapted into films. Without question, the Universal Pictures versions of each—and many others—are far and away the most iconic. I mean, who do you think of when you think of Dracula? Gary Oldman? Nick Cage? Christopher Lee? As incredible as Lee was in the role, you're undeniably thinking of Bela Lugosi. What does Frankenstein's monster look like? Robert De Niro? Christopher Lee (again)? No, it's Boris Karloff, whose appearance as the monster practically codified every typical Frankenstein monster depiction: green skin, flat head, bolts in the neck, outstretched arms, you name it.
But, I digress. Point is, the Universal Monsters are pop culture legends, and 1998's Monster Bash by Williams is a big reunion! The Creature from the Black Lagoon had a solo act about six years prior, and while that outing was pretty sweet, there's really nothing like having the whole band together. We got the Creature, Dracula, Frankenstein('s monster), Bride of Frankenstein('s monster), the Wolf Man, and the Mummy all here to put on a concert. With some of the greatest callouts and sound queues of all time, as well as some of the greatest rules in all of pinball, Monster Bash is as classic as the monsters it represents.
About Monster Bash Pinball
- Manufacturer: Williams Pinball
- Release Year: 1998
- Design: George Gomez
- Code: Lyman F. Sheats Jr.
- Animation: Adam Rhine
- Mechanics/Electronics: Chris Shipman
- Art: Greg Freres, Kevin O'Connor
- Music / Sound: Vince Pontarelli, Jon Hey
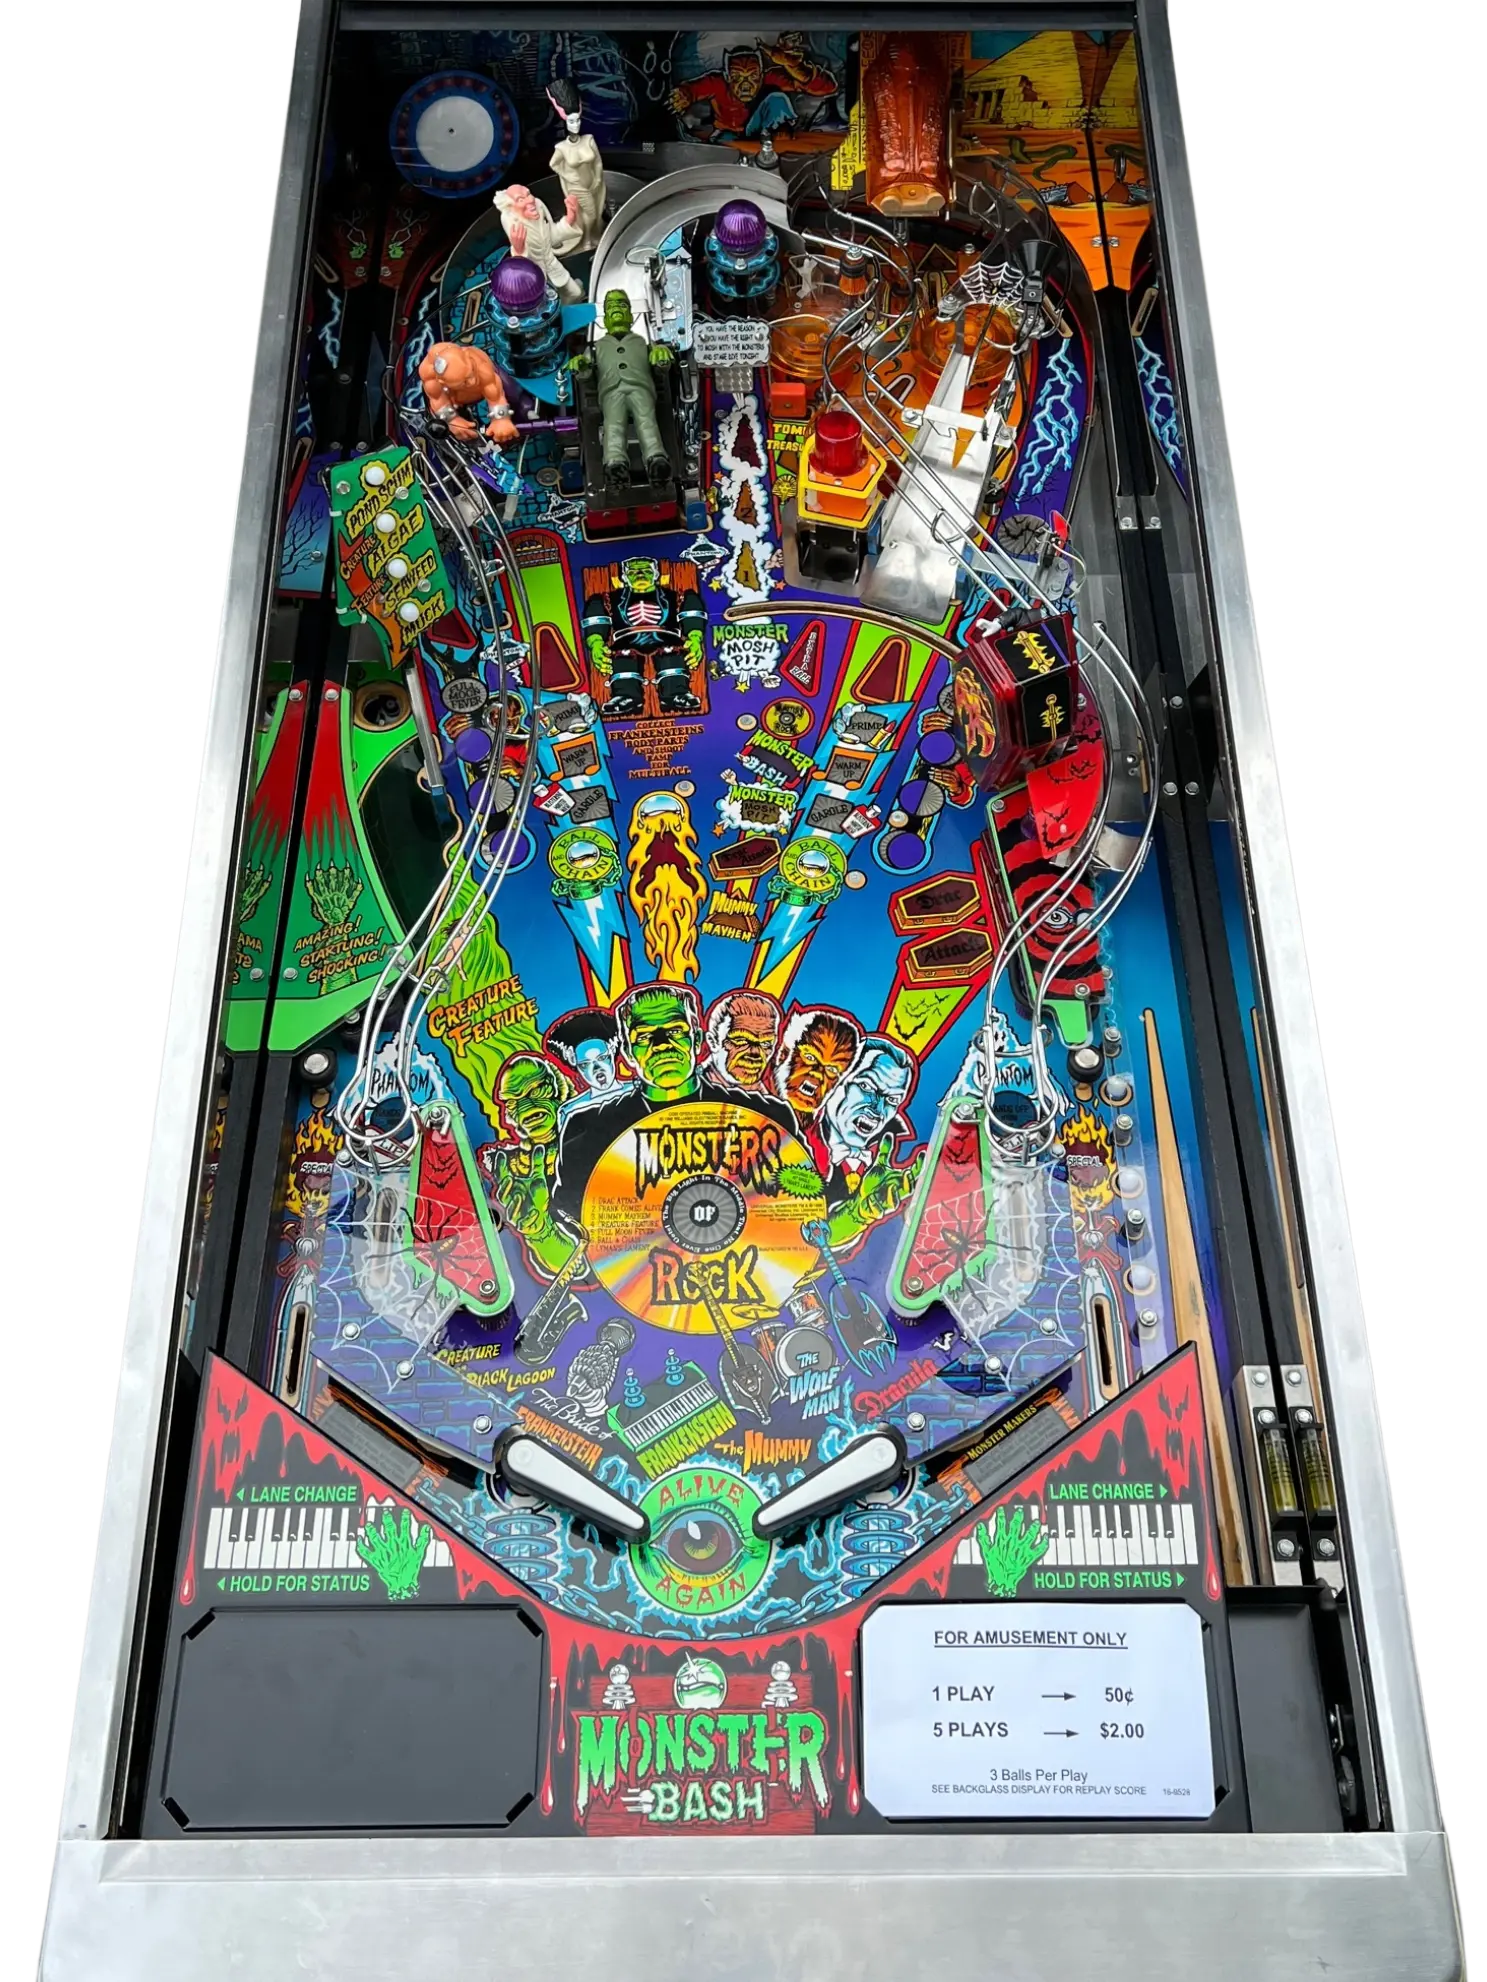
Playfield Overview
Before we begin, I’m aware that Frankenstein is the name of the doctor, not the monster he created. However, it seems that the game's designers— like many people—did not know that, so the monster is referred to exclusively as "Frankenstein" throughout the game. To spare myself the trouble, I'm just going to be calling him "Frankenstein."
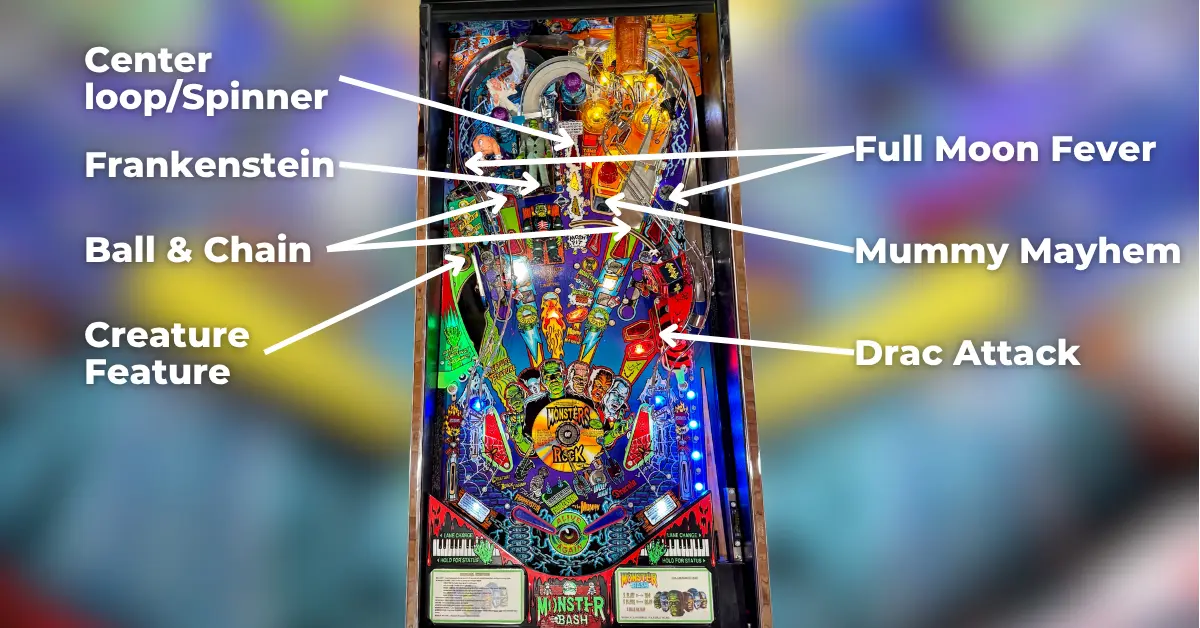
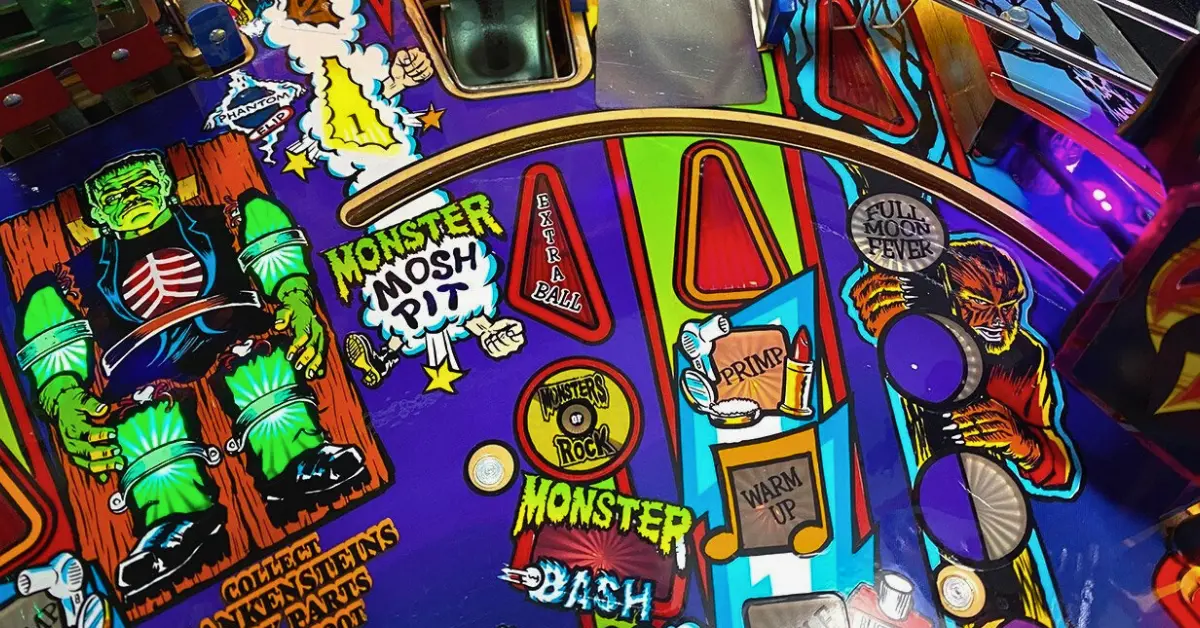
Monster Bash features a pretty standard fan layout, complete with two flippers, three ramps, a saucer, a scoop, two orbits, an inner loop, and three bumpers. No shot is particularly difficult, which is good considering that you really need to be shooting at everything in order to put up solid scores. Broadly speaking, this is a game about stacking as many modes as possible, and nearly every shot lights a specific mode, so you want to find all of those shots quickly.
If you need points fast, you want to be bashing the Frankenstein toy just to the left of the center. During standard play, a stand-up target will be blocking a ramp (all beneath that toy). Hitting it enough times will lower the target into the playfield (a la Attack from Mars), exposing a ramp behind it. You can put up a decent score by just going after this, but it really shouldn't be your sole focus. We'll go over why in just a bit.
Another good shot to aim for if you're after a good score quickly is the center loop/spinner. This feeds the left orbit and is a decent bailout shot – i.e., a shot you can hit if you're out of control – but, obviously, it's aligned perfectly with the center drain, and will instantly kill you should you miss. You also need to shoot this a whole lot in order for it to be profitable. It can be very profitable, but it doesn't advance you towards anything else otherwise, and considering the risk it imparts, I tend to avoid it.
During standard play, the two orbits are always diverted into the bumpers. Get used to giving the game a good smack as the ball comes around either orbit, though – keep it off of the wall, and by extension, off of the slings. They can be dangerous, as the outlanes tend to be pretty hungry on this machine.
There are also two ramps that are always available, and which can be alternated for points. The left ramp may not look like a ramp—the actual "ramp" part is behind a loop. In theory, you could just alternate these two ramps all day and also put up a decent score - but, again, you want to be doing everything, rather than just one thing. On top of that, a miss to the right ramp will usually send the ball straight down the middle. (Misses to the left ramp usually are safe, but your situation may vary.)
The right side of the table has two red standups that also house a mode, and they can be really annoying to hit safely. Figure out how to hit them – I like to use my multiballs – and cross your fingers you don't lose to the left outlane. Finally, there's the scoop. Ordinarily, you don't have much reason to be aiming at this (aside from starting some modes), but there will come a time when you need to hit the scoop, and being unable to hit the scoop then can be agonizing. Find out how to hit it when you get a minute. I prefer backhanding it from the right flipper, but it can be hit from either flipper.
Speaking of backhands, be warned that Monster Bash has very few available. Really, the only shots accessible from either flipper are the scoop and the spinner. Everything else can only be shot from the opposite side. That's not that big of a deal, though. Again, most shots on Monster Bash are pretty easy. The hard part is hitting what you want when you want to hit it.
The only other thing that really bears mentioning now is the Phantom Flip feature. By hitting the blue ramp standups, you light a Phantom Flip which is triggered by rolling through a lit inlane. Phantom Flips aren't worth any points - the game will just automatically take a shot at whatever it thinks you want, similar to the Thing Flips feature in Addams Family. Unlike Thing Flips, Phantom Flip absolutely sucks. It'll always favor shooting the Frankenstein ramp when a multiball is lit there. Don't get me wrong, that's great if you have a good mode stack going, but it's awful if you have nothing else going on - and considering that you light Phantom Flip by bricking shots, chances are you won't have anything else going on.
To add insult to injury, Phantom Flip usually hits the Frankenstein ramp with perfect accuracy, and misses about 95% of the other shots it attempts. It also locks up the flippers when attempting to make a shot, meaning you can't override it, and should it brick and send you towards the outlane, well, you're just dead. If the Phantom Flip doesn't fire at all (or misses entirely and doesn't hit any switches), you'll get a ball save - so don't walk away until you see that bonus. Usually, competition games will just disable Phantom Flip entirely because of these faults.
30,000,000 is solid should you not get very far into the game, but if you play your cards right, stack your modes, and reach the endgame, it's very possible to get ten times as much.
Getting Started
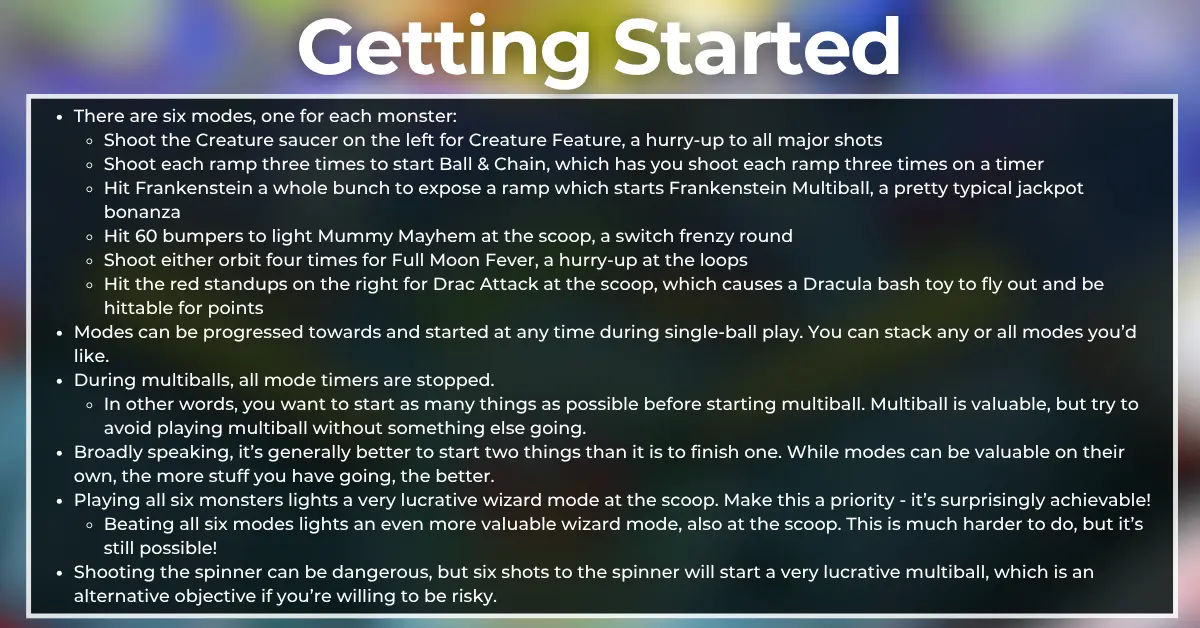
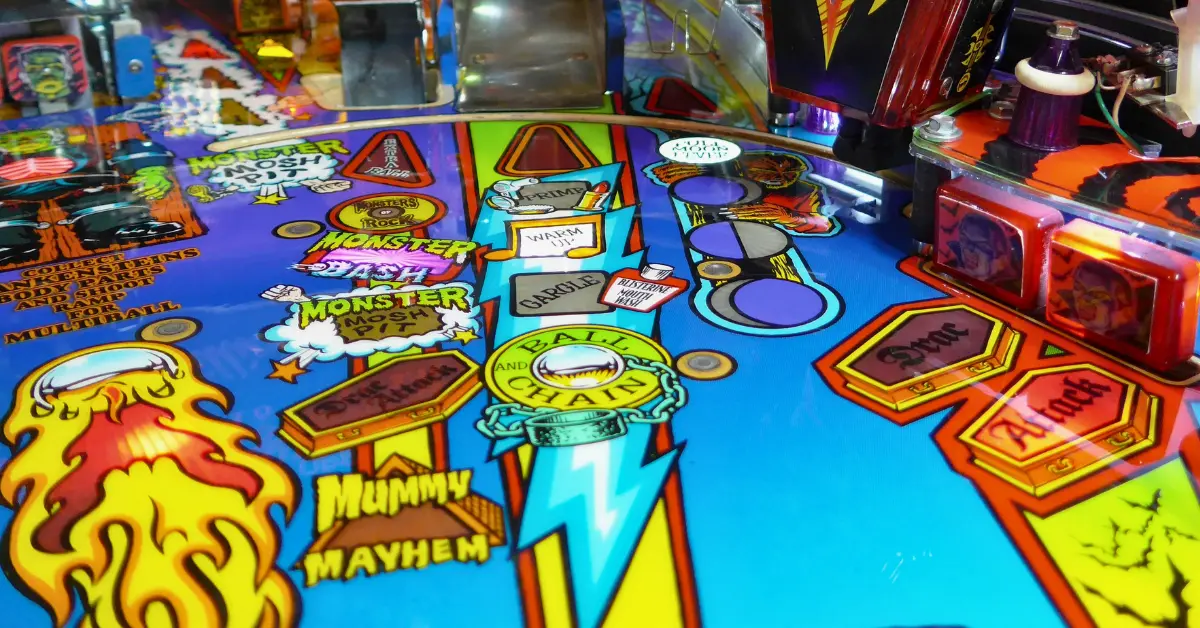
- There are six modes, one for each monster:
- Shoot the Creature saucer on the left for Creature Feature, a hurry-up to all major shots
- Shoot each ramp three times to start Ball & Chain, which has you shoot each ramp three times on a timer
- Hit Frankenstein a whole bunch to expose a ramp which starts Frankenstein Multiball, a pretty typical jackpot bonanza
- Hit 60 bumpers to light Mummy Mayhem at the scoop, a switch frenzy round
- Shoot either orbit four times for Full Moon Fever, a hurry-up at the loops
- Hit the red standups on the right for Drac Attack at the scoop, which causes a Dracula bash toy to fly out and be hittable for points
- Modes can be progressed towards and started at any time during single-ball play. You can stack any or all modes you’d like.
- During multiballs, all mode timers are stopped.
- In other words, you want to start as many things as possible before starting multiball. Multiball is valuable, but try to avoid playing multiball without something else going.
- Broadly speaking, it’s generally better to start two things than it is to finish one. While modes can be valuable on their own, the more stuff you have going, the better.
- Playing all six monsters lights a very lucrative wizard mode at the scoop. Make this a priority - it’s surprisingly achievable!
- Beating all six modes lights an even more valuable wizard mode, also at the scoop. This is much harder to do, but it’s still possible!
- Shooting the spinner can be dangerous, but six shots to the spinner will start a very lucrative multiball, which is an alternative objective if you’re willing to be risky.
Main Objective
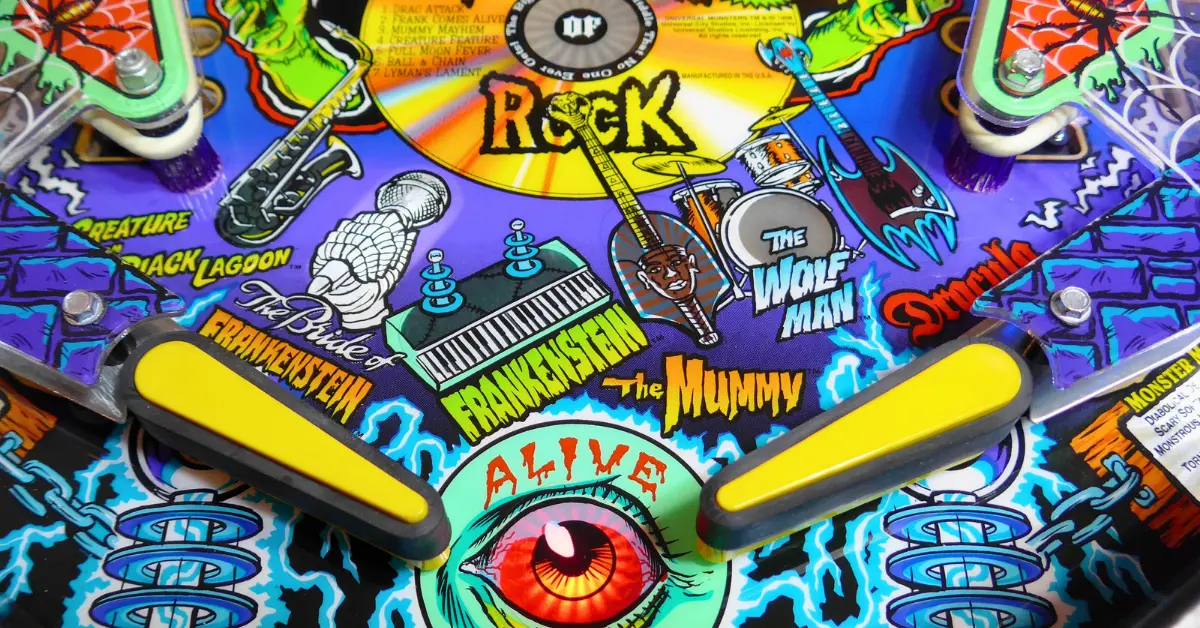
Monster Bash is a feature-based game. This means that rather than pursuing a single multiball or mode, there are a handful of modes located at different shots, each with their own unique objectives. Each mode is themed after a member of the Monsters of Rock - Creature (from the Black Lagoon) on sax, Bride of Frankenstein on vocals, Frankenstein on keys, the Mummy on bass, the Wolf Man on drums, and Dracula on guitar. Your goal is to get the band back together to put on the eponymous Monster Bash.
Starting a monster's mode will light their insert on the playfield. By accomplishing something significant in a given mode (e.g. beating it, making enough shots, etc.), you'll also light their instrument's insert. Getting all six monsters gets you to a wizard mode, getting all six instruments gets you a harder, more valuable wizard mode. Ordinarily, I tend to hold off describing wizard objectives until the end of the tutorial, but collecting all six monsters is actually very doable, even on difficult competition games. In other words, your priority shouldn't be playing one mode well, your priority should be starting everything. I'm going to describe the modes in order of their immediate value, but at any given time, the most valuable mode available is whichever one(s) you haven't played yet.
Excluding Frankenstein (which is a multiball), all monster modes are timed sequences with their own elaborate rules, generally involving shooting a whole bunch of the major shots for considerable value. More importantly, modes can be stacked, meaning you can – and should – run multiple modes at once. Doing so is absolutely vital to high scores, as most of the modes have considerable overlap on the shots they light. With three or four modes going at once, you're liable to get mode points for at least two of them with any given shot you make. Broadly speaking, it's more valuable to play two modes halfway than it is to play one mode to its completion. After all, this is a game about getting the band together – the more band members on stage, the more points you'll be scoring!
That's especially true when you learn of Monster Bash's signature rule: during any multiball, all mode timers are stopped. The game makes this extra clear on the display thanks to a fun exploding clock graphic, so it’s not too hard to miss – but the value might be easy to overlook. Two of the modes are hurry-ups, meaning they're effectively locked in to max value if run during a multiball. One mode awards infinite victory laps should you finish the main objective, and the other two modes both benefit from an unlimited timer. While it's important to stack modes with one another, it's way more important to stack those modes with a multiball.
Of course, there's a catch: you cannot light or progress to any modes while a multiball is running. This means that, ideally, you want to light everything, then start all of your non-multiball modes, then start multiball. That's the real challenge of the game. Personally, once a multiball is lit, I like to have at least two other modes underway. Of course, the timer for those modes will continue to run out while you're trying to start a multiball - and some of them have very short clocks. Hey, that's why this game is such a blast!
Modes do not get harder to start with each subsequent attempt. This is pretty unusual for games of this era and afterwards. Failing to complete a mode on your first attempt is far less of a setback than you might expect. Granted, the non-incrementing difficulty doesn't really help you with getting everything running all at once, but it does remove some pressure if the final mode is what you're really after. (Dracula is a bit of an exception, as the game starts with him half lit - but your third Dracula is no more difficult to start than your second.)
Two more small things before we go over the modes. First off, there's the scoop in the center of the table, which always awards a mystery. More often than not, this just gives some tiny little pity points (like 100k or less), but it can sometimes light or start monster modes, which can be helpful. It's not much of a reason to aim for it deliberately, but hey, it's there. There’s also a super wizard mode here if you manage to hit it 44 times – good luck doing that, though.
Secondly, there are smart missiles, similar to Martian Bombs from Attack from Mars or Troll Bombs from Medieval Madness. You get one if you make your skill shot (which, by the way, is a typical top lane skill shot), one for making three spinner shots (and another for every six spinner shots after that), and can sometimes get them as a mystery award. Pressing the launch ball button will use one and spot a mode shot, should the mode be running. Unlike Martian Bombs or Troll Bombs, though, there are six variants of smart missiles which each apply to one specific monster: Garlic Cloves are just for Dracula, Spear Guns are just for Creature, Hair Dryers for Bride, Flaming Torches for Frankenstein, Silver Bullets for Wolfie, and Ancient Scrolls for Mummy. I feel like it's really obvious who gets what, but hey, it's good to know.
And with that, let's rock!
Frankenstein Multiball
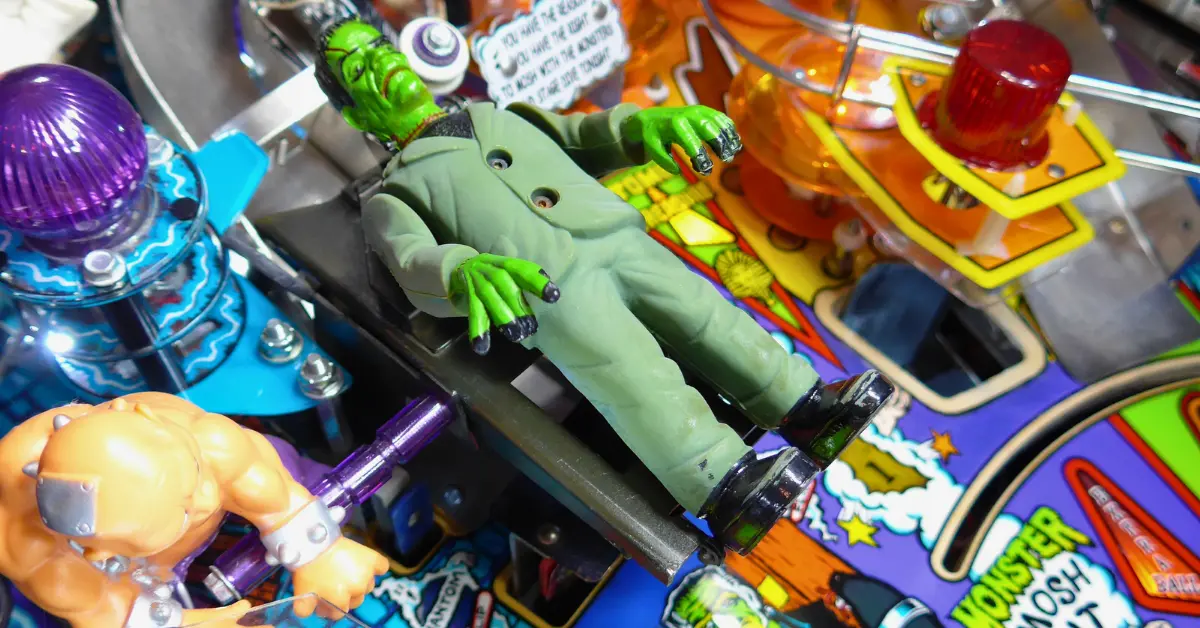
As mentioned in the playfield overview, Frankenstein's ramp will usually be blocked with a standup target. Hitting it will collect the body parts needed to put him together, as indicated by a whole bunch of playfield inserts right beneath said target. Once all seven body parts have been collected, the target will lower into the playfield, exposing a ramp. Hitting the ramp will start a 3-ball multiball – brace yourself for the killer startup sequence!
During multiball, Frankenstein will be flipped onto the playfield, revealing that he's secretly a bash toy. All shots will be lit for 400k a piece (increasing by 50k with each jackpot), with Frankenstein himself being lit for a 1M Super Jackpot. Hitting a non-super will light Frank for a Double Super Jackpot, and hitting two non-supers will light him for a Triple Super Jackpot. Each super also lights one body part from his inserts – collecting six will award Frankenstein's Keyboard and increases the super by 250k. Note that double & triple supers count as two and three body parts, so two triple supers is enough to grab the keyboard. Honestly, the keyboard is probably the easiest instrument to get – six hits to Frankenstein is not that hard, and you’ll likely need fewer than that!
Frankenstein multiball is as simple as they come. It's a little strange to me that bashing Franky is how you get supers, seeing how doing so is way easier than hitting any other playfield shots - but don't sleep on those standard jackpots! They're worth half as much as the supers are, and provided you're hitting Frank frequently enough (which, trust me, you will be doing), they're effectively worth supers anyway thanks to how they multiply the super value.
Frankenstein is far and away the most lucrative of the six monster modes. If, that is, you are to play all six modes independently of one another. I seriously cannot stress this enough – unless you need 10M or less to secure a victory, do not play Frankenstein without something else running. Aside from the fact that some modes practically beat themselves during multiball, you're giving up a ton of points by not stacking something else. Again, I like to have two other things going minimum before I'd even consider starting Frankenstein – and if I have other things lit, I'll try to get those running as well.
Ball & Chain
The Bride's (misogynistically-titled) mode is started by shooting the two non-Frankenstein ramps three times each. You don't have to alternate the ramps to light the mode, although it's easier to start the mode by doing so. Ball & Chain is a 30-second mode, during which the center spinner will award 500k +100k per time Ball & Chain has been completed, and – the first three times it's hit – reset the clock back to 30 seconds. Each ramp will award double that value. Shooting both ramps three times each will complete the mode, awarding the Bride's microphone. (In effect, this means you're just trying to do the same thing you did to start the mode during the mode.)
However, beating the mode doesn't end it. Instead, you get victory laps for the remainder of the timer, where both ramps and the center spinner will be lit for triple the mode value for the entire duration, which would be 1.5M at the lowest value. Completing this mode without shooting any spinners will earn you 6M, although thanks to those victory laps, the ceiling is way, way higher. One could argue that it's worthwhile to just forget about everything else and just alternate ramps all day. I mean, if you find a good groove, sure, I guess? But get a multiball running, hit some ramps, and you're looking at 1.5M ramps throughout.
I will say that, personally, I struggle with this mode quite a bit. Aside from the fact that the only thing at the ramps is Ball & Chain, I find that this mode requires a bit more focus that Frankenstein Multiball just doesn't allow you to have. It's still worth getting underway, no doubts there – I just don't find myself pursuing this mode as often as I probably should.
Creature Feature
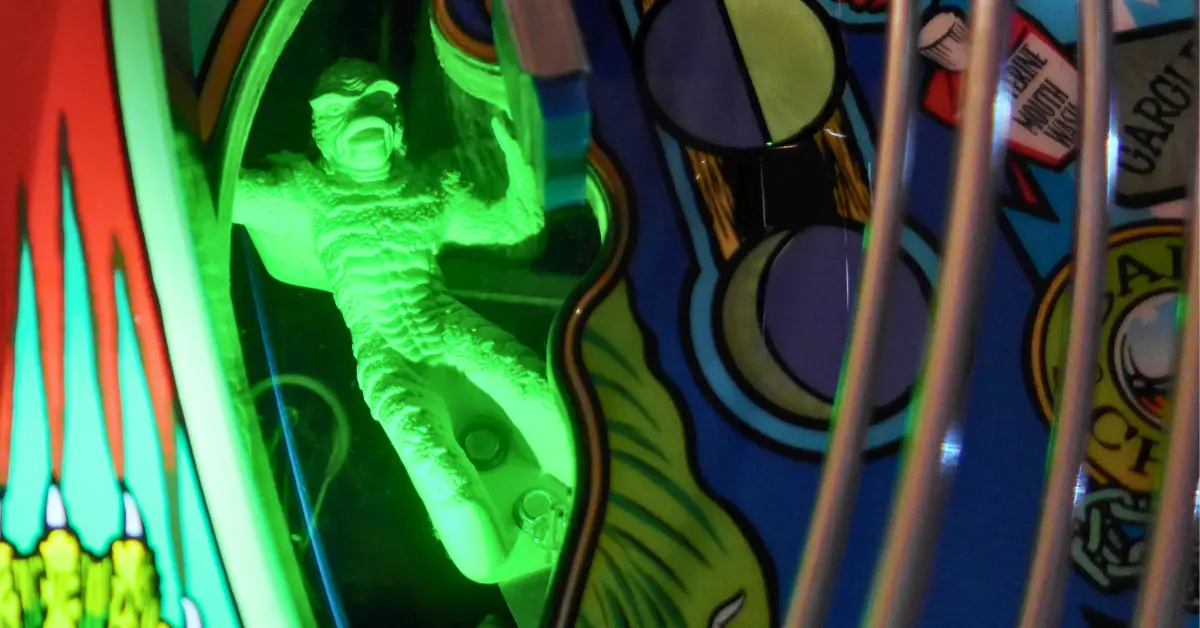
This is probably the easiest of the modes to overlook, as it's available at a shot far away from everyone else. Shooting the saucer on the far left side of the playfield will reveal a little Creature toy underneath the playfield, flailing around as he asks you to leave him alone. Shooting him four times starts Creature Feature. This is a simple "shoot every shot" mode – you need to hit all five major playfield shots as quickly as possible. The first shot will award a hurry-up value, starting at 1M and decreasing to 500k. Each shot after that will be on a 20-second timer, awarding that same hurry-up value, multiplied by which shot number it is – i.e. the second shot is doubled, the third is tripled, and so on. Hitting all five shots awards the Creature's saxophone.
So long as you hit that first shot quickly (and are able to finish the mode), Creature Feature will be worth 15M. During a multiball, beating this mode is trivial. Even if you collect the hurry-up at minimum value, you're still looking at 7.5M, which isn't too bad, either. As far as immediate value is concerned, only Frankenstein beats it, although Ball & Chain has a way, way higher ceiling. Starting this immediately before a multiball (especially if you get the hurry-up right away) effectively guarantees you the full 15M, so I like to make it a priority. Outside of a multiball, Creature Feature is still nice in that it lets you shoot anything, but is much harder to complete.
Mummy Mayhem
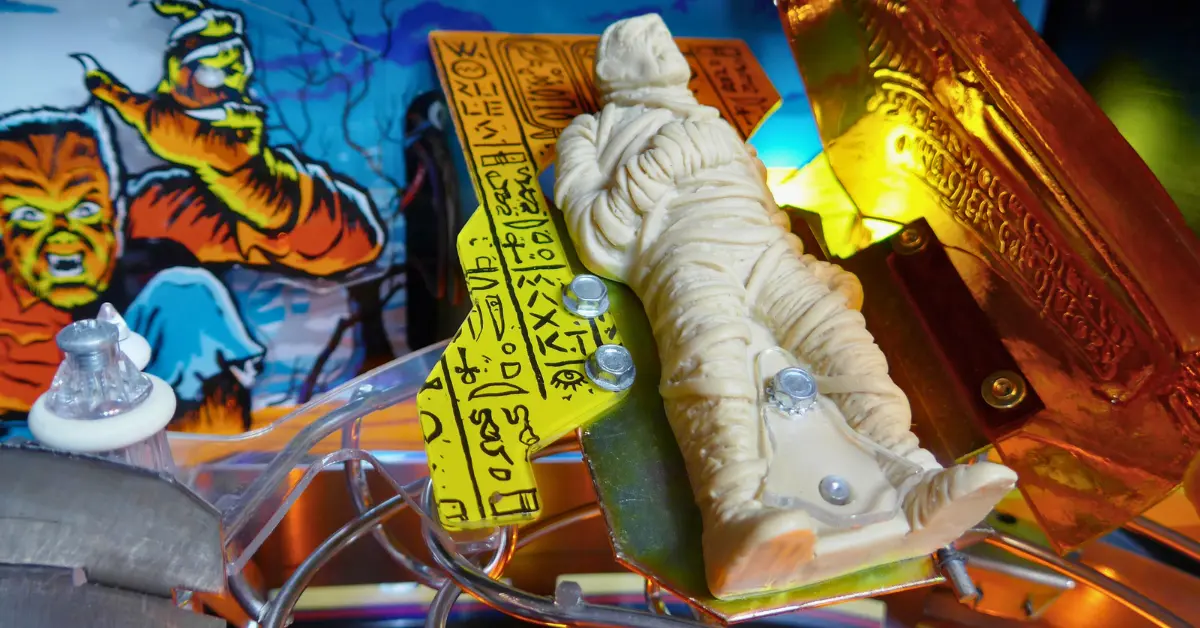
After getting 60 bumper hits, Mummy Mayhem will be lit at the scoop. It's a very simple mode: for 45 seconds, all switches will be worth 50k, and any major shot awards a 500k jackpot plus the sum of all switch values hit since scoring your last jackpot. Scoring 7.5M mayhem points finishes the mode, awarding the Mummy's bass. Doing so isn't exactly difficult - with enough switch hits, usually 10 or so playfield shots will cover it – but it's not exactly guaranteed. That is, if you're playing it outside of a multiball. Should you stack Mummy Mayhem with a multiball, the only way to really lose it is to tilt.
Without question, Mummy Mayhem is the hardest mode of all to start. That's not to say it's hard – it's just harder than the rest. 60 bumpers isn't exactly trivial, and considering that the loops start a separate mode (we’ll get to that momentarily), your six-mode stack is made much more difficult thanks to Mummy Mayhem. Unfortunately, the mode itself is not very valuable, as it's effectively a 7.5M jackpot should you complete it. Certainly not worthless, but not as great as the much easier-to-start Creature Feature.
Completing D-I-G also advances your bonus multiplier, and increases the bumper value (neither of which is a big deal). There's also a Tomb Treasure target in front of the leftmost bumper – this also increases your bonus multiplier and awards 10X whatever your bumper value is (usually 130k or so). Unlike the Tomb Treasures in, say, Iron Maiden, this target is basically pointless. Bonus value is really not substantial on Monster Bash - it's just based on how many switches you hit over the course of the ball, and is unlikely to be worth more than 5M.
Due to how many bumpers are needed to start Mummy, if getting all monsters is your goal (as it should be), I highly recommend going after bumpers early. Take your shots to the orbits when you can. Even if you don't have Mummy lit as you go into a multiball, just the progress made for your next multiball is worth the effort. Plus, you may find someone else lurking around those orbits....
Full Moon Fever
This mode gets so many bonus points from me just due to its callouts. "Somebody fetch me a razor!" is - for no particular reason, my favorite callout in all of pinball, and "Let me go fetch my sticks!" is a seriously underrated canine pun. But, I digress.
Shooting four orbit shots – doesn't matter to which orbit, they both advance the same – will start Full Moon Fever. This is another hurry-up round, during which you're prompted to shoot either orbit for 1M, decreasing down to 250k. Collecting one will light another hurry-up, again at either orbit, for 2M. Rinse and repeat two more times, increasing by 1M each time. Collecting the fourth hurry-up completes the mode and awards the Wolf Man's drums. During this mode, the orbits will not feed the bumpers as the usually would - the ball will come flying back around to the flippers.
As is the case with any hurry-up mode, stacking this with a multiball effectively maxes out the value, which would be roughly 10M. Not too bad, especially considering how this is probably the easiest mode to start, and you're going to want to shoot the orbits anyway in order to progress towards Mummy Mayhem. I find I play this mode more than any others, probably twice as often as Mummy Mayhem, just because I shoot the orbits all the time for bumper hits. That said, beating it isn't exactly trivial (especially in single-ball play), let alone beating it at max value.
Drac Attack
Hitting the two red standups on the right side of the playfield adds letters to D-R-A-C-U-L-A. Completing it will light Drac Attack at the scoop. (This is the only mode which actually gets harder with the second attempt, as the game will start with D-R-A spotted for free.) Drac Attack lasts for 30 seconds, during which a Dracula figure will come flying out of his coffin, swinging back and forth across the playfield. Hitting him will award 1M, plus 250k per hit during that Drac Attack, plus 250k per time Drac Attack has been completed. Hitting him while he's moving is worth double, although doubled or not, you need to hit him five times in order to finish the mode and earn Drac's guitar.
While this mode is fun, it's probably the weakest mode. Without making any doubled shots, it's worth roughly the same as Mummy Mayhem. Unlike Mummy Mayhem, it requires you to shoot at a bumpy, moving target that's uncomfortably close to the flippers. Even so - during a multiball, this practically will beat itself, as Dracula is invariably going to be hit by randomly flying balls five times in a matter of seconds.
While we're talking about similarities between Mummy and Dracula, I really shouldn't just gloss over the fact that both modes can be lit at the scoop, but don't need to be started right away. The same can't be said for any other modes, which all start immediately once their prerequisite shots are completed. Use the non-immediacy of Mummy and Drac to your advantage – with both lit at the scoop, work on lighting Frankenstein (and whatever other modes you want to have running), since you should be able to plug the scoop right when you're ready to start your multiball.
Also – not that this is something you should be aiming for, but whatever – completing DRACULA again while Drac Attack is already lit (or running) will award a garlic clove, i.e. a smart missile to award one hit during Drac Attack. This isn't really a good thing, as letters will carry over between attacks: if Drac Attack is lit and you have DRACUL complete, the standups will add a clove. If you play Drac Attack, then hit the standups, you'll finish DRACULA and light a second Drac Attack. Much more preferable, if you ask me.
Instrument Bonuses
If you collect an instrument, the non-Frankenstein ramps, the spinner, and the orbits will all be lit for an Instrument Bonus 1M a piece, plus 100k for each instrument you've collected that ball beyond the first. Each shot can only be lit for one instrument bonus at a time, meaning if you finish a mode with uncollected instrument bonuses lit, those bonuses will just be increased to the new value.
In effect, this means you put an extra 5M up on the table any time you finish a mode. While not necessarily substantial, it's far from nothing. Admittedly, if you're stacking modes – as you should be doing – you're more than likely going to end up missing out on some instrument bonuses, just because you're liable to finish a whole bunch of modes all at once. Don't sweat it too much – it's nice to have, and worth mentioning, but not exactly crucial for high scores. (Certainly less crucial than the instruments themselves, at least.)
Mosh Pit Multiball
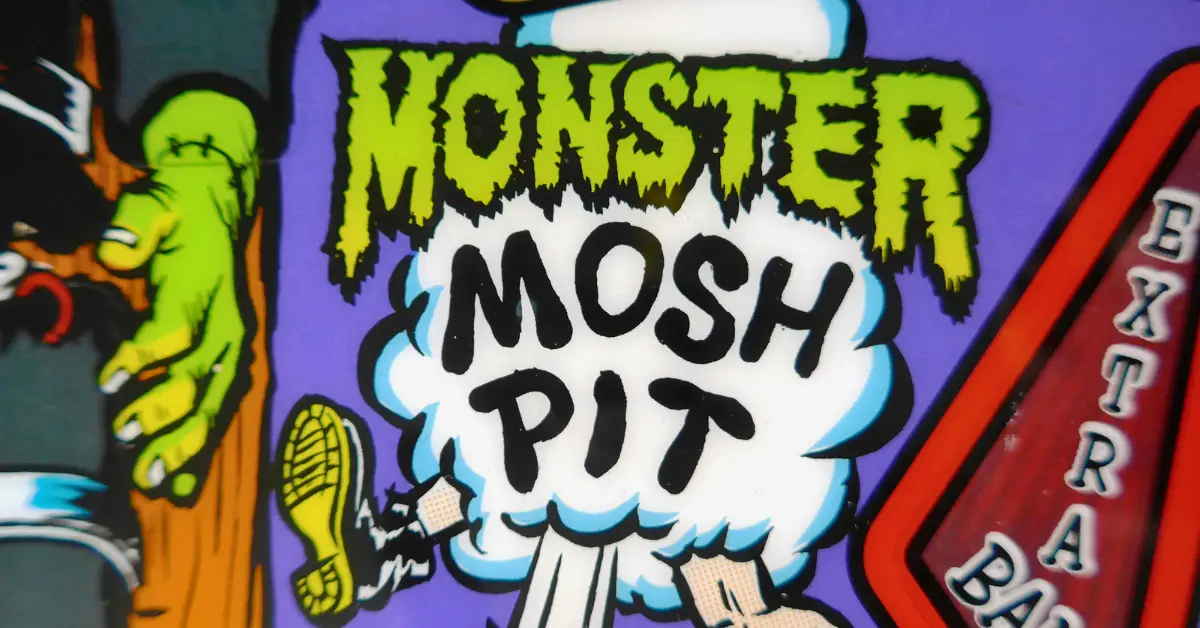
This is a seldom-seen, second major multiball. It's lit at the scoop after hitting the center spinner six times during single-ball play. Mosh Pit is a two-ball multiball, during which all shots are lit for 750k. The center spinner also increases the jackpot value with each shot, and the first two times, will add an additional ball into play. Shooting the Frankenstein ramp ten times – yes, ten times – will award a rather sizable super jackpot, after which you have to bash the Frankenstein standups five times to lower them for another super at the ramp. Then it's ten more ramps for the next, rinse and repeat.
Let's get one thing out of the way - Mosh Pit is very valuable. I mean, the jackpots are roughly double what the standard Frankenstein jackpots are worth, and while looping Frankenstein ten times might seem difficult, unlike the Bride ramps, Frankenstein can be looped repeatedly. You just don't see that happen any other time, since ordinarily the ramp is lit for one shot at a time to start Frankenstein Multiball. On top of that, Mosh Pit is a multiball, meaning it'll stop any other mode timers. It's also worth mentioning now that you can't stack multiballs, meaning that Mosh Pit cannot run concurrently with Frankenstein or any other multiball.
What's the downside? Well, for one, Mosh Pit isn't required for any endgame objectives. As mentioned above, the only other thing the spinner lights are smart missiles, which are pretty worthless – and if you're after wizard modes, Mosh Pit will only help if you have other stuff going. The same can't really be said for Frankenstein. In other words, by going after Mosh Pit, you're only advancing towards Mosh Pit. Now, that's not necessarily a bad thing - I've seen players put up very bulletproof scores just from a single Mosh Pit - but there's a much bigger reason to be dissuaded from making it a focus of yours. Take another look at the spinner. What do you think would happen if you were to miss the shot?
Therein lies the true fatal flaw in the Mosh Pit strategy. Six shots might not seem like much, but it's six shots that are liable to instantly kill you if you're anything less than perfect. It's certainly not something that I'd aim for deliberately, but if I happen to light it (or am like, two shots from lighting it), I certainly wouldn't ignore it or avoid it. If you somehow play one Mosh Pit and decide to go for a second, good luck - you need 24 spinner shots total to relight it.
Stacking Considerations
Before moving onto the wizard modes, let's take a moment to go over some things to keep in mind while trying to get your mode stacks going. I briefly touched upon this at the start of the tutorial, but since the entire game revolves around good stacking, it's worth taking the time to talk about it more in-depth.
To reiterate: the ideal situation is to light everything, then start everything, then start your multiball. Obviously, that's much easier said than done. I haven't really emphasized this, but every mode is started, and played out, at different shots. So, while you want to get everything going at once, you can only progress towards one thing at a time. The sole exception is Full Moon Fever & Mummy Mayhem, both of which are advance by orbit shots - but even then, Full Moon Fever is way easier to start, and unless you have some ultra-aggressive bumpers, you're likely to see an entire Full Moon Fever play out before seeing your first Mummy Mayhem even light. Not exactly ideal!
Even if you somehow manage to light everything without starting anything, getting your golden stack requires five shots (one for each mode, with Drac and Mummy sharing the starting shot). Since two of the modes are on hurry-up timers, you gotta do it quickly, too - and should you drain after starting three of them, or start Frankenstein first, or something, you waste an awful lot of potential. In other words, it's not just about lighting everything - it's about starting everything, too. Essentially, Monster Bash is a push-your-luck game. It constantly asks you "do you want to take what you have, or do you want to chance a drain/premature multiball/mode timer expiration in an attempt to get more stuff cooking?"
Sometimes, the answer is obvious. Again, if you're 5M away from winning, then take a Frankenstein without anything else and secure the victory. Sometimes, it isn't. Personally, I consider a three-mode stack (with one of them being Frankenstein) to be valuable enough to warrant picking up, although if I have more things lit, I like to risk it. Granted, I tend to be an aggressive, risky player who doesn't like to play it safe. If you disagree with that, I certainly won't argue - again, there's a lot of subjectivity there. But, that's for ball 3, when the scores are more solidified! Early on, what should you go for? Well, here’s how I generally tend to prioritize things:
- Creature Feature should be your top priority. Aside from the fact that stacking it with a multiball is effectively just 10M points (plus 5M for the instruments), if I accidentally start it during single-ball play, I can at least score some Creature points while trying to start other things. After all, Creature is unique in that his mode shots overlap with other modes.
- Advance towards Mummy Mayhem. Sure, I’m gonna get a Full Moon Fever (or two) going, but having Mummy Mayhem in my pocket is a major boon for progression purposes.
- Ball & Chain. If I’m able to alternate between the ramps easily, I’ll bump this up a couple of places. If not, I’ll try to get four or five ramps done before working on Frankenstein.
- Advance towards Frankenstein, if I somehow haven’t already lit it (since usually Frankenstein is accidentally lit at this point).
The only mode I don't often aim for deliberately is Dracula, just because he's not as valuable, is easy to beat (should I start him during a multiball), and I'm likely to spell DRACULA on accident anyway. Once I start something, if I'm close to Frankenstein and any other modes, I start as many of those modes as I can, but only if said modes are one or two shots away, starting Frankenstein once I have everything readily available underway.
With that, let's go over some wizard modes, shall we?
Monster Bash
Monster Bash isn't just the name of the game, it's the name of the first wizard mode! This is lit at the scoop after lighting all six characters, regardless of their instrument status. Shoot it, and enjoy one of the greatest startup sequences in all of pinball.
Monster Bash is really as simple as wizard modes come. It's a four-ball multiball during which all shots are worth a whopping 2M each, including Dracula (who comes swinging out), Frankenstein (who assumes his upright multiball position), and the Mummy (i.e. every 10 bumper hits). The spinner is lit for a "Bash Jackpot" worth 2M plus 500k per hit to another shot since your last Bash Jackpot, although, frankly, that shouldn't be your priority. I like to just fire away at Dracula and Frankenstein, maybe picking off some ramps along the way. Keep the balls in play, and watch your score skyrocket. Monster Bash will be worth 50M on a bad day, and can be worth 100M or more should you keep the balls in play long enough.
Note that characters are lit when a mode starts, not when it ends. In other words, just by starting your sixth mode (assuming that mode isn't Frankenstein), Monster Bash will light. Since Monster Bash is, in and of itself, a multiball, that means your modes will continue to run, and your mode timers will be stopped. Unlike Frankenstein, however, you should absolutely pick off Monster Bash regardless of what else is going on, because the value is just insane. Granted, you're probably going to have something going, seeing as Monster Bash will light some other mode begins.
Simply put, if you're able to reach Monster Bash when nobody else is able to do so, victory is all but guaranteed. And this is just the first wizard mode!
Monsters of Rock
This is the big wizard mode, and is lit at the scoop after collecting all six instruments. Should you manage to light Monster Bash at the same time you light Monsters of Rock, Monsters of Rock will supersede it - you won't get Monster Bash at all. Similarly, if you happen to collect the final instrument(s) you need while Monster Bash is running, Monsters of Rock will immediately start, ending your bash. Don't be sad about that, though – this is by far the most valuable mode in the game.
Just for starting Monsters of Rock, you'll be awarded 5M per instrument you've collected over the course of the game, which means you're looking at 30M minimum, plus an extra 5M if you happened to beat anything twice. That's not out of the question, as Frankenstein can be completed multiple times in one multiball (every six supers awards an instrument). You'll also be awarded 25M for each set of six unique instruments you've collected over the course of the game, which effectively translates to 25M plus 25M for each time you've made it to Monsters of Rock. So, just starting Monsters of Rock will be worth 55M minimum, and likely much more. Also, if you reach Monsters of Rock without playing Monster Bash first, you get an extra 50M included with this payout. (Aside from being extremely difficult to do, it’s not exactly worth trying for, considering Monster Bash will likely be worth more than that anyway.)
In case that jackpot isn't enough for you, how about a four-ball multiball which is basically just Monster Bash at double value? All monsters will be lit for 4M each, which is nothing short of incredible. Additionally, hitting everyone once will award a jackpot worth 5X the monster value (i.e. 4M), increasing by 1X each time you collect it to a max of 10X. Rather than awarding a so-so Bash Jackpot as it does in Monster Bash, the spinner spots one uncollected monster, meaning if you can't find someone, you can hit the center to cash it in. At max value, that's 40M – and it's not too hard to reach max value, if you can hit your shots.
To reiterate: it's nigh impossible to beat someone who reaches Monster Bash without doing so yourself. Monsters of Rock is effectively twice as valuable, so....yeah. Now, while playing all of the modes is easy, beating all of them is hard. This is largely due to how every mode requires spreading out your shots - so if you're close to finishing everything, hone in on what you're missing to get Monsters of Rock. That said, you should still focus on starting everything before you should focus on beating any one specific thing - Monsters of Rock is roughly twice as hard to get to as Monster Bash, which makes sense given how valuable it is.
Lyman’s Lament

Each time you shoot the scoop, the game will name a spooky concert venue, such as “Wolfstock” or “Wormly Stadium”. If you manage to see all 44 of these by shooting the scoop 44 times over the course of the game, you’ll start Lyman’s Lament. Named after the late, great, Lyman Sheats, who blessed us with the code for this game (and many, many others), this is often considered to be the true ultimate wizard mode.
When running, the music will change, and the callouts will be replaced entirely with callouts from Lyman himself. Scoring isn't changed too much - all switch hits are worth an additional 2.5k, your bonus multiplier is increased by 25X, and....that's about it! It's much more about the novelty of having Lyman make fun of you while you flail around than it is about the actual value, as Monsters of Rock is significantly more lucrative.
It's also possible to skip ahead to this mode by pressing the left flipper 11 times, then right once, left 5, right once, left 6, and right once (i.e. the initials ‘LEG’). You'll hear Lyman say "Totally!" and the scoop will be immediately ready for Lyman's Lament. I believe you have to do this on ball 1, and moreover, it’ll turn your game into a one-ball game – meaning it’s also strictly prohibited for competitive play. It’s a fun little easter egg, although one could argue it’s not the same if you don’t earn it the “normal” way. Of course, the “normal” way is – needless to say – hard. Best of luck!
Like what you're reading?
Get pinball news, analysis, and deep dives delivered to your inbox.
Related Posts
More in Pinball Tutorial or browse all topics.